Introduction

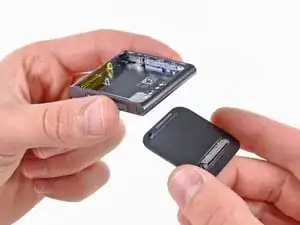
Use this guide to remove your Nano's belt clip.

  1. lqKlCtMsQpYnmwqN
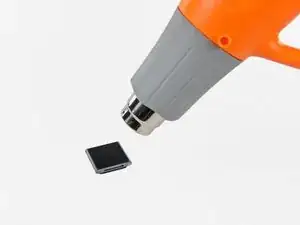
    • Use a heat gun or hair dryer to soften the adhesive securing the perimeter of the front panel assembly to the outer case.

    • Be careful not to overheat the front panel assembly, as it may result in damage to the LCD.

    Do I need new adhesive to reassemble?

    David Wallin -

    Make sure to not break this cable even if your backlight is out, there can be internal corrosion that prevents the backlight from working. It may still work with the old display.

    Matthew Borgholthaus -

  2. QwRPFKaTUfY5wvVe
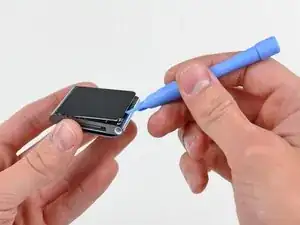
    • While the front panel is still warm, use the edge of an opening tool to pry it from the headphone jack side of the front panel assembly out of the Nano.

    • Do not attempt to pry out the front panel assembly from, or insert the opening tool into the left side of the display, as the display data cable is right underneath and may be damaged in the process.

    • Continue prying the perimeter of the front panel assembly out of the outer casing, being careful not to damage the display data cable held under its left edge.

    • If the front panel is excessively difficult to lift out of the outer case, reheat the area and try again.

    I strongly recommend using a Small Suction Cup (IF145-019-1) instead of a plastic opening tool.

    After half an hour of various heating times, trying to use a plastic opening tool, I overheated the LCD, which caused it to discolour. Now I need to buy a new screen. I wish I'd thought to use a suction cup earlier; it seems so obvious in retrospect.

    Peter Burkimsher -

    I used a hot water bottle with towelling cover, resting on it for about 5 minutes. glue softened at 45 degrees. enough to easily lift panel.. Ipod’s working temperate is 55 deg C max according to apple. I used IR heat gun for temperature check.

    Hay rack -

    We have a temperature controlled testing oven at work. I set the oven for 50 degrees C, let it absorb heat for half an hour, then took it out. I had zero luck with either the plastic pry tool or the suction cup, so I carefully pried up the indicated side with the sharp pointed tip of a dental pick until I could get the plastic tool into the crack opening.

    Klieb -

  3. igxGIWdBGjufPoAM
    igxGIWdBGjufPoAM
    Sq3MKLVxjFZfTLsb
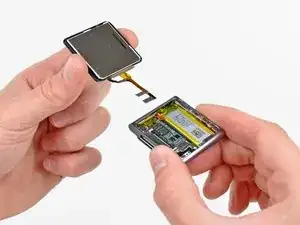
    • Lift the front panel assembly from the headphone jack side of the Nano.

    • Pull the front panel assembly slightly away from the left side of the Nano to clear the display data cable.

    • The front panel assembly is still attached to the Nano by two cables.

  4. DlZM3DGDlh2Wflu1
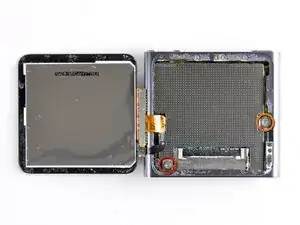
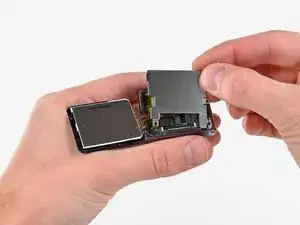
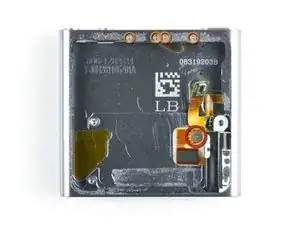
    • Lay the front panel assembly next to the Nano.

    • Remove the following two screws:

    • One 2.3 mm Phillips screw

    • One 2.6 mm shouldered Phillips screw

  5. dSU3vipUBQDOB2YU
    dSU3vipUBQDOB2YU
    Z462On2RXtRxUblK
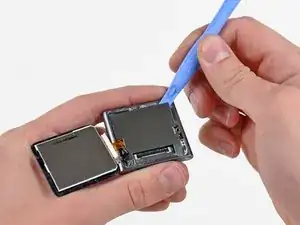
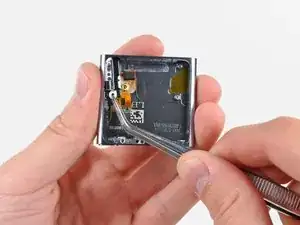
    • Use an opening tool to pry the steel shield out of the Nano by its upper right corner.

    • Remove the steel shield from the Nano.

  6. GT1KwHmNxpJRZpBE
    GT1KwHmNxpJRZpBE
    C6QZWqLdQth2rQhD
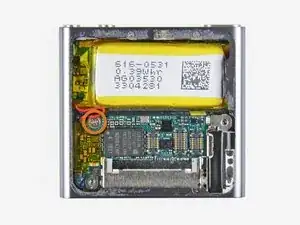
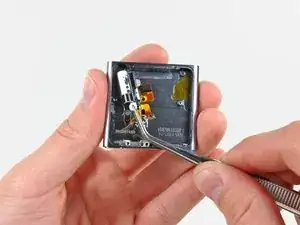
    • Use an opening tool to disconnect the display data and digitizer cable connectors up from their sockets on the logic board.

  7. KKVtRDIuPGSClKGX
    • Remove the front panel assembly, minding its two cables that may get caught.

    • To reassemble, you can use the double-sided tape found here.

    How come you did not put back the metal plate that goes between the iPod and the display?

    Adam Meyerson -

    You do put the steel shield back in to place and screw it down, but only after you connect the digitizer and display data cable connectors to their sockets on the logic board.

    Lance J -

  8. BhynMUrYy1VXGF1X
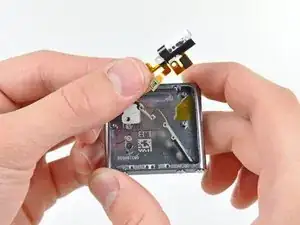
    • Use an iPod opening tool to lift the headphone jack assembly connector up and out of its socket on the logic board.

    Hello.. I lost my jack connector and it still stay on logic board.. So what will i do? I cant remove it from logic board.. Please help me.. :(

    Emonk -

  9. KRJiY5aAPhHkvdBg
    • Remove the single 1.9 mm Phillips screw securing the logic board to the outer case.

  10. YTYhmvXR1aaPj5KC
    YTYhmvXR1aaPj5KC
    chQhgWJgrILDFaG2
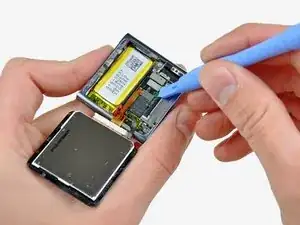
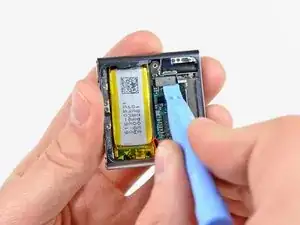
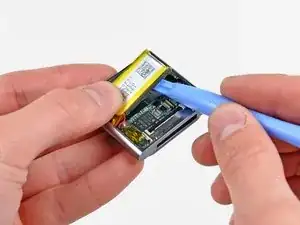
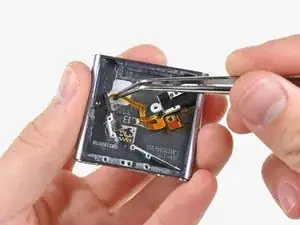
    • Use an iPod opening tool to gently pry the battery up from the adhesive securing it to the outer case.

    • The adhesive is very strong. Work carefully and slowly, making sure to not slip and break any fragile components.

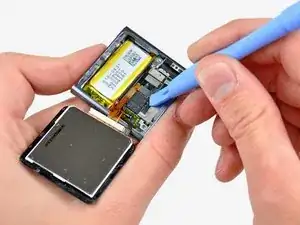
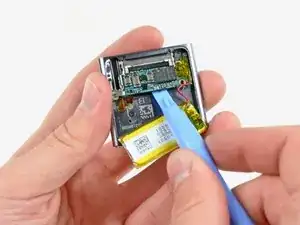
    • Use your thumb to pull the battery toward the left side of the Nano as you pry the battery's other edge out of the outer case.

  11. xI3WTWbTteNxdZhc
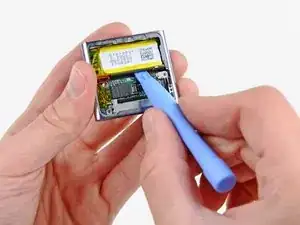
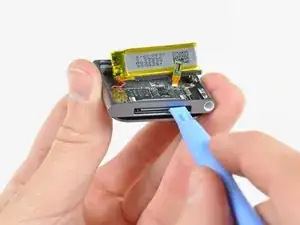
    • Use an iPod opening tool to gently pry the logic board off the adhesive holding it against the outer case.

    • Do not excessively pry the logic board upward.

  12. MNPURT3mXXQAI14r
    MNPURT3mXXQAI14r
    SDgd26UUwP5dy2sX
    • Use your iPod opening tool to gently push the dock connector toward the center of the Nano.

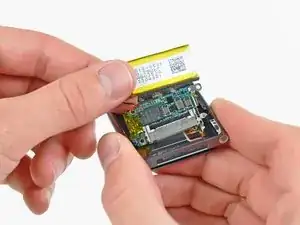
    • Remove the logic board assembly from the Nano, being careful not to damage the headphone jack assembly cable.

    very good directions. You lead only half way to the push button area. I have to try the rest of the way!

    Good work!

    kcryeung -

  13. OYSNTANPqaxG1OZR
    • Remove the following five screws:

    • One 1.7 mm Phillips screw

    • Four 3.9 mm Phillips screws.

  14. YUBBLsTBZurVJNOV
    YUBBLsTBZurVJNOV
    dKTnWJUEAbyhycVD
    • Use a pair of tweezers to carefully pull the headphone jack toward the center of the Nano.

    • Avoid pulling on the cable, as it is very thin and delicate. The plastic mounting ear is a safer area to pull on.

    hello all.!!

    i replaced the whole assembly (power, volume and headphones). Now my ipod is not getting ON. i followed the whole procedure as mentioned. Can anyone suggest me anymore.

    Sofia Bhaskar -

  15. LGGQnDSCXLHx5nYR
    LGGQnDSCXLHx5nYR
    LjrNAFRcQWhZeS3Z
    • Very carefully pull the headphone jack assembly ribbon cable toward the dock connector to separate the sleep and volume buttons from the outer case.

    • Remove the headphone jack assembly.

    Note that on the two-button sub-frame (the left-hand piece secured by two of the four screws in Step 13) there are two tiny locating studs which must be aligned on the replacement wire ribbon.

    dave -

    Thank for providing the notice. It was perfect.

    To make the way back, it is better to skew first the power button before the +/- volume buttons.

    Didier -

  16. kscTpjMvFOn3VuGO
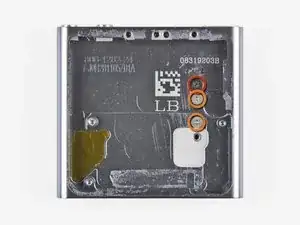
    • Remove the following three screws:

    • One black 1.8 mm Phillips screw

    • Two 1.7 mm Phillips screws

  17. 3OvLAHRHBXPTWHq2
    • Remove the clip from the outer case.

    • When reinstalling the clip, it is necessary to squeeze the base of the clip very tightly against the outer case as you insert the first screw.

Conclusion

To reassemble your device, follow these instructions in reverse order.

Andrew Bookholt

585795 Reputation

0 comments