Introduction

Battery not lasting long? Swap it out (requires soldering).

  1. f3VLjUkllASpBsSy
    • Please be aware that removing the rear panel from the back of the iPod will cause considerable damage to the rear panel. We highly recommend purchasing an additional rear panel to properly reassemble the iPod.

    • Before opening your iPod, ensure that the hold switch is in the locked position.

    I found removing the back to be very difficult and had to use a mini screwdriver to complete it. While removing the back to replace the clickwheel, I not only destroyed the back, I inadvertently mangled the video cable and so I then had to replace that too.

    gruntso -

  2. SRSp1IEOFyiCabd1
    • The rear panel is secured to the front case by eight clips permanently attached to the rear panel. These clips lock onto small tabs machined into the front case.

    • To free the tabs, they must be pushed toward the center of the Nano. Note the location of all tabs on the rear panel. When using an iPod opening tool to free the rear panel, be sure to work the tool at the location of these clips.

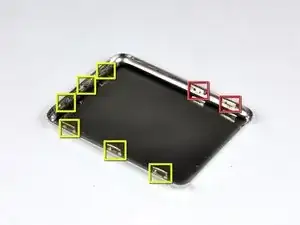
    • To aid in visualization, the two clips boxed in red are located closest to the headphone jack.

    i don't know what genoration my ipod is...but it looks exactly like that on and it doesnt have the clips......what do i do?

    lydija mizell -

    https://www.ifixit.com/info/ID-your-iPod

    Try that first to find what you have

    Kevin Bhasi -

    Given the inherited risks of damaging the components, it would also be important to mention that the area where there are no clips is where the flat cable to the screen resides. So NO deep sticking tools in that area. It’s attractive to do because at that right side the back panel is intruded the easiest way - but dont do it.

    frederik boersma -

  3. B31gu3DJaCWHBfYC
    B31gu3DJaCWHBfYC
    jPqqcbvYKkxQg1ew
    • Opening the iPod can be challenging. Don't get discouraged if it takes you a few tries before the iPod is opened.

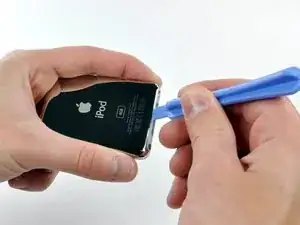
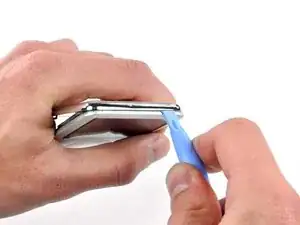
    • Insert the large iPod opening tool into the seam between the front case and rear panel of the iPod, above the dock connector. The tool's edge should point toward the rear panel to prevent any accidental scratching of the anodized aluminum front case.

    I don't have a gap big enough to put anything in it what do I do?

    Jayden Gamble -

  4. pcaTvfLghFIo3JAX
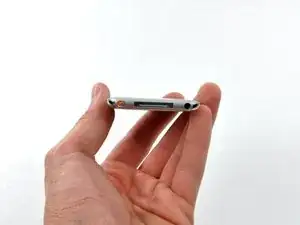
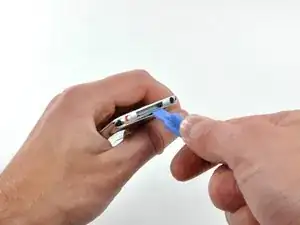
    • Insert a small iPod opening tool into the seam on the headphone jack side of the Nano, with the edge of the tool pointing toward the rear panel.

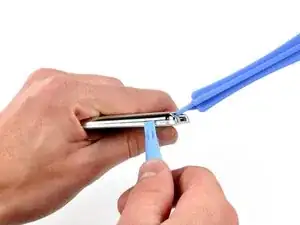
    • Gently enlarge the existing gap by pressing/wiggling the small iPod opening tool into the gap near each of the the two tabs attached to the rear case, pushing the clips toward the center of the Nano until both have been freed.

    the tool i bought because you suggested it to me got inevitably broken like it was butter made, thanks

    Daniele Ciriello -

    This is virtually impossible! I have already cut myself when the stupid tool slipped trying to push in on the clips. Why on earth would anyone design something to impossible to open when they know the battery would need to be replaced at some point?

    Virginia VeDepo -

    Forget the iFixit plastic tools. You need to use steel on steel. I used a heavy duty engravers knife I happened to have, to get it started. Then, a fine chisel and jeweler’s screwdrivers and LOTS of force to pry it off. I messed up the aluminum front case a bit, but I cleaned that up with sandpaper. The back case was bent a bit, but I straightened that, and after replacing the battery I fastened it back on with black electricians tape. It looks quite well, and good enough for me. I will cancel my order for a replacement back. Joe M 2/3/2018

    Joseph Mensch -

    Garbage tutorial, this step was probably scribbled down in 2 minutes off the top of someone’s head for real.

    ᅚᅚMauxie -

    i never needed the large tool i just needed i little flat head screwdriver

    Jaxon Smith -

  5. kMmjUM1XX6UxS6V6
    kMmjUM1XX6UxS6V6
    eirbSDcbFTVfRejN
    • The large iPod opening tool is no longer needed to gain access to the left side of the iPod.

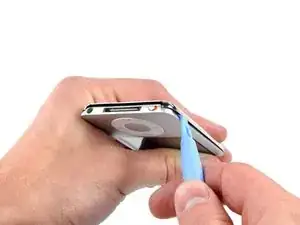
    • Repeat the same procedure listed in the previous step to free the three clips along the hold switch side of the Nano.

    this part is really tough - stuck here

    Mark -

  6. PcCTErdAFnVKwWRb
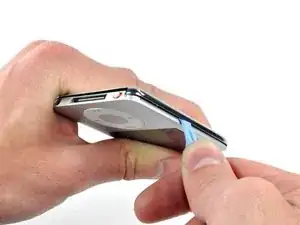
    • Insert an iPod opening tool into the gap near the top left corner of the Nano and work to free the three clips along the top edge of the rear panel.

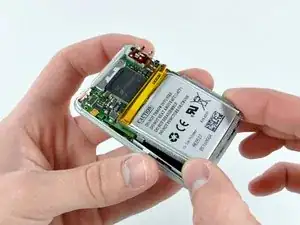
    • After ensuring all tabs are free, separate the two halves of the iPod.

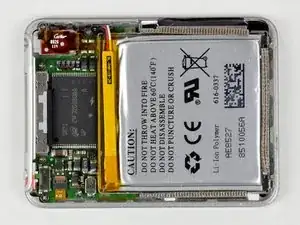
    • The rear panel is now free from the iPod.

    thanks you for help

    jeff -

    i gotta say this is some of the worst prying I’ve ever done on a delicate electronic piece. Even with three sides off, that last top wouldn’t budge. I had to ram a thin alumninum tool in there and bend the top lip and it still wouldn’t move.

    Mark -

  7. X2xYM3VEvb4fdJTX
    • With the rear case removed, the back side of your Nano should now look like this.

    At this stage an alternative (and more simple) procedure is to cut the battery wires between the battery and the logic board (one at a time to avoid shorts), remove the old battery, fit the new battery, strip and prepare the ends of the old cut wires, then solder the new battery to these wires again being careful not to short connections. Then sleeve or encapsulate these soldered joints (wax or blu tack will do). This makes it an easier and quicker job.

    viridens -

    Sounds a much better idea to me.


    I was just given some old parts in a box. Scored a decent router, laptop power supply and 2 ipods. Unfortunately, the newer one has half it's power connector snapped off and the other (4GB/A1236), I successfully reset via iTunes but it doesn't hold a charge! %#*@. I might just scout for an old speaker dock at a garage sale or such and put it in the bathroom or something.

    Tracy Fortune -

  8. RN3uheH1pQNenqql
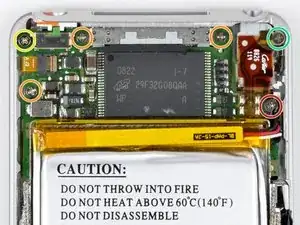
    • Remove the following six screws:

    • One 1.8 mm Phillips.

    • Three 1.9 mm Phillips.

    • One 2.4 mm Phillips.

    • One 2.6 mm Phillips.

    If your headphone jack isn't working, note that it is possible to replace just the headphone jack here:

    There are just 4 soldering points that need to be loosened, and then you can put on the new one.

    iTronics Repair -

    One 2.6 mm Phillips. The colour of this screw isn´t blue in the picture, it´s green.

    Daniel -

    I was able to remove the back cover using two think plastic guitar picks and my red cross donor card

    Professor Wagstaff -

    I read some steps further back and it was recommended to NOT remove all the screws and the boards indicated in the following steps, but to go directly to replace the battery. It is no more difficult to go directly to cut the battery leads, or unsolder them. I tried to splice the new battery wires to the cut leads from the board, but it was hard working with the fine wire. I ended up clearing the top of the three battery solder-through holes, but I did not clear the holes. I soldered the battery leads directly to the top of the small round solder dots…first the white, then the black, and finally the red. I fastened the battery in-place with a piece of two-sided carpet tape. I straightened up the back and taped into place with black electricians tape. It is very delicate work, and not for a beginner…I repair family jewelry, which is valuable practice. Joe M 2/3/2018

    Joseph Mensch -

  9. OWvJGtYldhWeSmIM
    OWvJGtYldhWeSmIM
    3NWThcewSac4EBr6
    • Using a spudger, flip up the brown click wheel ribbon cable retaining clip.

    • The clip is hinged at the end nearest the edge of the case.

  10. 2RB5vXjVfVuArppn
    • Use the tip of a spudger to slide the click wheel ribbon cable out of its socket.

    • The logic board is still connected to the iPod by the display ribbon cable.

  11. JsNeBBJVUryM1GRT
    JsNeBBJVUryM1GRT
    mvVpBKBvvwn3ishs
    • The logic board is still connected to the front case by the display ribbon cable, located on the headphone jack side of the logic board.

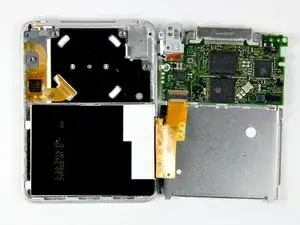
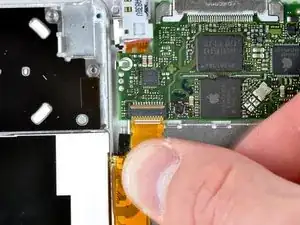
    • Lift the logic board assembly out of the front case from the click wheel connector side (the cable you just disconnected). Rotate the logic board assembly about the display ribbon cable and lay it next to the front case.

    When reassembling the logic board into the case, watch out for the tiny nose of the audio jack that's facing towards the center of the device. This nose has to be inserted first, then the rest of the audio jack followed by the logic board itself.

    Alexander Schwab -

  12. YTcdTAWq1CbAVQYC
    • Use a spudger to flip up the display ribbon cable retaining clip.

    • The retaining clip is hinged about the end nearest the battery.

  13. 4LHrdBXhRRLdn4Hu
    • Slide the display ribbon cable out of its socket.

    • The logic board is now completely disconnected from the front case.

  14. 3VIxBVOY4QHRDODr
    3VIxBVOY4QHRDODr
    CCrncIYFMDSCTpW5
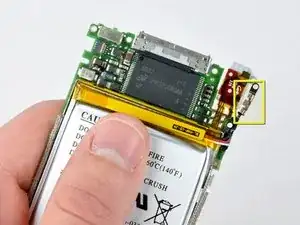
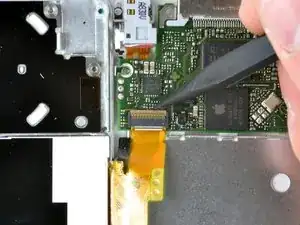
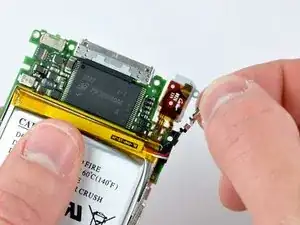
    • Before proceeding, remove the metal EMI finger shown by pulling it away from the adhesive on the logic board.

    • Do not forget to reinstall this during reassembly.

  15. TI4BDVq51xLFqZ1A
    • Battery replacement on the iPod Nano 3rd Generation requires soldering. Before proceeding, be sure you have all the required tools and a general feel for soldering small electronic components.

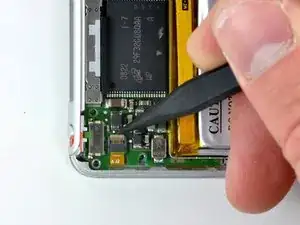
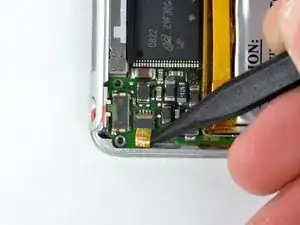
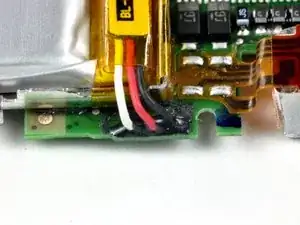
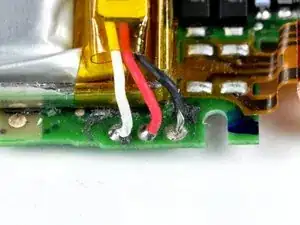
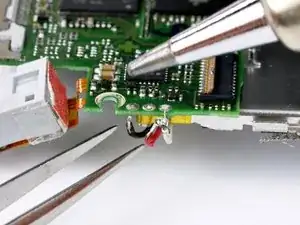
    • Before de-soldering the battery cables, you must remove a small amount of black rubbery adhesive securing them to the logic board.

  16. iYHhPI6kRretSirR
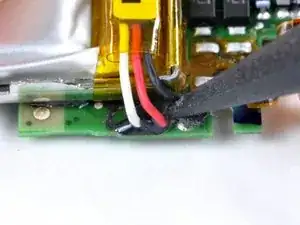
    • Push the tip of a spudger beneath the rubber adhesive and toward the battery to free it from the surface of the logic board.

    • Start freeing the adhesive from around one of the outer leads, then free it from the two gaps between leads, and finally push the spudger along the back side of the leads to completely remove it from the logic board/battery leads.

    • The battery leads are delicate, so be careful to not tear them while removing the black adhesive.

    It’s actually much easier to remove the rubber adhesive if the battery is taken out and laid upside down.

    frederik boersma -

  17. AjAhWcmYDDowJARl
    • The battery leads, now free of adhesive, should look like this.

  18. 3Io5SdOyodqxFxBQ
    • The next few steps require a soldering iron.

    • The ends of the battery leads are fed through small holes in the logic board and held in place by a small amount of solder.

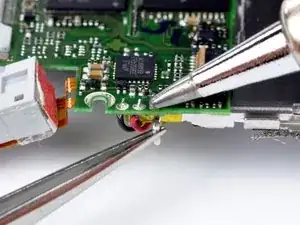
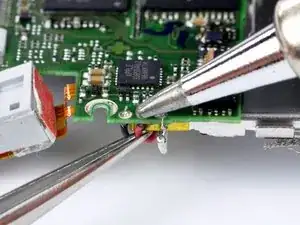
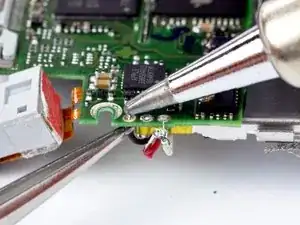
    • Begin by heating the exposed end of the white battery lead with the tip of a soldering iron while simultaneously pulling the lead away from the connection, using tweezers to grasp the lead by the insulation.

    • Due to the delicate nature of electronic components, it is imperative to limit the amount of heat transferred from the soldering iron to the logic board. An easy way to accomplish this is to pull on the battery lead with light continuous tension while the soldering iron heats up the connection. As soon as the solder melts and the lead slides out, immediately lift the solder tip off the connection to avoid damage.

    When you clamp the logic board in a small vice for electronic work, the battery hangs down and with the soldering iron in one hand it’s easy to pull the leads with the tweezers. For anyone with soldering experience this soldering is actually easy to do as long as you have the right soldering tool: sharp point, low wattage.

    frederik boersma -

  19. FhJH3BXUUhkdoZWC
    FhJH3BXUUhkdoZWC
    ZvrQJ6wcAAlKVm1O
    • De-solder the remaining leads, following the procedure illustrated in the previous step.

  20. Wn4DldZG1nJbffQd
    • All leads should now be de-soldered and disconnected from the logic board.

  21. VXiEMH2WuKnNuATG
    VXiEMH2WuKnNuATG
    XLrQdrMaRX1SWeUq
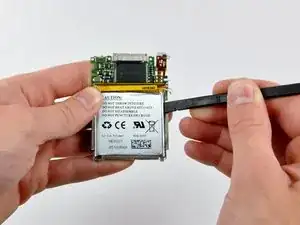
    • Using a spudger, pry the battery up from the adhesive holding it to the battery shield.

    • Start prying at the upper right corner of the battery and work your way around the perimeter until the battery has lifted enough to grab it with your fingers.

    • Remove the battery from the battery shield.

Conclusion

To reassemble your device, follow these instructions in reverse order.

Walter Galan

694047 Reputation

0 comments