Introduction

Upgrade your storage with a new hard drive.

  1. smr2ZlQeQdmuWLFo
    • Before opening your iPod, ensure that the hold switch is in the locked position.

  2. DM4HIkiSgsbZTffP
    • Opening the iPod can be challenging. Don't get discouraged if it takes a few tries before the iPod is opened.

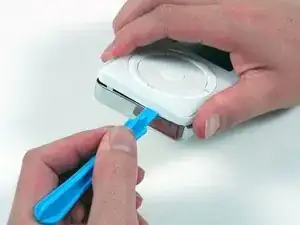
    • Insert a plastic iPod opening tool in the seam between the white plastic front and metal back of the iPod. Once you've inserted the tool, run it along the seam to free the five tabs holding the iPod together.

    The angle is important. I tried forever to get it started more like the photo, straight in between. No luck, seemed impossible. When I put the iPod down on a padded surface, held the top/white half with one hand, I was able to push "down" into the metal with the opening tool with relative ease. Popped right off without any great force. Then I was able to more closing match the remaining photos, circling around the other tabs holding it as pictured.

    About This Matt -

  3. NkqeRUMtITfg2mww
    • Continue to run the opening tool along the side of the case until all five tabs have been released.

  4. EEYVgZqemGDPPQDY
    • Work around the corner of the iPod and release the two tabs holding the iPod together near the dock connector.

  5. nc5w4OIEjpPlmABs
    • Free the five tabs holding the iPod together on the other side. You may be able to free the tabs by gently wiggling the front panel of the iPod.

  6. ZX2x65wtLPoIrYA1
    • Lift the rear panel away from the iPod, making sure it doesn't catch on the headphone jack.

    can be a little reluctant - DONT FORCE IT! gently pry the _entire_ contents out of the metal base at the dock-connector end. After which the headphone jack and lock switch will be free. Unlike newer models, there are no active components on the metal rear panel so no ribbon cables running between the two halves.

    Greg Matthews -

  7. SMUx1BKGdrdvXaLc
    • Peel up the metallic tape attached to the top of the battery.

  8. apdqTpg3aAlJ4psI
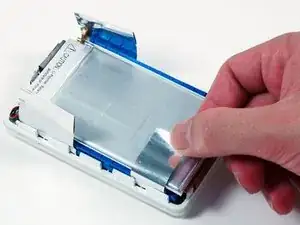
    • Lift the battery up from the hard drive and lay it next the the iPod (it is still connected to the logic board).

  9. SmxHRbyauQMeoASS
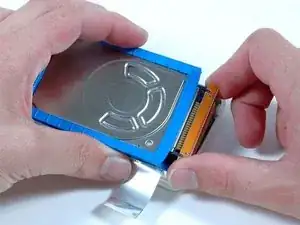
    • Carefully disconnect the orange ribbon cable from the hard drive.

    • If the cable doesn't come free easily, it may be helpful to gently wiggle the cable from side to side.

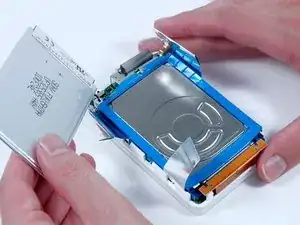
    • Lift the hard drive out of the iPod.

Conclusion

To reassemble your device, follow these instructions in reverse order.

iRobot

Member since: 25/09/09

0 Reputation

0 comments