Introduction

  1. ELMlFSUOebPWtXjT
    • Before you begin, discharge your iPhone battery below 25%. A charged lithium-ion battery can catch fire and/or explode if accidentally punctured.

    • Power off your iPhone before beginning disassembly.

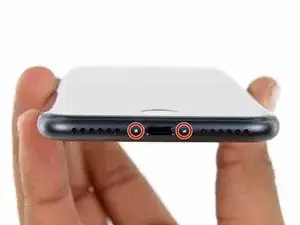
    • Remove the two 3.4 mm pentalobe screws on the bottom edge of the iPhone.

    • Opening the iPhone's display will compromise its waterproof seals. Have replacement seals ready before you proceed past this step, or take care to avoid liquid exposure if you reassemble your iPhone without replacing the seals.

    Can anyone confirm 7/7P's pentalobe screws have a ring of seal near the screw head?

    Cooper Chase -

    Confirmed, the screws have a black ring seal around the head.

    rcheing -

    Can’t get the display front

    Bernadette Pfeifer -

    From personal experience, I highly recommend before doing this procedure or any other, that you do a backup of your phone (preferably local) in case your procedure goes south.

    ballina5ny -

    I purchased the repair tools with the replacement battery from iFixit. The tools include a screw driver and three heads none were labeled 3.4 mm. I think the one that fit the pentalobe screws was labeled Y000. The guide should identify the screw driver head supplied by the kit not 3.4mm.

    Mark Lieberman -

    in the iphone 7 replacement battery kit from iFixit, the screwdriver that fits the 3.4 mm pentalobe screws is labeled P2 (and not Y000)

    Jan-Tijn Oppermann -

    3.4 mm is the height of the screw and is not related to the screw driver code.

    Ahmad Vaziri -

    the screwdriver PH000 does not work i wasted two screws and now they dont have the 4 cross mark they are now a circle, i buyed it all from Paraguay and it doesnt work, had to assembly back the parts because i got stuck like i mention with some screws, well im just going to send to a professional to install, thanks

    Martin Frutos, Nuñez -

    The bottom screws are Pentalobe, not Phillips.

    Bram Driesen -

    Before starting, I would recommend backing up your Iphone’s data just in case.

    Jon Moylan -

    If you managed to make it to this section, just send the phone into apple for 50 + 6 dollars shipping. The ribbon cables on the screen are designed to break. I can literally twist on the rest of the cable and it won’t fall apart but there is a diagonal section where it snaps. This is the fault of apple and the fault of ifixit for misrepresenting the fragility of the cables.

    Ryan Huebert -

    Had to reheat it a few times for a minute each with a hairdryer to get the seal to break after pulling and rocking the suction

    Cynthia Lamb -

    I’m technically challenged. Is there a premier national service who can professionally install a replacement battery got my 7 +?

    Richard -

    Do the screws come out in total?

    YVES THEUGELS -

    They may come out or may not. If you loosen as much as you can and they don't come out you should still be able to pry open the bottom. Once you get the screen off you can then push the screws out from the inside.

    Anthony Falabella -

    Is it the P2 you should use for the bottom??

    YVES THEUGELS -

    I heated the bottom of the phone with a hairdryer and then used a syringe to put a couple of drops of acetone directly into the bottom two screw holes. I GENTLY pulled on the screen with the suction cup and used the pry tool to GENTLY separate the screen. The sealant is applied around the entire display so be very careful pulling it off so you don’t break the fragile display cables.

    Anthony Scaminaci -

    At first it was very difficult to open, per instructions. I used a heat/ice pack and nuked it for 1 minute. The pry tool wasn’t working so I carefully used my pocket knife to wedge the cover open. The rest of the procedure went well until I cracked the glass while trying to get the top right corner to pop off. Other than that mistake, all went well. Tip: before setting the new battery, attach the battery connector first and leave enough room for the taptic engine, or better yet, place the taptic engine before adhering the replacement battery. This way you’ll have a small gap between the two, whereas mine barely fit. Good job on hosting the video, Gwendyl.

    Klaus Preiss -

    I love the fact that the screw bit and shaft are magnetic! I almost lost a screw and found it attached to the magnet.

    I used a heat/ice pack and nuked it for 1 minute. At first the display cover was very difficult to open with the pry tool, per instructions. The pry tool wasn’t working so I carefully used the blade of my pocket knife to wedge the cover open. The rest of the procedure went well until I cracked the glass while trying to get the top right corner to pop off. Other than that mistake, all went well. Tip: before setting the new battery, attach the battery connector first and leave enough room for the taptic engine, or better yet, see the taptic engine in place before adhering the replacement battery. This way you’ll have a small gap between the two, whereas mine barely fit because I placed it almost too low.

    Good job on hosting the video, Gwendyl.

    Klaus Preiss -

    I replaced the lightning connector assembly and reassembled. The old one did not 'click' into the cable and had corrosion inside, it needed the cable to be placed in a specific way to charge. The new part - does not recognize that a charger is plugged in at all.

    I backtracked the assembly - took it apart, put it back again - and find that every thing on the part works - the mic, speakers, taptic engine.

    The original problem with the cable still persists. Any ideas?

    H K -

  2. aMorTfedGgH3rI5R
    aMorTfedGgH3rI5R
    j6YutYie6sBNvKB2
    DTNCSTyuPgJxNIkh
    • Make sure the battery is disconnected before you disconnect or reconnect the cables in this step.

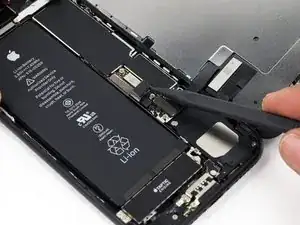
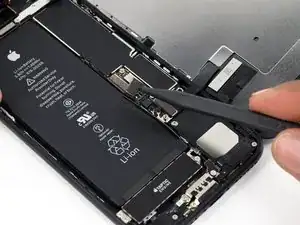
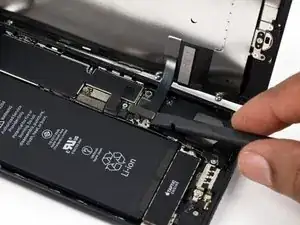
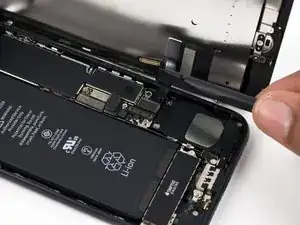
    • Use a spudger or a fingernail to disconnect the two lower display connectors by prying them straight up from their sockets on the logic board.

    • To reconnect these cables, press down on one end until it clicks into place, then repeat on the opposite end. Do not press down on the middle. If the connector is even slightly misaligned, the connector can bend, causing permanent damage.

    • If you have a blank screen, white lines on the display, or partial or complete lack of touch response after reassembling your phone, try disconnecting and carefully reconnecting both of these cables and make sure they are fully seated.

    To be honest you don’t really need to disconnect the display cables in step 15 or 16 to get the battery out. Just keep the suction cup on the screen to keep it propped up and to give the cables some slack. The only reason to take these cables off is that it’s a pain to apply the replacement display adhesive with those cables in the way. If you’re not re-waterproofing your phone just leave these attached.

    iPhone Display Adhesive Replacement

    minimalist -

    MAKE SURE you hold the top screen when dislodging the cable connections. I let the screen lie flat down and ended up tearing one of the cable connections, now my touch ID does not work at all! I’m going to have to order a whole new screen.

    Arjun Nagarajan -

    Don’t miss that SECOND CONNECTOR like I did. It will break very easily if not disconnected :(

    garrett peek -

    An earlier comment said to re-apply the suction cup to the right side of the display so that it acts as a stand when the phone is partially opened. That’s a great idea, and helps a lot for this step and the next.

    Mark -

    Hey – I broke one of these flex cables and I cant find them to purchase anywhere. Can somebody help me? It’s the LCD connector first and what is the second flex cable for? Thanks!

    Chan Ty -

    I broke the second (smaller) display connector flex cable.

    1) Is it replaceable or repairable?

    2) Where can I get the replacement?

    Ben Blom -

    Same happened to me. What solution did you find? Could you replace a part to make it work? Thank you!

    Viktoria -

    I replaced the screen and have ended up with a blank screen. Touch control seem to work (touch button works and I can shut down the phone by pressing power button for some seconds and then swipe left to right in the upper part of the screen). But the screen is blank. I’ve tried to disconnect and connect the two connectors in step 16 but with the same result (blank screen). What do I need to do?

    Thanks for advice!

    Bjorn -

    this point is the most important in the whole manual.

    Please pay attention not to strain the flex cables or they will end up breaking

    Jose Joaquín Sanz Iniesta -

    I should have been more careful - the second cable tore off.

    My own fault after having done this replacement about four times previously without any issues, I clearly got cocky and didn’t pay enough attention.

    Be VERY CAREFUL and remember to unplug those cables. Don’t skip steps.

    I’ve now had to order a replacement screen.

    Stuart -

    Echo minimalist’s comment here. Prop the display up and skip to step 19 to save time and remove risk.

    .A. -

    If you replace the screen and there is no display apply io propyl alcohol 99.9 & purse to both connectors on the screen and on the iPhone with a clean toothbrush and let them dry for 45 minutes and then fit the screen and reassemble the iPhone..

    It works for me . when I get a new screen I do t5his before fitting it.

    David Howard -

    I tried to save time by not removing the screen during battery replacement as some comment here, HOWEVER, I ended up having to use a little force to remove the battery and in the process broke the second, lower smaller cable, resulting in loss of home button function and needing to get a new screen. Next time I will follow these steps and completely remove the screen during a battery replacement

    chrislacey -

    I removed the screen and cable still got ripped during reassembling :(

    Viktoria -

    There is a critical fact missing from the steps here, for reassembly: That bottom (underlying) cable is longer than it should be. Loads of people are reporting that the Home button is dead after this repair, but the cables aren't torn. I'm pretty sure this is why. Here is a picture of the problem.

    When reassembling the phone, you must poke this cable back into the body of the phone while you bring the halves together, or you will crush, crimp, and destroy the cable.

    Gavin Stokes -

    I’m only reading your very useful comment now, after the exact thing happened to me and my cable got ripped during reassembling phone. Would you be able helping me naming this part, so I can look for a new one? Thank you very much!

    Viktoria -

    thanks gavin. ifixit should have included this piece of info.

    soupamanx -

    Can somebody help me with the name of the part that these cables belong to? The bottom one got ripped during my battery replacement, I need a new one but unsure what to look for.

    Viktoria -

  3. bmgfPpWHNVhhLV2o
    bmgfPpWHNVhhLV2o
    krsGsMngtAk6HqyE
    XC5yVbnZluTweVIj
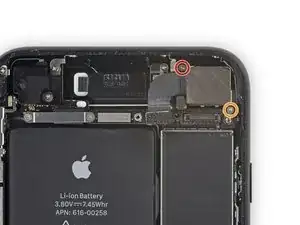
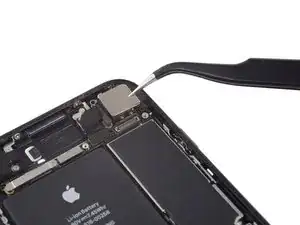
    • Remove the two 1.3 mm Phillips #000 screws securing the bracket over the front panel sensor assembly connector.

    • Some phones could be Y000. Apple started using Y000 for these at some point in the middle of the product's lifecycle.

    Has anyone had trouble getting these two screws off? I’ve been working on these for about 10 minutes and the LEFT screw wont spin. It seems like the little PH000 screwdriver bit won’t even grip it. (The one of the right comes off, no problem)

    It looks like I’ll have to pick this project up again with a screwdriver that will actually take off this piece.

    Makana Sylva -

    If you’re having trouble removing these screws;

    the screw on the right goes into a standoff screw that is screwed into the frame.The left one goes into the logicboard.

    If your phone is used most likely it has been repaired in the past and the person that repaired it put the screws in way too tight.

    If your phone is brand new And you know 100% it is then the problem is your screwdriver.Stop before you strip it completely and buy a better screwdriver (EBAY).

    If you already stripped the screw head take the phone to a shop before you break it.

    there are ways to get them out but truthfully it’s extremely dangerous and sometimes your better off quitting while you are ahead.

    Vegeta Barrett -

    The right screw kept spinning, tried different levels of force but didn’t work. I left the screw on and bent the shield to get to the cable.

    s h -

    I used a #1 flat head tip to loosen.

    Peter Pearson -

    I couldn’t get the two screws out either—used the correct screw tip and everything. Stripped the screw. Will now attempt to just keep the cable attached…..

    Therese Peffer -

    Use the PH000 and apply a little more force before spinning, should come right out!

    Sierra Scolaro -

    ^To anyone having trouble, this is the correct answer. Put the phone on a firm surface, align your driver carefully, press down hard, and twist. As long as your driver is approximately the right size, it’ll come out.

    Jeff Suovanen -

    the two screw i have are stripped and i have n way of getting either screws off whats my next bet

    Alexis Marie Colon -

    The PH000 bit is to large. I can’t get the screws out either which really sucks…now I have to put everything back together, find another bit that will work and try this again another day. Not impressed with IFIXIT’s attention to detail so far :-(

    Ryan Welborn -

    Using iFixit’s driver kit, I prefer a PH00 for this, which is larger than the PH000. If you think the PH000 is too big, something is wrong.

    Jeff Suovanen -

    I think part of the issue with the iFixit PH000 is that it is slightly too pointy. The PH00 fits better because the splines engage the slots of the screw before the point bottoms out. The PH000 tip bottoms out in the screw’s center point and the splines don’t engage as well. I have other PH000 tips that are more blunt nose and they work better than the iFixit bit.

    rcarswell -

    Use the J00 bit. Worked perfectly

    efazio588 -

    PH000 screwdriver didn’t work for any of these screws, or the barometric vent, or the taptic engine. It was too big. I had to use a different screwdriver from another kit I had.

    minimalist -

    I’d do this step before removing the ribbon cables by the battery connector. That way you can disconnect all of them at the same time.

    Ray Bieze -

    i used the little +-shape 30 mm screwdriver (not the Y…but the + shape).

    mason -

    the cable tore. is that it i need a new phone?

    patricia loving -

    You don’t need a new phone, but your selfie camera and phone speaker will not work. You can get replacements for that about $10.

    jack jones -

    Reconnecting this cable and coverplate took a good 20 minutes. O_O

    Nicole Crome -

    What can I do to remove the screw (I stripped it)

    Alex Vu -

    I also had issues to loosen up the screws, in two parts the right side up and the left side down, i think the PH000 is to pointy or something or its too hard for the srews of the iphone, i cannot take it off and know im regreting i bought i order all the way from Paraguay in south america and know so angry it doesnt work

    Martin Frutos, Nuñez -

    I skipped this step. Just be really careful not to pull on the screen.

    Takumi Arai -

    The guide says they changed these to the Y000 “at some point in the t middle of the product’s lifecycle”…

    That can’t be true, I have a *day one*, preordered iPhone 7, and mine had, unmistakably, Y000 screws!

    and also, I’m just faithfully following the guide here, but can anyone clarify *why* is is necessary to entirely remove the display AND the Taptic Engine at all? The battery seems accessible just fine… oh well

    PS- I’m doing this on an older backup iPhone 7. My iPhone 12 Pro just went berserk and stopped working completely a little over a year after I got it day one of its release… since the iPhone X I’ve only had easily breakable, overly sensitive phones. I’ve had every numbered iPhone except for the 8 (I got the X released at the same date) and the 11, and man, are these newer iPhones post X fragile!

    Cam F -

    This worked for me! As mentioned use PH000 and apply pressure and then unscrew the screws. They are tiny, adhere to a piece of tape so you don't lose them.

    Rosie J -

  4. uCv2qq5X3dLp5gXA
    uCv2qq5X3dLp5gXA
    3XQvxPR6gZtBBjeL
    • Disconnect the front panel sensor assembly connector from its socket on the logic board.

    • This press connector should also be reconnected one end at a time to minimize the risk of bending.

    Das ist sehr mutig, das Kabel dort so zu strapazieren.

    Mich würde das Display daneben stellen und mit irgendetwas stützen, dass es nicht umkippen kann um Beschädigungen an dem Kabel zu vermeiden. Das reißt sehr schnell ein.

    Detlef Menninger -

    Is this the connector for the earpiece, as well? I did the screen replacement and everything worked, except now I can’t use my earpiece… I’m afraid I didn’t fully connect this particular portion.

    Victor Bui -

    @victorbui714 Correct, this is also the connector for the earpiece speaker. Check the flex cable carefully and make sure it wasn’t pinched or torn. Make sure the connector socket is clean (give it a blast with some compressed air if needed) and try reseating it. If that doesn’t help, you may want to remove the earpiece speaker and inspect the four springs on the back, and check that they’re intact and making good contact with the four circular pads on the flex cable. Give the pads a wipe with some IPA and try not to leave any skin oils on them. If none of that works, try replacing the entire flex cable/sensor assembly. Good luck!

    Jeff Suovanen -

    This is the only connector that is quite easily possible to put back in the wrong way. If you do so, the phone will just get into a continuous loop where it shows the boot screen, goes blank and then shows the boot screen again and again. If this happens, do not despair-just put it back in the right way.

    Roy Mathew -

    After putting together, I had a continuous loop boot up (as noted above). I saw articles where this (front panel sensor connection) was the reason. I disconnected this connection and the boot up loop stopped. I tried reconnecting several times but had the same problem (boot up loop). However, it turns out that I needed to apply extra pressure when installing until a heard a (faint) second click when pressing down. Note - before I was using the spudger to press the connection together, which didn’t do the job. I ended up using my finger to press harder to get it to click in. Solved that issue.

    Ed Scannell -

    The ribbon cable on this step is torn. Is this something that can be replaced? Is this only to the earpiece?

    John Daily -

    The ribbon cable on this step is torn. Is this something that can be replaced? Is this only to the earpiece?

    Sarah Valencia -

  5. GgLw2SeVMeWxZEj3

    When removing the screen, be aware of the two tiny square black rubber grommets on the Penelope screw brackets that secure the screen. They can fall off very easily and be lost without even knowing it (it happened to me, but was lucky enough to find them).

    Guy Cooley -

    Sorry, I’m so unclear about when to replace the Adhesive tape. Should I put the iPhone 7 Display Assembly Adhesive at this step, or after I’ve replaced the battery?

    Victor Bui -

    @victorbui714 Battery first, then adhesive during reassembly, as it says in the instructions. ;)

    Jeff Suovanen -

    This is the 3rd screen iv put in my phone and everyone them bust at the top by the camera every time iv bought one of these screen idk if it’s the manufactures fault or what?

    trent bost -

    @trentb28922 Ouch! That’s not normal. Is your phone’s frame bent? Are you having to use a lot of force when you install the display?

    Jeff Suovanen -

    If the instructions are followed step by step, then adding the adhesive comes before changing the battery.

    If I had to do it all over again, I'd skip adding the adhesive, because you have to disconnect the battery, plus the two lower display connecters and the front panel sensor assembly connector. It was a nightmare trying to marry the components back together without disturbing the wire prongs, and I don't even want to talk about reinserting the tiny screws that kept twirling around on the tip of the screwdriver as well. It wasn't worth the time or aggravation!!

    If you decide to skip this step, just avoid using your iPhone near water.

    Rosie J -

  6. IQQnOWOdHXJAyeL5
    IQQnOWOdHXJAyeL5
    qfZNvQu5aR1dVdVP
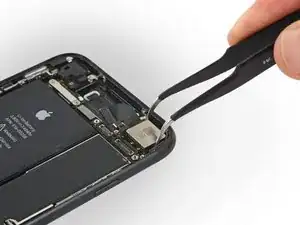
    • Use the flat end of a spudger to disconnect the rear-facing camera's press connector from its socket on the logic board.

  7. MFw5WPagFWfGyMYc
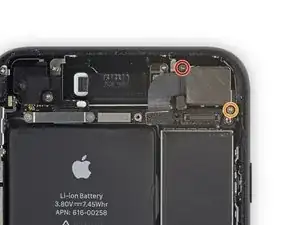
    • Remove the following Phillips screws securing the rear camera bracket over the camera module:

    • One 1.3 mm screw

    • One 2.5 mm screw

  8. 4JlhsRQb1OpZZjww
    4JlhsRQb1OpZZjww
    GETGqBLaD5gpFdNT
    • Remove the bracket.

  9. DJQl5YTo6w4VUOqX
    DJQl5YTo6w4VUOqX
    Hojs1UMbDkm3QYUa
    • Remove the rear-facing camera.

  10. SOZQx1QGabvNhHRd
    • Before starting, download the battery of your iPhone under 25%. A charged lithium-ion battery may ignite and / or explode if accidentally punctured.

    • Turn off your iPhone before starting to take it apart.

    • Disassembling the iPhone display will damage the waterproof seals. If you do not replace the gaskets, your phone will no longer be waterproof.

    • Remove the two 3.4 mm pentalobe screws at the bottom of your iPhone

  11. vdpXdZ2qlBFeRfZG
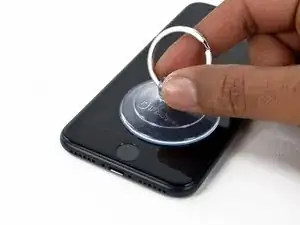
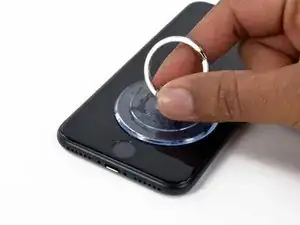
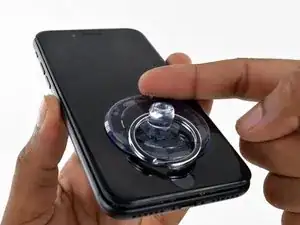
    • Put the hot iOpener over the bottom of the phone to soften the adhesive that holds the display.

    • Wait for about a minute to allow the adhesive to warm up before going on to the next step.

  12. vr1PjQEuIFZKD6UL
    vr1PjQEuIFZKD6UL
    YH1EvI1LNXwQY53E
    • Apply a suction cup to the bottom half of the display assembly, just above the home button.

    • Make sure the suction cup does not overlap the home button, otherwise it will not have a tight seal.

  13. GcKPZRY65MccSiHF
    GcKPZRY65MccSiHF
    TeFtRWqRU1uNCQop
    yNdLYWdSTdO1AOKX
    • Pull the suction cup to create a small gap between the display assembly and the back case.

    • The waterproof adhesive that holds the display in place is very tough and the creation of this initial crack requires the application of a rather high force. If you find difficult to open a gap, move the screen up and down to weaken the sticker until you can insert the spudger.

  14. XPj3f3vhEwiAyYDx
    XPj3f3vhEwiAyYDx
    1i1HCdlljqXfZcIQ
    2GKEjUZUTYBoccEj
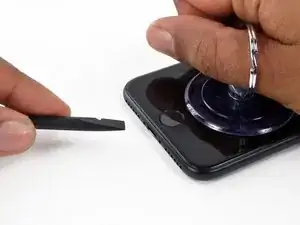
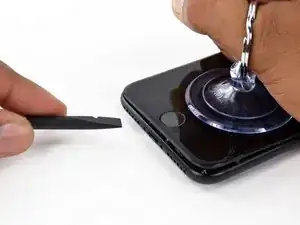
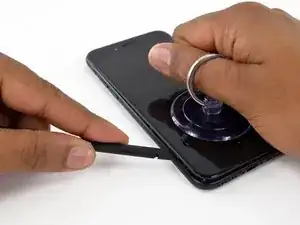
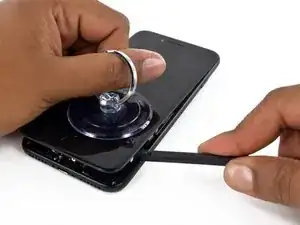
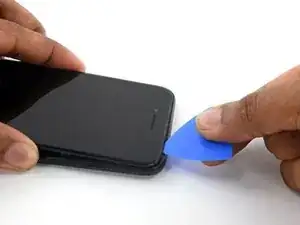
    • Slide the spudger to the left along the bottom side of the iPhone.

    • Twist the spudger to widen the gap between the display and the back case.

  15. ArPJg5S4vjehECAj
    ArPJg5S4vjehECAj
    A225QgfD6q5oZrBY
    kWZKcRPmMPMoqb52
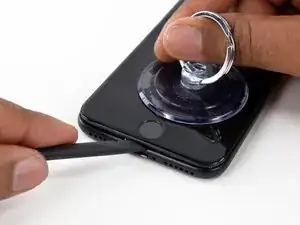
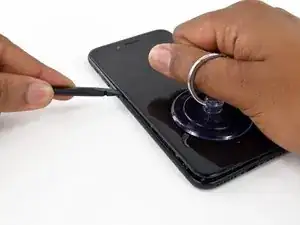
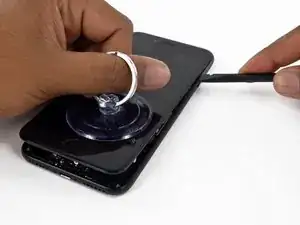
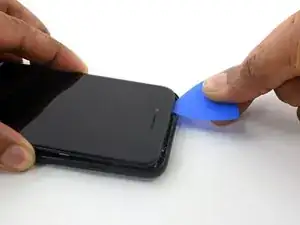
    • Slide the spudger along the left side of the iPhone, starting at the bottom and moving to the volume control buttons and the silent mode switch.

    • Do not try to force the top of the display up by lifting it from the back case, because it is locked in place by plastic clips that may break.

  16. GXRvQMBLCeyUsnya
    GXRvQMBLCeyUsnya
    op5geuu5kCavSOnp
    jBEBZGMcOAZKbHJW
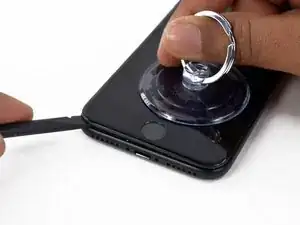
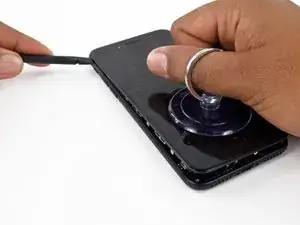
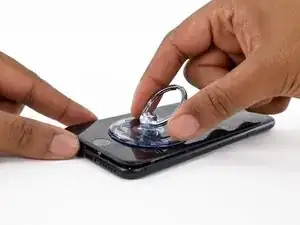
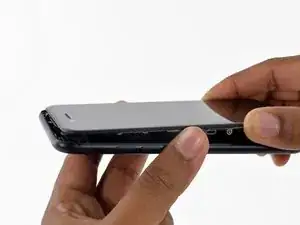
    • Remove the spudger from the left side of the iPhone and insert the flat end into the lower right corner of the device.

    • Rotate the spudger to widen the gap between the display assembly and the rear case.

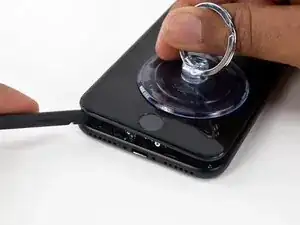
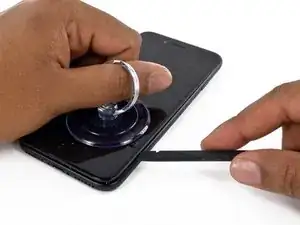
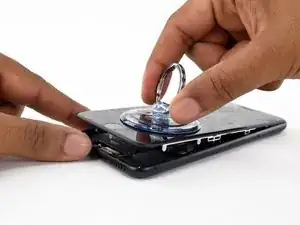
    • Slide the flat end of the spudger to the right side of the phone to break the adhesive that holds the display in place.

  17. QGBfv2UuIpJ23sHn
    QGBfv2UuIpJ23sHn
    Ql2BxUDgoShbVU26
    hYSQn6qluME1yoal
    • Pull the suction cup up to lift the display and open the iPhone.

    • Do not lift the display above 10 ° because there are ribbon cables along the right edge of the device that connect the display to the logic board.

  18. PWIPNVtbApOBP2vi
    • Lift the small appendage of the suction cup to remove the instrument from the front panel.

  19. iCcL4ymnwcQnqV36
    iCcL4ymnwcQnqV36
    KCCDPJy3sT2YVjb6
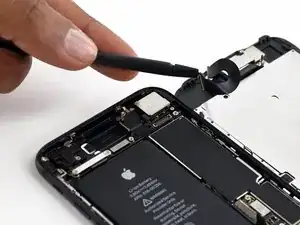
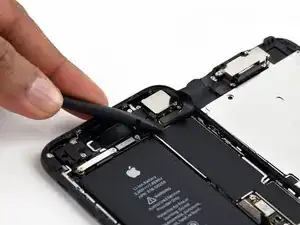
    • Slide an opening tool along the top side of the iPhone, between the back case and the front panel, to break the rest of the sticker that holds the screen in place.

  20. hQlEnx6nylvgIePW
    hQlEnx6nylvgIePW
    5V2qGlY3bVQGqlYl
    1OETyKDrPNwEH2oX
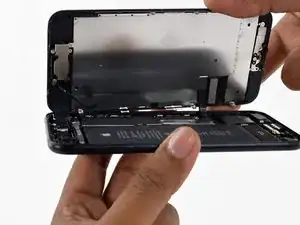
    • Carefully pull the display assembly horizontally to move it away from the top of the phone to disconnect the clips that lock the screen to the back case.

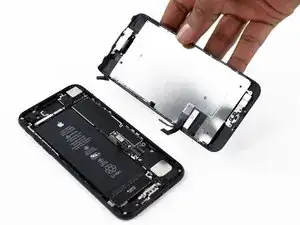
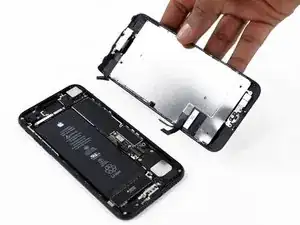
    • Open the iPhone lifting the display from the right side, like the back cover of a book.

    • In this step, do not try to completely separate the display because there are several fragile ribbon cables that still connect it to the iPhone logic board.

    • Now you can place the phone on a flat surface and keep it open like a book.

  21. dGCmYGEHcqF3Xq3Y
    dGCmYGEHcqF3Xq3Y
    3NXRrBIWwxEYqKem
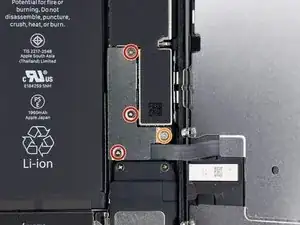
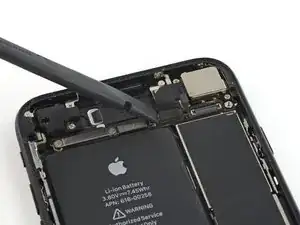
    • Remove the following Y000 tri-wing screws from the connector lower bracket:

    • Three 1.2 mm screws

    • One 2.4 mm screw

    • Remove the connector lower bracket.

  22. HiAUbubluVBtPWef
    HiAUbubluVBtPWef
    mbSprdvKUYLCHs1G
    OrGBcr1gNynZFWDZ
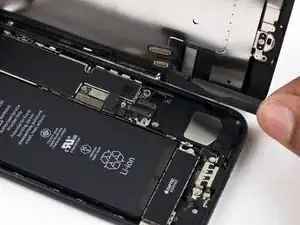
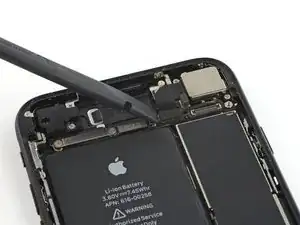
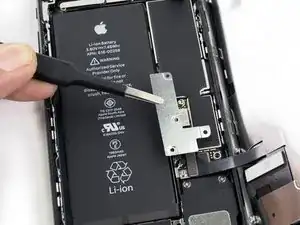
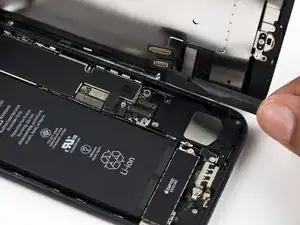
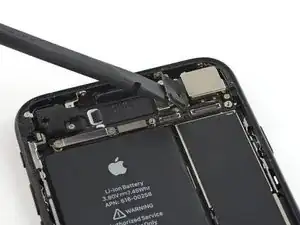
    • Use the pointed end of a spudger to lift the battery connector from its socket on the logic board.

    • Slightly bend the connector cable to prevent any contact with the socket and therefore power up the phone.

  23. 3xPWlLGQBDIfyJBZ
    3xPWlLGQBDIfyJBZ
    2RwwvhoyicSjdV2S
    LMtAB2nCZG6hSJxL
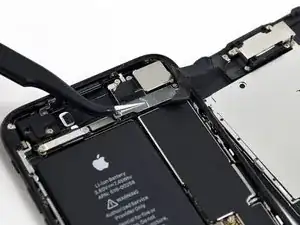
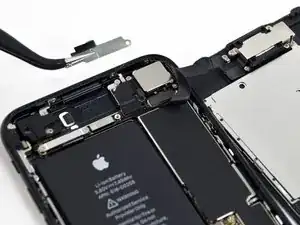
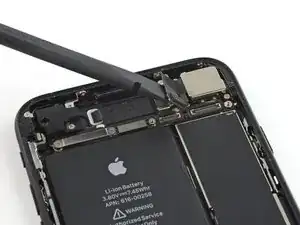
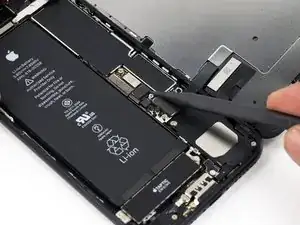
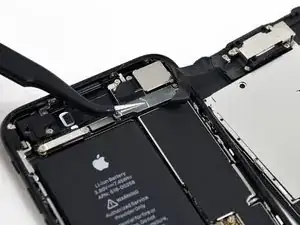
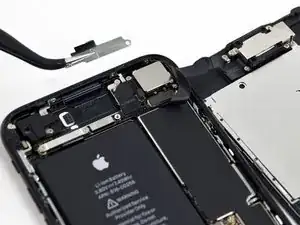
    • Use the flat end of a spudger or a fingernail to disconnect the two lower display connectors lifting them straight from their socket on the logic board.

    • To reconnect these cables, press from one end until you hear the click indicating the block, then repeat the operation on the other side. Do not press in the middle. If the connector is also slightly misaligned, the connector may bend, leading to permanent damage.

  24. C3wHucOOYraVGoZu
    C3wHucOOYraVGoZu
    lfHXjQ5nhWJYKCnG
    OvR3aWQgA1YC6AYQ
    • Remove the two 1.3 mm Phillips screws securing the bracket to the front panel sensor assembly connector.
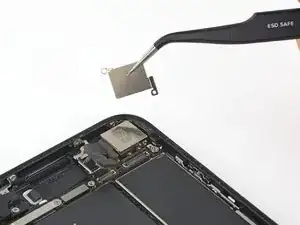
    • Remove the bracket.

  25. 1aMTKWc3QVHNLqkR
    1aMTKWc3QVHNLqkR
    nVNGDCye1grT1MH4
    • Detach the front panel sensor assembly connector from its socket on the logic board.

    • This pressure connector must be reconnected one end at a time to minimize the risk of bending.

  26. 1p1xBLBKtA6UxcfH
  27. ROEBiSNTfGFH6Boc
    ROEBiSNTfGFH6Boc
    ECaeFOMjC4dpKPVm
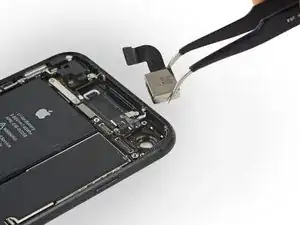
    • Use the flat end of a spudger to detach the rear camera's pressure connector from its seat on the logic board.

  28. JH6cdd35fJLypp5U
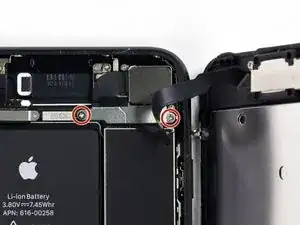
    • Remove the following Phillips screws that secure the rear camera bracket to the camera module:

    • A 1.3 mm screw

    • A 2.5 mm screw

  29. I5pX6ytJnRP1Wifa
    I5pX6ytJnRP1Wifa
    WkKLWEJuALp2hAh4
    • Remove the bracket.

  30. ctFImlPYDDt2hTAW
    ctFImlPYDDt2hTAW
    dJvQc41OSjhJGf31
    • Remove the rear camera.

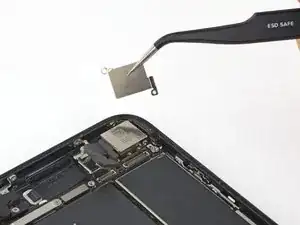
    • Remove the bracket. The inner edge of the bracket seems welded to the lens ring of the camera.

    • You will have to use a lot of force to remove it; do not be surprised if it breaks.

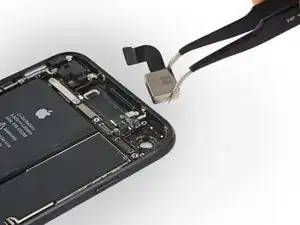
    • As a last step you will have to eject the broken lens.

    • First of all, look for an instrument that you prefer and that you can use strongly. Then he points the chosen instrument towards the lens to be replaced and press strongly until it is detached.

    • Place your hands so that the phone does not bend when you use force.

    • Pay attention to the phone and your hands.

Conclusion

To reassemble your device, Follow these instructions in reverse order.

jacopo

Member since: 25/03/14

4373 Reputation

0 comments