Introduction

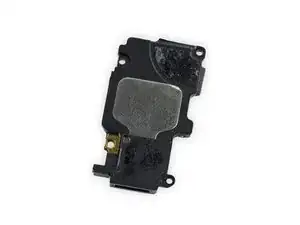
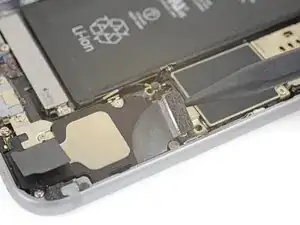
Prerequisite guide only! This guide shows how to remove the loudspeaker module.

  1. Q1EPtsJMW6KGNImB
    Q1EPtsJMW6KGNImB
    2RVpRC3LMfXbfIPP
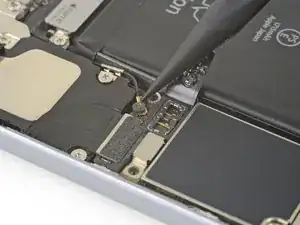
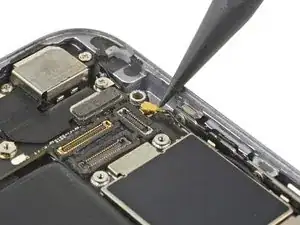
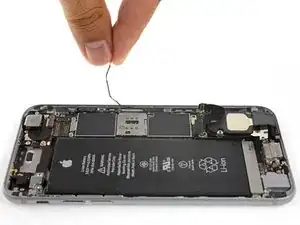
    • Use the point of a spudger to lift and disconnect the antenna cable from the bottom end of the logic board.

    • To reconnect antenna cables like these to the socket, carefully align the connector to the socket, then use the flat end of a spudger to press down. It should click in place. If not, check for alignment. Do not use excessive force.

    Do not remove the isolation on top of the antenna or it will stop working. If you already removed it, use a piece of isolation tape to isolate it again.

    Jan -

    There is no instruction on how to reconnect this antenna cable, and it is proving extremely difficult, at least for myself… Please help!

    Brennan Lutkewitte -

    To reconnect antenna cables like these to the socket, carefully align the connector to the socket, then use the flat end of a spudger to press down. It should click in place. If not, check for alignment. Do not use excessive force.

    Arthur Shi -

    What does this cable do?

    Because accidentaly broke mine, but everything working fine, just want to be sure , what does it for!

    I broke at the end, when the gold round is. Somehow i placed the cable with that round ring , just to be sure , thst there is some contact with it, and pluged in!

    I know, i need to change the whole bracket with charging port etc., to fix the cable, cause i cant solder the conector back. But maybe i can just ignore the cable?

    sekuent -

    Hi Sekuent,

    That cable attaches to possibly cellular antennas. It may be that certain bands are impacted by the break.

    Arthur Shi -

    Some more research may indicate that it may instead be the 2.4GHz Wi-Fi bands.

    Arthur Shi -

    I also broke this antenna off. I left it off as per suggestion. Everything seems to still work fine.

    garyrclark -

    Can i solder the wire with the plug round myself? Is it safe to do that?

    sekuent -

    If you have soldering skills, definitely! Note that you have to solder the wire to wire. You can’t solder the wire to the round plug as it’s ground and not signal.

    Arthur Shi -

    When installing my new lightning port board, I had to rescue the isolation from my previous one. It came off fairly easily with tweezers.

    Edward Coe -

    When reassembling, this is where I’m spending most of my time. Really tedious to reconnect. Ended up using a loop to precisely set the connector.

    step inthelight -

    I placed small piece of plastic on the top to assist with the alignment. It was thin enough to fill the gap.

    moredtails -

  2. WL2OrkaOY2oT2AlS
    WL2OrkaOY2oT2AlS
    2DCKMCEywR3MbbfK
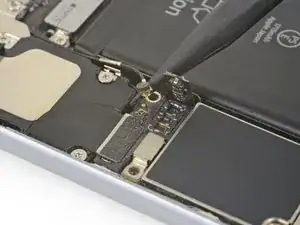
    • Use the point of a spudger to lift up and disconnect the Lightning connector ribbon cable from its socket on the logic board.

    new ribbon cable doesn’t fit!

    Allen Grant -

    I am having the same issue…

    Colin McCornack -

    I found it best to plug in the ribbon cable without the speaker in place then ease the speaker into the ‘pocket’ in the ribbon cable. It’s still possible to reach all the speaker screws this way.

    Alex.McHardy -

  3. gaUOgWuQsiq2FoaN
    gaUOgWuQsiq2FoaN
    FfZqJ4cZXwxfQVUo
    • If you are following this guide to replace the Lightning connector, you can choose to keep the antenna cable connected and skip this step and the next one. Be very careful not to strain the delicate antenna cable when you move the loudspeaker around.

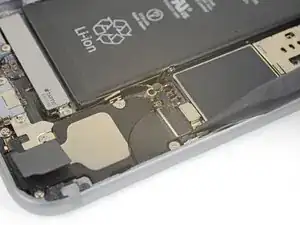
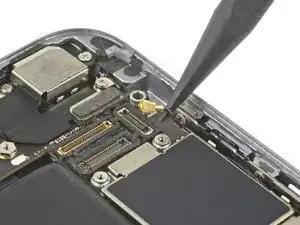
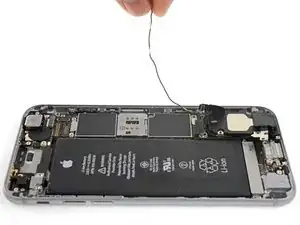
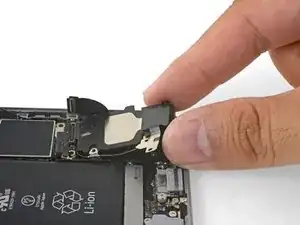
    • Use the point of a spudger to lift and disconnect the antenna cable from its socket near the top of the logic board.

    Do not remove the isolation on top of the antenna or it will stop working. If you already removed it, use a piece of isolation tape to isolate it again.

    Jan -

    The note here should read “you can choose to keep the antenna cable connected and skip this step and the next one” (steps 27 and 28). The way it reads now, “you can choose to keep the antenna cable connected and skip the next two steps”, makes it seem that you should skip steps 27, 28, and 29, which is clearly incorrect.

    Bom Tomdabil -

    Hi Bom,

    That’s a great suggestion! Thanks! I will update the step.

    Arthur Shi -

    What is this antenna for?

    Daniel Gyabaah -

    Hi Daniel,

    This should be the Wi-Fi diversity antenna, which improves Wi-Fi performance.

    Arthur Shi -

    Ah alright, on mine I've got this black foam on on top of it, is it true that if I remove it will stop working?

    Daniel Gyabaah -

    It might! The foam acts as an electrical insulator. Keep it on the connector.

    Arthur Shi -

  4. h14jEuGAjg6sDdEl
    h14jEuGAjg6sDdEl
    OaDU3yLdINgI5rSC
    Z1DxewevyMATgjIn
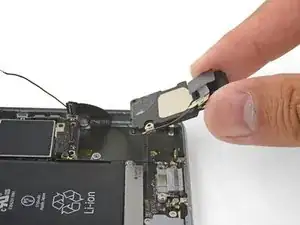
    • Carefully lift the antenna cable and de-route it from the edge of the phone. Use the point of a spudger to help lift the cable to free it from the retaining clips.

    • If the cable does not have enough room to lift up, loosen this Phillips screw securing the logic board so that the board can give more wiggle room.

    • Be sure to re-tighten this screw during re-installation.

    • During re-installation, be sure to route the antenna cable underneath the logic board corner.

    • During re-installation, you can also re-insert the SIM card tray after re-routing the antenna cable.

    • If you feel any resistance, stop and make sure that the tray isn't snagging the antenna cable.

    Why would it be necessary to remove the antenna cable from the top for this repair? I did it whilst leaving it in.

    Edwin -

    The antenna cable is taped to the speaker module in an inaccessible location. While it is possible to pull the cable out of the tape binding, doing so may break the cable. We opted to remove the cable with the speaker as a workaround.

    Arthur Shi -

    is it necessary to somehow try to get the antenna back into the retaining clips? I can’t say I can even see where they are.

    Tonya -

    Hi Tonya,

    It is not necessary for the general operation of the phone. Keeping the antenna in the clips may help with grounding and keeps it in place so that you can easily insert/remove the SIM tray without snagging it. Wherever the antenna cable turns silver on the strand, there should be a corresponding clip underneath it.

    Arthur Shi -

    What if when taking the antenna out, it looks to have removed a tiny section of the black shielding? Do I need to replace the antenna?

    Martin -

    HI Martin,

    The antenna has specific areas where the shielding is intentionally missing. These areas snap into corresponding clips on the phone frame.

    Arthur Shi -

    It’s not where the clips are, it’s right where it goes under the motherboard, so I am worried it might short the motherboard.

    Martin -

    You are most likely fine. You can use some electrical tape on the cable to help prevent any accidental contact.

    Arthur Shi -

    Same here - I replaced the speaker without taking the antenna cable out (which would have had me break the cable for sure).

    Richard Guenther -

    I ended up snapping the antenna cable. What do I do now?

    Nolan Ferox -

    Is there a repair guide for the antenna cable for the 6s

    k s -

  5. fbZPDiHNRCwASe6M
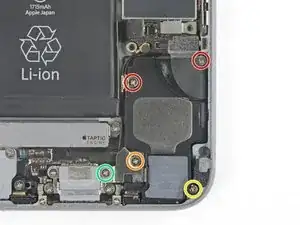
    • Remove the following Phillips screws securing the speaker to the rear case:

    • Two 2.6 mm screws

    • One 2.3 mm screw

    • This screw may be covered by some tape.

    • One 2.3 mm screw

    • This screw is different from the prior one. Be sure not to mix the two together.

    • One 3.0 mm screw

    I did not realize there was film over the screw and thought my phone just didn’t have the screw, which caused me to bend the speaker bracket; it would be very helpful to include this information.

    Matthew Dessem -

    Hi Matthew,

    Thanks for the feedback! I’ll add that in.

    Arthur Shi -

    So, there’s a hidden screw, anyone know what the tape/film is called? Mine ripped and I want to replace it.

    Samuel Creel -

    Orange 2.3mm screw has a broader head than the yellow one.

    Mark Slaughter -

    I suggest when putting it back together to not put the screws in the speaker module till you connect the ribbon cable. I had to take them back out to connect the cable. I needed the flexibility to get the cable connected.

    Joe Kloss -

  6. ABRsHhmKlsETZSZ3
    ABRsHhmKlsETZSZ3
    Ol12loOX4woEQWCi
    HY5bNZhFIPosal3J
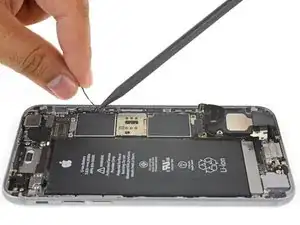
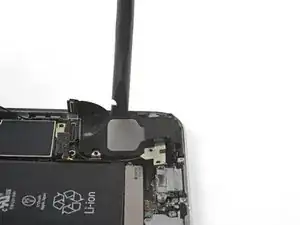
    • Insert the flat end of a spudger between the long edge of the speaker module and the case wall.

    • Pry gently to loosen the speaker module.

    • Once the module is loose, lift and remove the speaker module from the phone.

    I could not completely remove the antenna cable (attached to the speaker) without removing other components. I just left the speaker and antenna cable dangling while I replaced the lightning connector.

    Tyler Clayton -

Conclusion

To reassemble your device, follow these instructions in reverse order.

Arthur Shi

Member since: 03/01/18

248651 Reputation

0 comments