Introduction

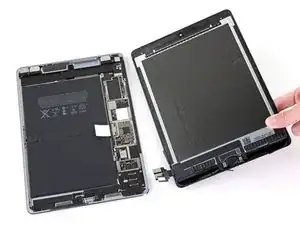
Prerequisite only. This guide shows how to disconnect the iPad Pro's display assembly.

  1. SSnJJGWG4QmSor5T
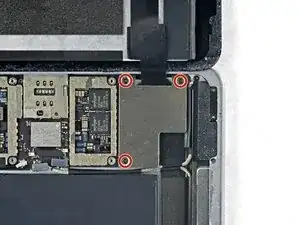
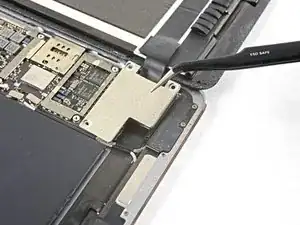
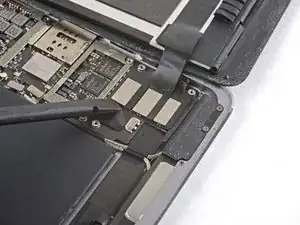
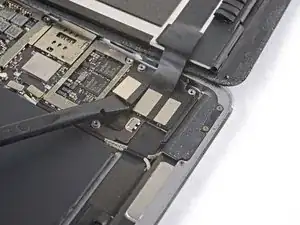
    • Use a Phillips screwdriver to remove the three 1.3 mm Phillips screws securing the display cable bracket.

    i think we need to talk about the battery situation here. apple change up the style of battery connector on this model as well as some others. if someone can add to this list and add the appropriate photos in the right spot should help someone else. the battery tabs are open towards the battery side and inserting a tool in this area can pry them open further and damage or rip off the tab. some have found that by lifting on either side of the battery tab, they would not even encounter the tabs.

    greg -

  2. 1a4ywPCBXTXe1uPJ
    1a4ywPCBXTXe1uPJ
    NQOaPfW4OXpa5vek
    • Remove the display cable bracket.

    A tab was folded over a connector of some sort on the bottom side. I found it was a better to pull from the top to the bottom to fold the tabs slightly to remove this cover.

    rosecitymech -

    Actually it helps to move the cover slightly towards the bottom of the iPad as that disengages to tabs…

    DeeAnn Hopings -

  3. N3WqLqmlprqjmhha
    N3WqLqmlprqjmhha
    vyNRHkW1HFHRt5rb
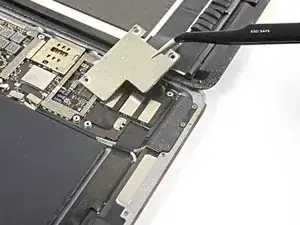
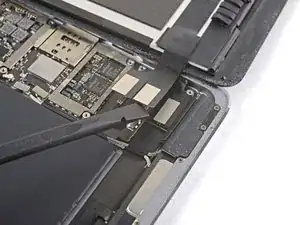
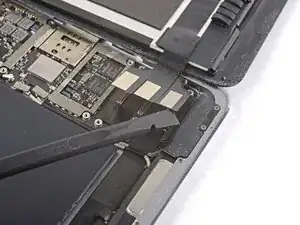
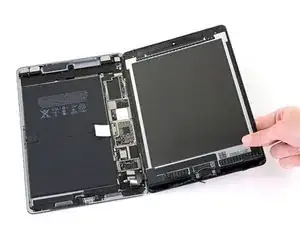
    • Use the flat end of the spudger to disconnect the display assembly connector from the motherboard socket.

  4. 6ym1twSljAhoSG46
    6ym1twSljAhoSG46
    FMHLJUerOdlvCIJh
    • Repeat the previous step for the two remaining connectors.

  5. VfYWrFtvNprHjYIC
    VfYWrFtvNprHjYIC
    C5LVpSEBGFwHVbQb

    You "CAN" skip steps 41 through 98 and 102-109 if you're confident in your repair abilities and PATIENT. Lots of alcohol around all the edges of the battery, and apply heat to the back cover on one half of the battery, the slowly ease your "card under the edges of the battery. Wiggle it back and forth and add more alcohol under the edges of the battery where your working; DONT PUSH your card to hard or you will sli[p and damage components. Then do the same for the other half. When both halves are loose, fold over one end and slide the flat edge off the spudger under the area of the logic board next to the battery connector, then do the same to the other side; you want just enough of a gap under the logic board to lift the battery tab off of the post then you can remove the battery.

    Gregg Stanley -

    ディスプレイアッセンブリを外して、黒くて古い接着テープをはがしすためにぴっぱったら、ディスプレイと本体基盤を接続するコネクターのテーブを不注意で切断してしまった。これで、交換はあきらめで中止。注意されたし。ちなみに、手順41~89は省いてもバッテリー交換ができるのではないかと思います。

    susuper -

Conclusion

To reassemble your device, follow these instructions in reverse order.

Arthur Shi

Member since: 03/01/18

248651 Reputation

0 comments