Introduction

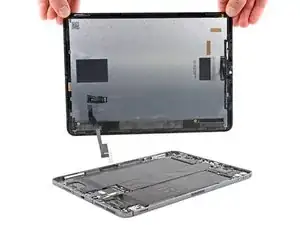
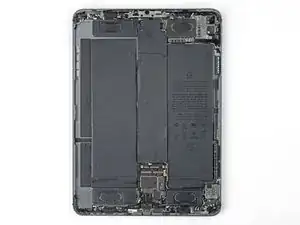
Follow this guide to replace the screen on your iPad Pro 11" 4th gen. The screen design has been mostly unchanged in terms of how it connects to the logic board from the 1st generation to the 4th. This means that any display replacement you can find that fits an 11-inch iPad Pro will likely work.

If your battery is swollen, take appropriate precautions.

The LiDAR sensor assembly attached to the screen is paired with the Face ID hardware. You'll need to transfer it to your new screen to keep Face ID functionality.

  1. qCY4tiPSNo5LtR4Y
    • Ensure the battery is entirely drained before attempting this repair. The battery connection in this device is sensitive and you don't want to accidentally provide the board power for a myriad of reasons.

    • All cords/cables should be removed and the iPad should be fully shut down.

  2. uLWbfSlN4CTNPXOo
    uLWbfSlN4CTNPXOo
    gL2QfRexFjbWNfDM
    V2BrgaAesACMvDBW
    • There are important and sensitive connections that you should make note of before attempting this repair. The colored boxes each represent an important component just below the screen.

    • Exposed LCD Edges

    • Screen Magnets

    • Camera Module, Ambient Light & Proximity Sensors, and Microphone

    • Display Cables

  3. R2aJnFAXAVPPWVfL
    • Apply a heated iOpener to the right edge of the screen for two minutes.

    • You may use a hair dryer or heat gun but extreme caution should be used because you don't want to over heat any one part of the display.

    • There is an additional method for opening using iFixit's new Anti-Clamp.

  4. pIlpsnDpFk14LcHH
    pIlpsnDpFk14LcHH
    oVQrKLuODVxhlnM1
    • If the display is badly cracked, consider cover it with a layer of clear packing tape. This may allow a suction cup to adhere. iFixit even advises using superglue if you are totally replacing the display.

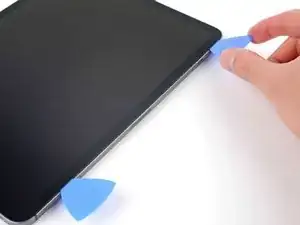
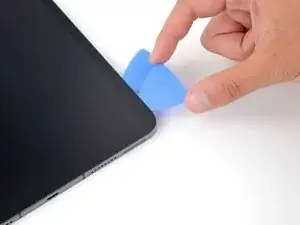
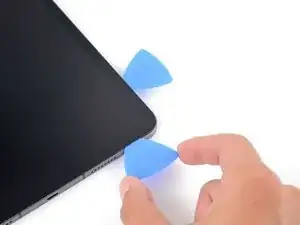
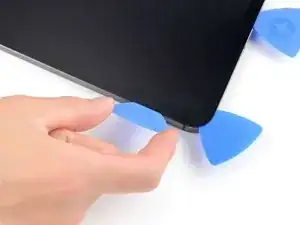
    • Apply a suction cup to the right edge of the screen about 5 cm from the bottom edge.

    • Pull up on the suction cup with firm, constant pressure to create a gap large enough to insert an opening pick no more that 5mm into the iPad.

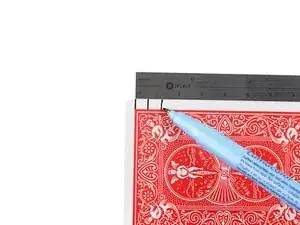
    • If you find it helpful, mark the 5mm line on the opening pick with a sharpie before inserting.

    • Try to remember you only need to create a gap large enough for the opening pick to get in.

  5. ib4Du2d1ENlldhYL
    ib4Du2d1ENlldhYL
    nBMVCYndJpaDpfRJ
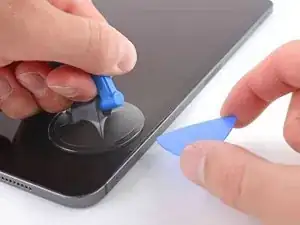
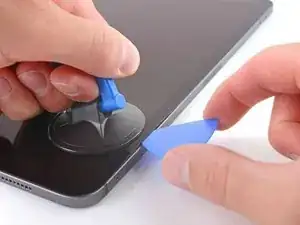
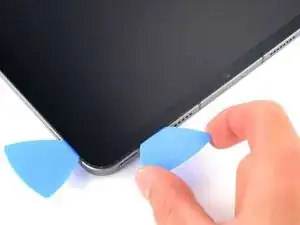
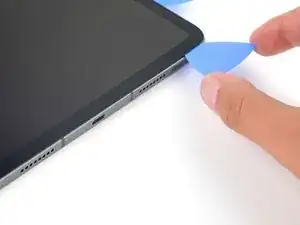
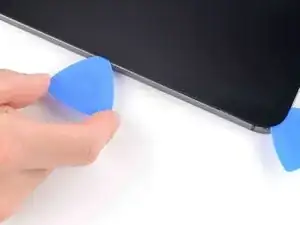
    • Insert another opening pick right next to the original.

    • Slide the new pick along the right edge to separate the adhesive.

    • When you get close to the volume buttons make sure the pick isn't inserted more than 2mm

    • Leave the pick in the top right corner.

  6. SY3hkQeiMjuJgRJ5
    • Apply the heated iOpener to the top edge of the iPad for two minutes.

  7. KYjPliO3IYKqwQ2H
    KYjPliO3IYKqwQ2H
    OgLu5IOElRCTQG2J
    • The top edge contains the camera module, two ambient light sensors, the proximity sensor, and the front microphone. All of these components are fragile and easily damaged if an opening pick is inserted too far.

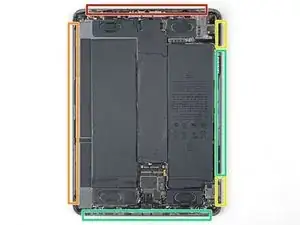
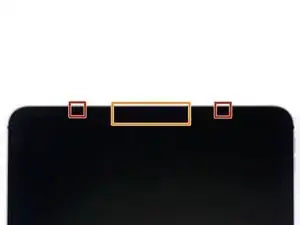
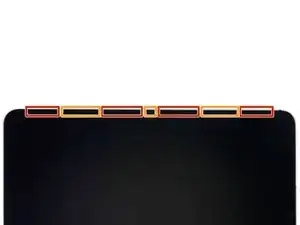
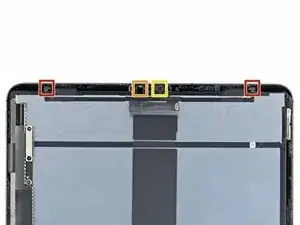
    • This color indicates the location of the ambient light sensors. Avoid inserting the opening pick more than 2mm to avoid damaging the sensors.

    • This color indicates the location of the camera module, proximity sensor and microphone. Avoid inserting the opening pick more that 1mm to avoid damage.

  8. DshRL1dJrVXGJIiK
    DshRL1dJrVXGJIiK
    xGIRVRvG3VDiZO22
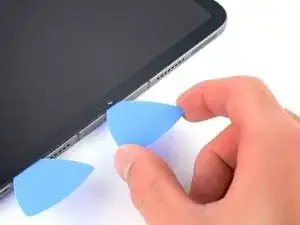
    • Insert opening pick #3 around the corner from where you left #2.

    • Take pick #3 and slide the pick along the top edge. Taking precaution of the components listed in the previous step.

    • Leave pick #3 on the right side of the ambient light sensor, near the upper left corner.

  9. R6GoGLNVTsbL6KDI
    • Apply a heated iOpener to the bottom edge of the screen for two minutes.

  10. hXNkCAVIYPjai6Af
    hXNkCAVIYPjai6Af
    bmCQmxyYHiZ3LNJZ
    • Insert pick #4 in the bottom right corner below the original pick.

    • Slide the pick around the bottom right corner taking caution not to insert more than 2mm.

  11. CvJPDnAxiq4GHosU
    CvJPDnAxiq4GHosU
    dGuDjgrhRUHBc1Bw
    • Slide the opening pick along the bottom edge, taking care just above the USB-C port.

    • Once the pick has made it to the opposite corner, leave pick #4 right above the USB-C port.

    • Insert opening pick #5 above opening pick #4 and take #5 the rest of the length of the bottom edge and around the left corner. Leave #5 at just above the corner.

  12. jdjHHH2PKVjqh1Ov
    • Apply a heated iOpener to the left edge of the screen for two minutes.

  13. SUu4p3n4jqgFK1Yf
    SUu4p3n4jqgFK1Yf
    ABJUyuMEDtpSNTTn
    • The left edge contains several display cables. These are extremely fragile and easily damaged by an opening pick if it's inserted too far.

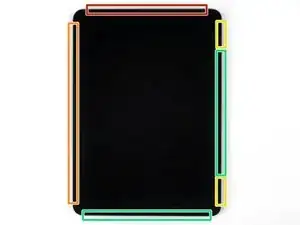
    • This color indicates where the display cables are located within small indents of the frame. Best practice is to insert the pick at a 45 degree angle.

    • This color indications where the flat sections of the frame are. These sections require the pick to be horizontal.

  14. cR2MecZqUrxWGmwd
    cR2MecZqUrxWGmwd
    UEgdeGKJ5W2jIMK4
    • Insert a pick at a 45 degree angle just above the bottom left corner.

    • Carefully slide the pick along the left edge, stopping when you reach the flats section of the frame.

  15. rn6PwlQMRYjhxvnx
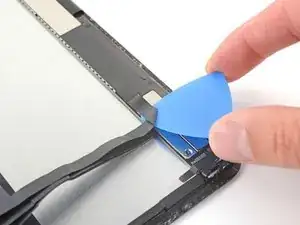
    • Separate the remaining adhesive.

    • Slide the pick at a 45 degree downward angle and don't insert the pick more than 5mm.

    • Slide the pick horizontally and don't insert more than 5mm

  16. Ht3sTadT3FEXqeFS
    Ht3sTadT3FEXqeFS
    LiXJPBBLXVwoUFSe
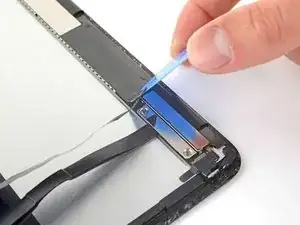
    • Use yet another opening pick to see if there is any remaining adhesive.

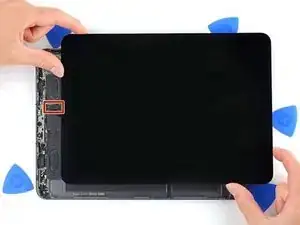
    • Grave the top right and bottom left corners of the screen and slowly move the screen towards the bottom right side.

    • The screen is still attached to the iPad by several ribbon cables. While you move the display you can lift it straight up slightly to see their position.

    • Keep moving the screen until you see the ambient light sensor ribbon cable near the top edge is uncovered.

  17. eSC2XUFaFXLtTAQn
    eSC2XUFaFXLtTAQn
    hxVpYLZAi2YvaUaa
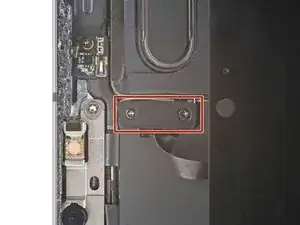
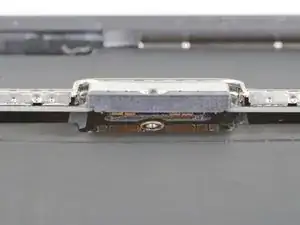
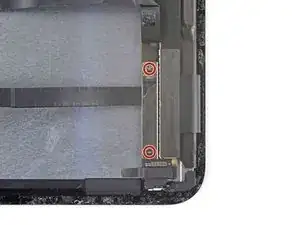
    • Use a Phillips screwdriver to remove the two screws securing the ambient light sensor bracket to the logic board.

    • One 1.3 mm screw

    • One 2.0 mm screw

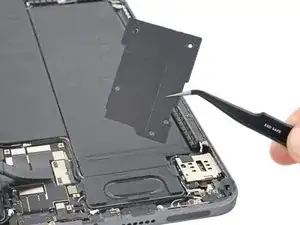
    • Use a pair of tweezers or your fingers to remove the bracket.

    • During reassembly, this is a good point to power on your iPad and test all functions before sealing it up. Be sure to power your iPad back down before you continue working.

  18. tyqZTbgxBYiiP11U
    tyqZTbgxBYiiP11U
    l5FRnLYyL2MtATH6
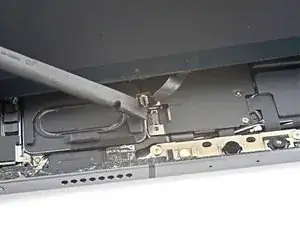
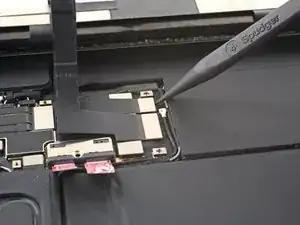
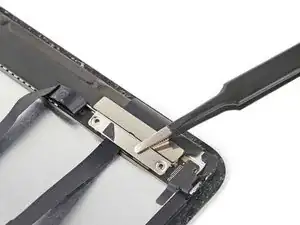
    • Use the flat end of a spudger to disconnect the ambient light sensor cable by lifting straight up on the press connectors.

  19. qFyuwAx5YUSYjm4F
    qFyuwAx5YUSYjm4F
    YByMeFACgsyXPSjs
    HMmQwXNQMHnYJmkq
    • The screen is still attached by one more ribbon cable - do not try to remove it yet.

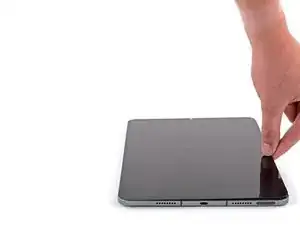
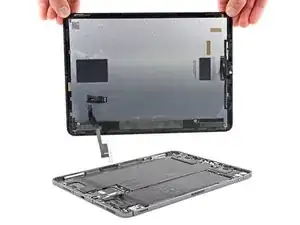
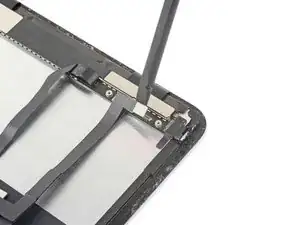
    • Holding the right edge of the screen, open the iPad like a book.

    • In order to not strain the ribbon cable let the screen rest over the left side of the iPad.

  20. fmaK5uSJBvYPqciU
    fmaK5uSJBvYPqciU
    p1ekoaAWn5nVLQOu
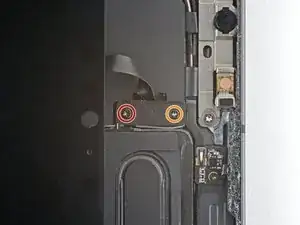
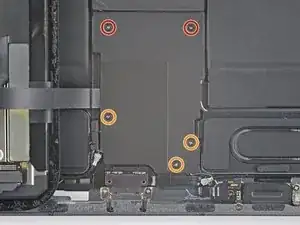
    • Using a Phillips head screwdriver, remove the five screws securing the cable shield to the logic board:

    • Two 2.0 mm screws

    • Three 1.3 mm screws

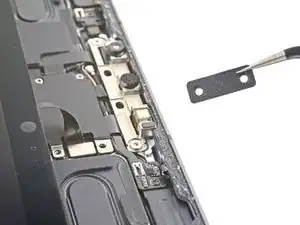
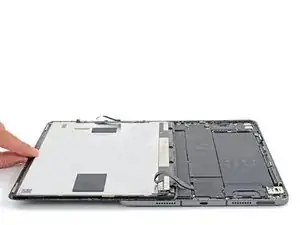
    • Use tweezers or your fingers to grab and remove the lower cable shield.

  21. xjiuMLHaANwiQfXW
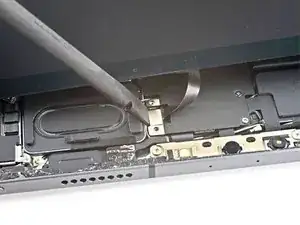
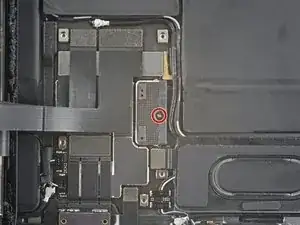
    • Use a Phillips screwdriver to remove the 1.8 mm screw securing the battery connector to the logic board.

  22. 2jBGHTZjIyAJcoDR
    2jBGHTZjIyAJcoDR
    CHwvRRMbSvHcUFTf
    6fnAyFp23sev3OkW
    • These photos show what the battery connector looks like underneath the logic board. Use these photos as a reference while you safely disconnect the battery.

    • Notice that the battery connector has cantilever springs on the logic board that press against the battery contact pads. Since both the logic board and battery are glued down, you'll need to slide something thin and flexible between the contact points to disconnect the battery.

  23. qIifrVTYlKnQEl1X
    qIifrVTYlKnQEl1X
    14NEZNJxBLpNG3kD
    xxiuY14SrsmTBSWB
    • You need to place a barrier between the battery connector and logic board to disconnect the battery. Follow this step to create a battery blocker out of a playing card.

    • Cut two 6 mm-wide strips from a playing card to block the connections to the battery.

  24. uODUbhwxYlaMVFPO
    uODUbhwxYlaMVFPO
    JmXEfJfHWdrRbfKE
    REh2YHLSCEZaSeCr
    • Insert the card strips under each side of the battery connector.

    • If you can't slide the cards under the battery connector, use an opening pick to gently lift the connector to help insert the card strips.

    • Don't pry or lift the connector too much—it's soldered onto the logic board and may break if stressed.

  25. x6Oi4ANhFQQUIWnQ
    x6Oi4ANhFQQUIWnQ
    sJODhuNrDwPxHHDA
    ZsRngBwtuyCOMDvP
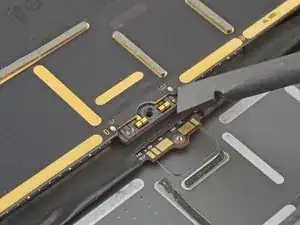
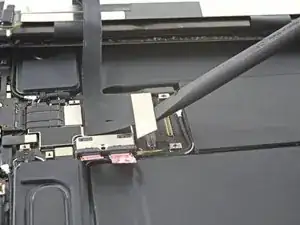
    • Using the pointed end of a spudger, disconnect the bottom two display cables.

    • Using the pointed end of a spudger disconnect the top two display cables.

  26. 4v5jSiSFN6LTA6dm
    • The screen is now entirely disconnected. You may lift it away from the housing.

    • Use isopropyl alcohol (>90%) and a lint free cloth or q-tip to remove any remaining adhesive on the housing before replacing the display. Remember, without replacing the adhesive strips, your iPad is at serious risk of water damage.

    • Follow this guide to install pre-cut adhesive strips on your iPad before sealing it up.

  27. LKdocySqCjFFUhet
    LKdocySqCjFFUhet
    duqpBOX2SxSnrTw1
    • The LiDAR sensor assembly is paired to the Face ID hardware. You'll need to transfer it to your replacement screen to keep Face ID functionality. The following steps show how to remove the sensor assembly and install it on your replacement screen.

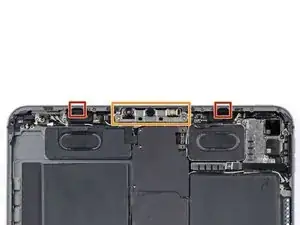
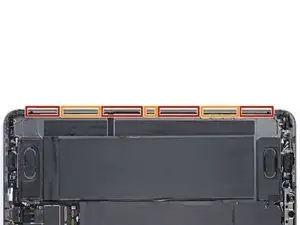
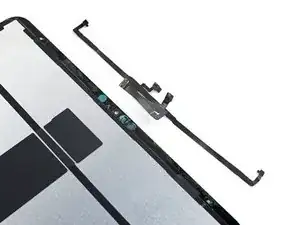
    • Ambient Light Sensors (2)

    • Microphone

    • Proximity Sensor

    • The ribbon cable that connects these sensors is very thin and delicate, take your time and be careful with removal.

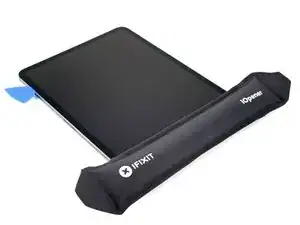
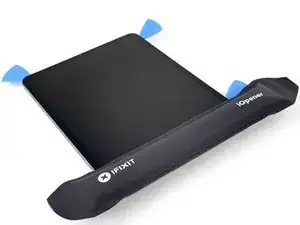
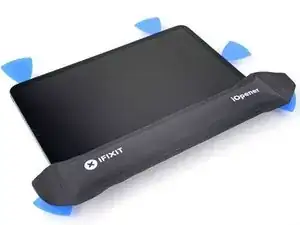
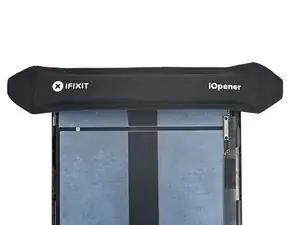
    • Prepare an iOpener. Leave it in place at the top of the display for two minutes.

  28. nUC1ZG3KEt4AWTew
    nUC1ZG3KEt4AWTew
    BHmV3JBIVpxIPKoH
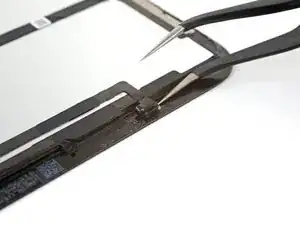
    • Using a pair of tweezers, insert one arm between the ambient light sensor and the screen.

    • Gently pry the sensor up from the screen. This may take considerable force.

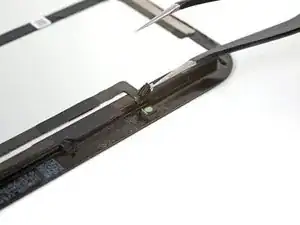
    • Repeat these steps with the other ambient light sensor.

  29. UwlJ4rPTVjcFElZX
    UwlJ4rPTVjcFElZX
    uVX2VU2CaOgYCTZR
    • Reheat & reapply your iOpener

    • Using the same method that we used with the ambient light sensor, use one arm of the tweezers to slip under the ribbon cable and gently pry up.

  30. xIJ16DXCsZlbjEKD
    xIJ16DXCsZlbjEKD
    BYPacp3OMTsvjUvX
    • There may be tape covering the microphone.

    • Slide the opening tool under the microphone to separate the adhesive.

    • Pry up to separate the microphone from the screen.

  31. WdpSePA12heXwBBe
    • Slide an opening pick under the LiDAR sensor assembly cable to separate it from the screen.

    • Exercise caution while separating this cable to avoid tearing it.

  32. VGfuNhEMxcroB4xg
    VGfuNhEMxcroB4xg
    AsuJUIn3GZloukMy
    • Continue to use the opening pick to separate the LiDAR cable from the screen.

  33. mXd4BRpPYDHPhlmK
    mXd4BRpPYDHPhlmK
    GmQWKJLxftKFwBlk
    • Some display replacements come without display cables attached. If this is the case, you will need to remove the display cables from your original display.

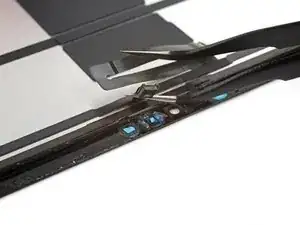
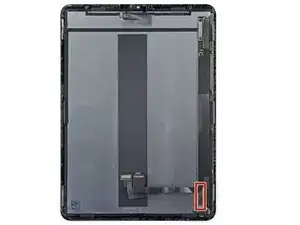
    • The bracket in the bottom right corner of the display is covering the display cable connectors.

  34. jvvp2OUfV4vClMuO
    jvvp2OUfV4vClMuO
    dtSksaHZLZLFeK6w
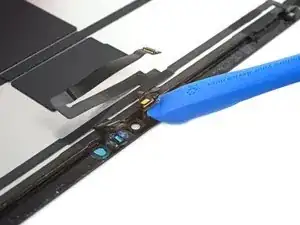
    • Use an opening pick to remove the small section of the upper display cable that is attached to the bracket.

  35. CAOqwsZPsWlexH5c
    CAOqwsZPsWlexH5c
    OqVvEkxfYwAyp5LN
    OBffM5eSt1YExBfQ
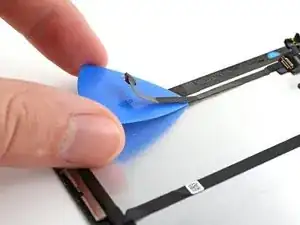
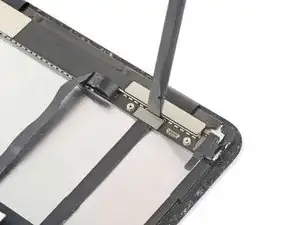
    • Use a Phillips screwdriver to remove the two 1.2mm screws scoring the display cable bracket.

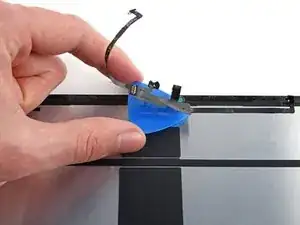
    • Using a pair of tweezers remove the lower display cable bracke.

  36. MxyCAmRAcvVkCylB
    MxyCAmRAcvVkCylB
    GwV5RqhQWVFSSdg2
    gLKmppuYewxpQrqr
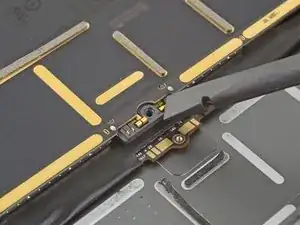
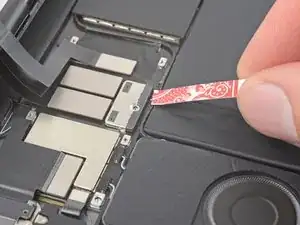
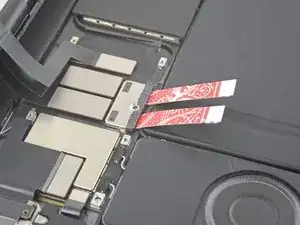
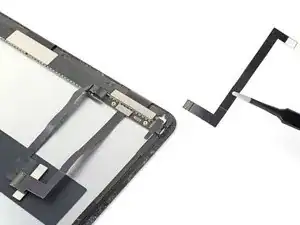
    • Using flat end of a spudger, pry up and disconnect the narrow display cable.

    • Set the cable aside to connect to your new display.

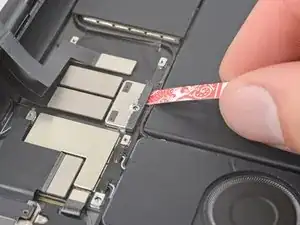
    • Repeat this process with the wider display cable.

Conclusion

To reassemble your device, follow these instructions in reverse order.

Luke

Member since: 24/07/19

992 Reputation

0 comments