Introduction

Your optical drive no longer works? Does it refuse to read CDs and DVDs? He grinds then ejects them all? All is not lost, all it takes is a little cleaning that won't cost you anything.

  1. jJhwSRnKSjThYh5y
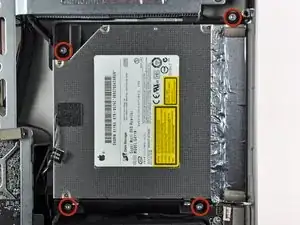
    • Remove the four T10 Torx screws securing the optical drive to the outer case.

    Is it possible to use the DVD drive after installing the SSD, or is there no space left?

    Joel -

    Yes, it is possible. The SSD fits below the dvd drive; it doesn't replace it

    Dan -

  2. DgBKVDwBG5aVgdNS
    • Pull the optical drive thermal sensor connector straight away from its socket on the logic board.

    This step is not necessary. I have problems with the pulling out, and found that it's not necessary to out it in this case.

    Steve -

    Agreed. Leave it plugged in and peel the buffer tape and temp sensor off the optical drive assembly while it's still in the computer.

    John Lavenia -

    What problems did you have?

    Toni Marmol -

    Don't do that! It's not necessary to pull the sensor cable out. And it cost me an hour to find out that it was this sensor cable and not the LCD sensor cable that made the fans spin at 3000+rpm. The less sensor cables you remove, the easier to find the culprit if you stumble into fan issues.

    bhager -

  3. GVsLm2KxXMKTOIUq
    GVsLm2KxXMKTOIUq
    awAqRpRHhQhBTtqU
    • Insert a spudger between the optical drive connector and the optical drive.

    • Twist the spudger to slightly separate the optical drive connector from the optical drive, then use your fingers to pull the connector away from the drive.

    Hello, is the sata & power cabla from the mac can directly feet inside the SSD?

    Roman Quenin -

    Can the superdrive connector cable (possibly just SATA and SATA power bundled) be used for SSD? I wanted to replace the superdrive completely with an SSD, and thus having in total 2 SSDs and one HDD inside the iMac. Thanks in advance.

    Krisna -

    There is another SATA connector on the back side of the logic board for an SSD.

    Neal Sofge -

  4. q53pwUVhpfY1CeWA
    • Lift the left edge of the optical drive slightly and pull it away from the right side of the outer case.

    • During reassembly, note that there are two holes in the optical drive face plate into which two stubby plastic posts must engage for proper positioning.

  5. dE4nQPWgXqdSpsWv
    dE4nQPWgXqdSpsWv
    tV6f3TwnOKxFCxr5
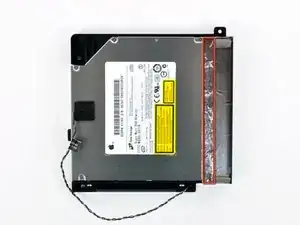
    • Peel back the portion of aluminum tape highlighted in red, leaving the rest attached to the black plastic optical drive bracket.

    • It is not necessary to peel all of the EMI tape off the optical drive bracket.

    Found it easier to remove the four screws in step 16, then rotate the drive out of the plastic frame so the tape acts as a hinge, making it easy to peel the tape. This also eliminates step 17 as the tabs vacate their slots as the drive is rotated.

    Dave Winn -

  6. lSdFTojIkwowSxkp
    lSdFTojIkwowSxkp
    LBaI1AmM1yu5nuqU
    • Remove the two T10 Torx screws from each side of the optical drive (four screws total).

  7. NGT2hAsrnpRNLtw1
    NGT2hAsrnpRNLtw1
    Tj4GoLBU3jIq53Cd
    SWY6pIaBoP1Zt5By
    • Use the tip of a spudger to press each of the optical drive bracket tabs out of their slots on the bottom of the optical drive.

    • Rotate the optical drive bracket slightly away from the optical drive.

    • Pull the optical drive bracket away from the open end of the optical drive, minding any tabs that may get caught.

  8. DNcdQiNmRCQR3QEZ
    DNcdQiNmRCQR3QEZ
    XWKQ6KLOhfECRUyQ
    • Use the tip of a spudger to peel back the piece of foam tape covering the optical drive thermal sensor.

    • Use the flat end of a spudger to carefully pry the thermal sensor up off the adhesive securing it to the optical drive.

    • If you have a disc or anything else stuck inside your optical drive, we have a guide to fix it.

    Do I have to reattach the optical drive thermal sensor to the SSD?

    Ignatius Lee -

    Yes, just stick it onto the SSD and cover it with the buffer. Better than leaving it loose in the computer, or worse omitting it altogether.

    John Lavenia -

    looks like you cracked the edge of that sensor :)

    Ivan Ivanov -

    Replacing an HDD was easy as PIE compared to this, the replacement Superdrive's holes did not line up the same way the original did. The original was a Sony drive, the replacement was made by H-L. But the shape was the same. By holding the bracket in place with my hand I was able to worm two screws in sideways until the pressure lined it up, then I was able to get the rest of the bracket screws back in. I had to do that while making sure the little tabs in the front of the drive were orientated properly - And not messing up the silver tape much. After that it was all relatively easy. The instructions were spot on and for the exact iMac (11,1) I was working on. The replacement Superdrive works perfectly despite the Brand change, I installed Bootcamp to make sure- It read and installed from my Windows 7 install DVD, NO Problem. I set the monitor screen in place without screwing it all back in just in case I had to open it back up again, not needed. Thank you SO much for your easily understood instructions.

    Jonny V -

    I had it easy with replacing dead optic drive in 2011 27" with a 2010 27" optic drive so did not even have to take the optic drive out of its holder. Now I have an internal dvd super drive again. Thank you ifixit.

    Michael -

    • Follow all super drive replacement steps for disassembly. Step 8 is absolutely unnecessary for the repair. Do not peel off the sensor from the optical drive.

    • Once the reader has been disassembled, all you have to do is unscrew the 5 small screws from the reader cover (the side where there are the labels). Remove the cover once the screws have been removed;

    • Plug in your vacuum cleaner and gently vacuum the entire interior, including the lens (beware of vacuum cleaners that are too powerful).

    • With a cotton swab previously dipped in rubbing alcohol, gently clean the lens.

    • reassemble the cover with the screws and reassemble everything.

    • Once everything is reassembled, start and cross your fingers. Usually it's just a dust issue.

    • Enjoy!!!

Conclusion

To reassemble your device, follow the instructions in reverse order.

Quentin Hindley

Member since: 08/02/19

73 Reputation

0 comments