Introduction

This guide is an internal private guide used as a prereq.

  1. jJhwSRnKSjThYh5y
    • Remove the four T10 Torx screws securing the optical drive to the outer case.

    Is it possible to use the DVD drive after installing the SSD, or is there no space left?

    Joel -

    Yes, it is possible. The SSD fits below the dvd drive; it doesn't replace it

    Dan -

  2. DgBKVDwBG5aVgdNS
    • Pull the optical drive thermal sensor connector straight away from its socket on the logic board.

    This step is not necessary. I have problems with the pulling out, and found that it's not necessary to out it in this case.

    Steve -

    Agreed. Leave it plugged in and peel the buffer tape and temp sensor off the optical drive assembly while it's still in the computer.

    John Lavenia -

    What problems did you have?

    Toni Marmol -

    Don't do that! It's not necessary to pull the sensor cable out. And it cost me an hour to find out that it was this sensor cable and not the LCD sensor cable that made the fans spin at 3000+rpm. The less sensor cables you remove, the easier to find the culprit if you stumble into fan issues.

    bhager -

  3. GVsLm2KxXMKTOIUq
    GVsLm2KxXMKTOIUq
    awAqRpRHhQhBTtqU
    • Insert a spudger between the optical drive connector and the optical drive.

    • Twist the spudger to slightly separate the optical drive connector from the optical drive, then use your fingers to pull the connector away from the drive.

    Hello, is the sata & power cabla from the mac can directly feet inside the SSD?

    Roman Quenin -

    Can the superdrive connector cable (possibly just SATA and SATA power bundled) be used for SSD? I wanted to replace the superdrive completely with an SSD, and thus having in total 2 SSDs and one HDD inside the iMac. Thanks in advance.

    Krisna -

    There is another SATA connector on the back side of the logic board for an SSD.

    Neal Sofge -

  4. q53pwUVhpfY1CeWA
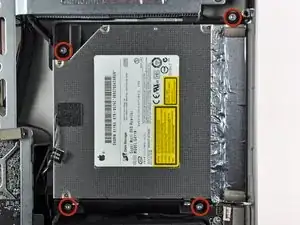
    • Lift the left edge of the optical drive slightly and pull it away from the right side of the outer case.

    • During reassembly, note that there are two holes in the optical drive face plate into which two stubby plastic posts must engage for proper positioning.

Conclusion

To reassemble your device, follow these instructions in reverse order.

Walter Galan

694047 Reputation

0 comments