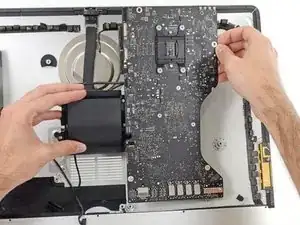
Introduction

Prereq only.

  1. bpUJduIptxtCQTrJ
    bpUJduIptxtCQTrJ
    NY3U2MjTCPHSNjfv
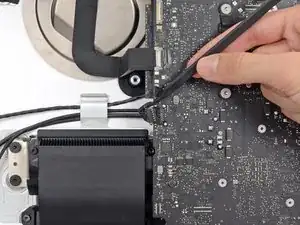
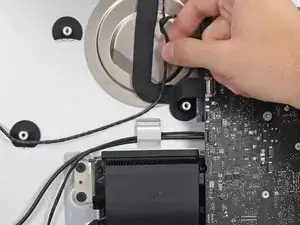
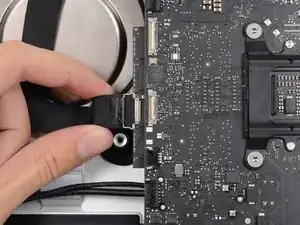
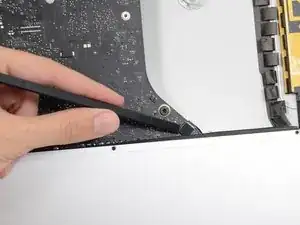
    • Push on each side of the left speaker cable connector with the tip of a spudger and gently "walk" it out of its socket.

    As noted in the right speaker cable section, the two corners of the connector are latches that need to be pushed toward the center of the connector to release. This is easily done with the pointed end of the spudger. Once the two corner latches are released, the connector comes apart easily.

    Fred Heineman -

  2. nIBOyJbEX5Sl4Or2
    nIBOyJbEX5Sl4Or2
    pAPeO3l2vihSiYDM
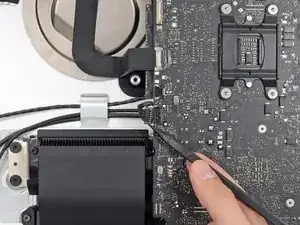
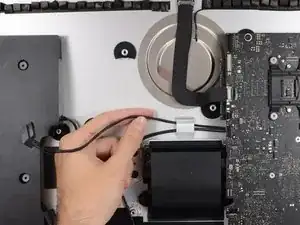
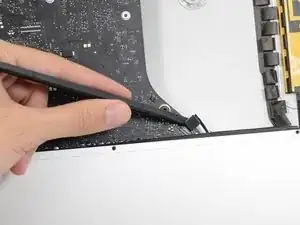
    • De-route the left speaker cable by pulling it straight up out of the retaining clip in the back of the rear enclosure.

  3. aPduYkOrm1ijEuIm
    aPduYkOrm1ijEuIm
    J3l5W2gyvQbjlT4W
    nPMIkqvYZHIUCEXb
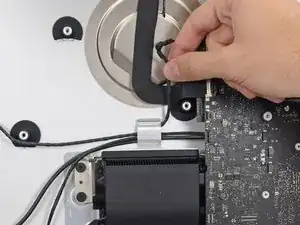
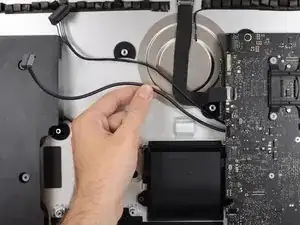
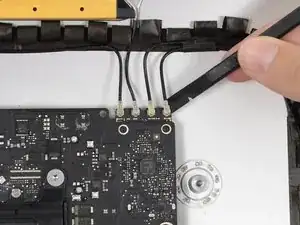
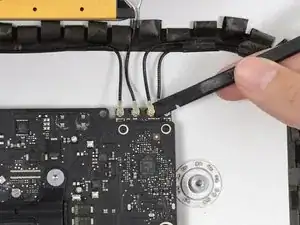
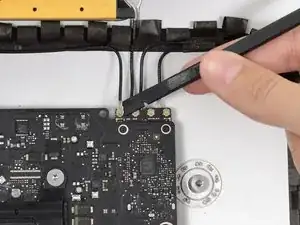
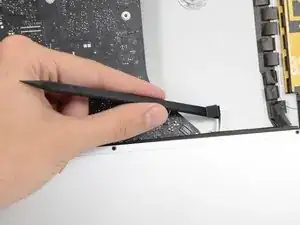
    • In a similar fashion as the previous step, de-route the SATA data and power cables up out of the retaining clip.

  4. Oi1uPFeAgU4d4B1V
    Oi1uPFeAgU4d4B1V
    UQYT31FILKH2XlFo
    deVi3sgpTG6ko3ev
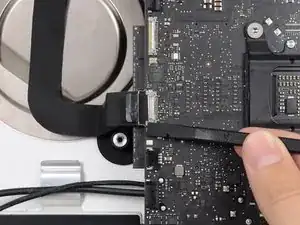
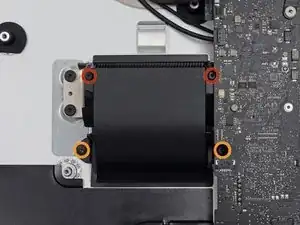
    • Use the flat edge of a spudger to flip up the metal retaining bracket on the iSight camera cable connector.

    • Pull the iSight camera cable straight out of its socket on the logic board.

    • This is a delicate connector that can be easily damaged.

    As seen in the photo this clip clearly has a pull tab. Forget the spudger and just open the clip with the pull tab.

    airshack -

  5. ChWlT2nybGpoDtrw
    ChWlT2nybGpoDtrw
    2LQdOvIdwuPacACY
    52lBdh3y1pIxgFri
    • Use the flat edge of a spudger to disconnect each of the four antenna connectors from the AirPort/Bluetooth card.

    • Note the original positions for each connector when reconnecting the cables.

    I broke off one of the antenna connectors when I took off the antenna wires, but the new 802.11ac card is working:) I seems the way to take off the wires is lifting it up from the wire side. In hindsight I just wasn´t careful enough.

    Runar Vaernes -

    how do I check a working logic board

    Navneet Garg -

    I labeled mine with label printer labels prior to disconnection.

    airshack -

    I labeled mine with label printer labels prior to disconnection. The label/tabs made reinstalling easier as I held onto the label/tabs while pressing down on the connectors. Much easier than holding onto the physical wires.

    airshack -

    If you have a pair of angled tweezers, they work well for grabbing under the connector so that you aren’t pulling on the wire. The head of the T10 screwdriver works well for pressing them back on.

    Mitchell Scheffler -

    iMac 2017 EMC 3069 this has the antenna brackets with two T5

    Glenn Koslowsky -

  6. vB6hEWFiH4WTjcfY
    • If brackets secure the four antenna cables, remove the two T5 Torx screws from the brackets.

  7. PVF2eFHOcWUlH6ov
    PVF2eFHOcWUlH6ov
    qbxXCqIthxynZ525
    tjH4h6FyAyucQGqX
    • Use the flat edge of a spudger to pry the headphone jack cable connector from its socket on the logic board.

    • Push the cable slightly to the right.

    Unlike the rest of the connectors on the logic board, this one lifts up away from the board rather than to the side. That “Push the cable slightly to the right.” notation is after the connector is free.

    Fred Heineman -

  8. QJIoRvsnlHELAikU
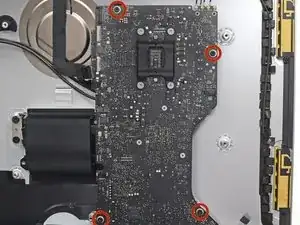
    • Remove the following screws securing the exhaust duct to the rear enclosure:

    • Two 6.3 mm T8 screws

    • Two 4.7 mm T8 screws

    Weirdly, these screws didn’t work with my T8 driver. Not with T6 or T10.

    Every other screw (to this point) has been fine. Hmm.

    Jake Lodwick -

    ??? The T8 worked fine for me. Not sure what the difference would be.

    Fred Heineman -

    Fare molta attenzione alla vite in fondo a destra, è facile (soprattutto se la punta del proprio cacciavite non è magnetizzata) che la vite si perda sotto alla Logic board. Se la punta del cacciavite non è magnetizzata consiglio o di utilizzare un magnete esterno o di utilizzare delle pinze mentre si svita la vite in modo da non incorrere in questo problema.

    Carlo Molta -

  9. vTFjxoQJVL1LjsGU
    • Remove the four 7.2 mm T10 screws securing the logic board to the rear enclosure.

    • Depending on the age and model of your iMac, a T9 driver may work best.

    When reinstalling the logic board, install four screws loose. Insert thumb drives into the back in all slots to ensure alignment. Once aligned, then tighten screws.

    Gary Kelch -

    On some models there is a tiny microphone cable connector, just above the lower left logic board screw. Remove by carefully pulling straight down. There is also a piece of insulating plastic w/adhesive on top of the screw which can be pulled off prior to removal. Save and reuse with the same screw on installation.

    Ed Beachwood -

  10. CbhcbTbVVbCDOdVR
    CbhcbTbVVbCDOdVR
    3ZWTvdymBERwUaSS
    kWgY5CCYya3SJRcj
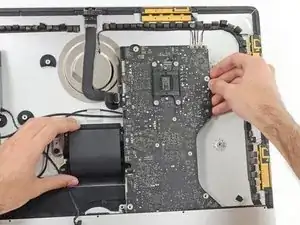
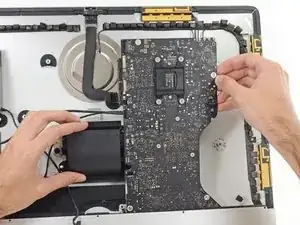
    • Tilt the top of the logic board away from the rear enclosure.

    • Lift the logic board straight up and out of the iMac.

    • Be careful not to snag the board on any of the rear case's screw posts.

    • The I/O boards at the bottom of the logic board will be the greatest challenge. It is recommended to pull gently to avoid any damage.

    • During reassembly of the logic board, pay attention to the position of the I/O connectors. When the board is back in the case, insert a USB or Thunderbolt cable into one of the connectors to align it perfectly.

    When inserting the logic board back, pay attention of the position of the I/O connectors. When it is back in place, put a USB / Thunderbolt cable into the connectors to ensure the perfect alignment.

    Peter -

    This is fantastic advice. I used a combination of USB and display port plugs to ensure proper alignment and help keep the logic board steady while i screwed it back in. Thank you!!

    kazoodac -

    Great technique. I plugged a cable into every port before tightening logic board screws.

    airshack -

    ive gotten this far and i still have one question, i’m replacing my HDD With A SSD should i also remove the original Blade drive ? and run exclusively off the ssd, ? i wasn’t 100 on whether or not i was getting the fusion set up so i’m not in possession of a upgraded blade, so i though this was a good question id hadn’t seen asked.

    Eliasar -

Conclusion

To reassemble your device, follow these instructions in reverse order.

Sam Goldheart

Member since: 19/10/12

465329 Reputation

0 comments