Introduction

Follow this guide to upgrade your iMac's hard drive with an SSD using an updated 2.5” to 3.5” metal enclosure. The guide includes steps to install the temperature sensor so that the Mac's fans will operate at the correct speed.

This is a prerequisite only guide and should not be used alone. This guide is a part of the iMac HDD replacement guides.

  1. HKQbp12ZISQhNfAv
    HKQbp12ZISQhNfAv
    C535jLFwdCXbrulv
    wDWxsjpZCDD5vCjk
    • Follow the next steps if you are replacing your hard drive with an SSD kit.

    • If your SSD enclosure looks like the first image, follow this guide instead.

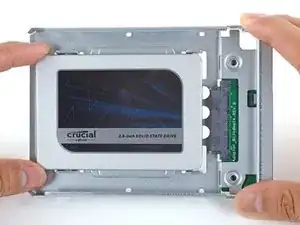
    • Line up the SSD connectors with the metal enclosure's sockets.

    • Press the drive against the enclosure sockets until the SSD is firmly seated.

    • The SSD connects with the enclosure in only one direction. If the connectors don't line up, rotate the SSD and try again.

    In my 21.5 “ imac, there simply isnt enough room to use the plastic ssd enclosure in photo 1 if you want to screw back into the bracket as instructions advise you to do. When trying to put the screen back onto the Imac, it just wouldnt fit. So basically i did not screw in the ssd enclosure fully with the bracket, there is still room for the ssd enclosure and for all of the connections and temperature sensor if you dont screw in the bracket.

    Computer is running fine after a month or so, but i image if we end up moving the imac we should be very careful not to shakeup the SSD too much.

    jacob d -

    scusate, sbalgio o manca un passaggio? mi riferisco alla rimozione del 'coperchio' metallico, quello dove c'è l'adesivo con le caratteristiche dell'hd, data di fabbricazione, capienza etc...

    Armando Palermo -

    Ciao @armandopalermo, scusami, non capisco bene la tuo domanda. Vuoi sapere cosa fare con la schiuma EMI (un passo sopra) o con l'adesivo del sensore di temperatura (2 passi dopo)?

    Claire Miesch -

  2. FtBOnUuDYZJTjvey
    FtBOnUuDYZJTjvey
    RvVXsqFVNCWuybvj
    UmyFUVECjaDZNRjp
    • Use a Phillips screwdriver to install the four silver screws (two on each side) along the edges of the SSD to secure it to the enclosure.

  3. HU4PFgCWjYNkrIi4
    HU4PFgCWjYNkrIi4
    gWGSmdLLDiJOASYW
    • Plug the included sensor-enabled SATA power cable into the enclosure's port.

    • The cable is keyed to connect in only one orientation. If you can't connect the cable, rotate it 180° and try again.

  4. nFPHEiNHZQZIIWir
    nFPHEiNHZQZIIWir
    25p6UPH1X2Hpm1ut
    kZJrQ2FKFMAo4eGZ
    • Peel the white liner off the back of the small temperature sensor board in order to expose the adhesive.

    • Adhere the temperature sensor board to an exposed, metal surface of the SSD, close to the SATA connector.

    • Fold the excess temperature sensor wires so that they are out of the way while you install the enclosure.

    I don’t remember these instructions including advice to first install MacOS onto the new SSD hard drive. If you don’t first install MacOS on the SSD before installing it, you will then need to use a different computer to create a bootable USB thumbdrive with MacOS installed on it, which is not as easy as it sounds as you have to format the USB correctly, and then download the OS which can take a while if your internet connection isnt great.

    jacob d -

  5. TB3g2BfZthZmgZof
    TB3g2BfZthZmgZof
    UZXpLNW61PfcoLXO
    • Use a T8 driver to install the mounting pins from the old hard drive onto the sides of the enclosure.

    Hallo. Will meine originale HDD wieder einbauen. Wo finde ich hier den Temperatursensor?

    MichaelRom -

  6. Aq2vsCxhf2S3qufG
    Aq2vsCxhf2S3qufG
    6HieMRWYI2Pgc2Yn
    • Attach any mounting brackets removed from the old hard drive onto the enclosure.

  7. ciVrfTP4LtNtlEV3
    ciVrfTP4LtNtlEV3
    QDKoTyhGQj1clwQP
    • Connect the iMac's SATA power cable to the other end of the new sensor-enabled SATA cable.

  8. CWAiJZexabkmRKlw
    CWAiJZexabkmRKlw
    UXFeucvE5hqbSPEU
    • Connect the iMac's SATA data cable to the enclosure.

  9. YJqasivdZRKDWMjy
    YJqasivdZRKDWMjy
    FI6EqbMtmSvAcIM6
    DpsoNu5h3obcGm6g
    • The images used in this step come from a 2017 iMac. Your cables may look slightly different, but the procedure remains the same.

    • Slide the SSD enclosure into the space previously occupied by the hard drive.

    • Route the SATA cables so that they will not interfere with any other components.

    • Try to keep the cables free from any sharp bends, and route them such that they are not pinched.

    I’m stuck on the last stage. In my 2011 21.5” EMC 2428, Model A1311, I simply can’t figure out how to get the new enclosure back in position to fasten it down. The new sensor cable interferes with the reinstallation. I don’t see adequate pictures above to see how to solve the problem, other than by just letting the new enclosure sit loose in the general area, which doesn’t seem ideal. Suggestions?

    David Hercher -

    Hi David,

    The sensor cable is pretty rigid, which makes it difficult to maneuver the enclosure into place. You may need to make some tight turns on the cable. You can also try running without the sensor cable and see if the fans will work adequately without it.

    Arthur Shi -

    If using a SSD adapter as replacement, does the EMI foam from step 15 go on the bottom of the SSD adapter?

    jim -

    It is a bit disorienting that the photos change from a 2011 to a 2017 model. Also the EMI foam seems to have gone missing in this instructions

    Gregory Robben -

Conclusion

To reassemble your device, follow these instructions in reverse order.
Arthur Shi

Member since: 03/01/18

248651 Reputation

0 comments