Introduction

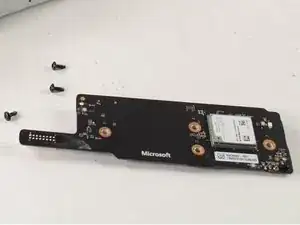
This is the wireless connection for the Xbox controllers and Headsets with the Xbox Series One S. You'll notice it has a Wifi mac address. Headsets and controllers disconnecting is a symptom of this card having issues. It's possible removing the card, cleaning the contacts, and reseating will return the card to normal behavior before ordering a replacement.

If your Xbox One S is not picking up motion signals when playing certain games follow this guide to replace your IR blaster. Make sure to check that you are within line of sight of the front of the Xbox One S and there is no barrier between the user and the device.

  1. AQtIBB1ZGqHTvNg4
    • Flip the Xbox One S so that the bottom of the case is facing upward.

  2. cI432T5plYCpwsEg
    • Begin by working at the case on the rear where the warranty sticker is located. Insert the plastic opening tool into the gap between the bottom of the case and the grated top side. Then find the clips in between that hold the case in place. Use the opening tool to pop the clips out. The best method is to pry the black case away from the bottom.

    • Use the opening tool to pop the clips out. The best method is to pry the black case away from the bottom.

    • You will hear clicking sounds when you are prying the case open. It may be fairly difficult to remove the bottom.

    • It's possible that the clips may break when you remove the bottom from the case.

    • We recommend starting at the back where the warranty sticker is located. Pry along the rear edge until all clips are free. From there do each side. When three sides are free start at the end of the front opposite the sync button. Be cautious and take your time and all should separate without any damage.

    Be careful not to damage the pairing button on this part

    David -

    Important!!

    You've to start from the back corner where is the information label, because there is a main clip behind a warranty sticker

    Cristian Ramirez -

    They should add this to the guide! I didnt know that, and did some minor damage to the bottom piece where that main clip is.

    I dont mind because it's my own Xbox, but what if it belonged to a customer?

    Charles Jackson -

    They should add this to the guide! I didnt know that, and did some minor damage to the bottom piece where that main clip is.

    I dont mind because it's my own Xbox, but what if it belonged to a customer?

    💯% same opinion!

    profnussecke42o -

    This was hard! I tried using plastic pry tools, but they did not work. A metal tool did, but make sure to watch a video or two, to see what you actually are dealing with. After the videos it went quite smoothly.

    Peterdk -

    I legitimately cannot open the case where the warranty sticker is, ive tried everything, im resorting to a fork to try and open this

    Sohail ツShah -

  3. DGFtVxEdoZKRdLMd
    • Once all of the clips are opened, remove the bottom part of the case.

  4. GeIOPswgPOYsuGeJ
    GeIOPswgPOYsuGeJ
    uITOYPJDbxUgf4Lc
    • Use a T10 Torx screwdriver to remove the six green 50 mm long screws from the metal case labeled F1 through F6.

    My F3 isn't coming out. The screwdriver isn't sitting tight like it is for the other ones. Any idea on how to fix that?

    ben mccord -

  5. 3AbSAfsoTxUrMeTi
    3AbSAfsoTxUrMeTi
    wudY36aHJeyT6WjV
    • Gently separate the interior case from the white exterior case using the appropriate method.

    • Pry the white plastic sides outwards at the rear to separate from the plastic I/O shield

    Essential tip: be sure to slide the metal housing backward, away from the from of the case as pictured above, rather than upward. If not, you can easily break off the teeny momentary switches on the IR blaster board!

    Mark Ross -

    “appropriate method is not descriptive like Mr. Ross’s comment. The original poster should edit the description to ensure people do in fact remove the box from the case appropriately. I would also add arrows to the picture.

    Ryan A -

    ____________⬆️

    ↖️Yes! I see it the same way!↗️

    ⬅️Arrows are always a good thing!➡️

    ↙️Can't do anything wrong with them! ↘️

    ____________⬇️

    😅😅

    profnussecke42o -

    I didn't realize that metal ribbon was connecting the case to the console and I yanked it w out realizing it was there. How o I get a replacement?

    Jerianna Mike -

  6. DvGTCQDMjlaiQ4UL
    • The IR blaster can be identified on one of the sides of the interior case. It will be next to the disc drive and near the fan.

  7. CsUuXCSVUxuemELY
    • Use a Torx T8 screwdriver to remove the four 15 mm screws with orange circles around them.

    • Gently pull the IR blaster off the case.

Conclusion

To reassemble your device, follow these instructions in reverse order.

Christopher Chen

Member since: 26/04/17

621 Reputation

2 comments

When the board gets replaced does the power light still function normally? I just replaced one because a power button failed and while the new switches work the indicator lights will not power on

Brandon Shrader -

Question. What's size and type of button does this board use? I have one with the eject and sync button sheered off.
Frank urmom -