Introduction

If you want to replace the hard drive with one that has a larger capacity, this guide will teach you how to replace the hard drive step by step.

  1. AQtIBB1ZGqHTvNg4
    • Flip the Xbox One S so that the bottom of the case is facing upward.

  2. cI432T5plYCpwsEg
    • Begin by working at the case on the rear where the warranty sticker is located. Insert the plastic opening tool into the gap between the bottom of the case and the grated top side. Then find the clips in between that hold the case in place. Use the opening tool to pop the clips out. The best method is to pry the black case away from the bottom.

    • Use the opening tool to pop the clips out. The best method is to pry the black case away from the bottom.

    • You will hear clicking sounds when you are prying the case open. It may be fairly difficult to remove the bottom.

    • It's possible that the clips may break when you remove the bottom from the case.

    • We recommend starting at the back where the warranty sticker is located. Pry along the rear edge until all clips are free. From there do each side. When three sides are free start at the end of the front opposite the sync button. Be cautious and take your time and all should separate without any damage.

    Be careful not to damage the pairing button on this part

    David -

    Important!!

    You've to start from the back corner where is the information label, because there is a main clip behind a warranty sticker

    Cristian Ramirez -

    They should add this to the guide! I didnt know that, and did some minor damage to the bottom piece where that main clip is.

    I dont mind because it's my own Xbox, but what if it belonged to a customer?

    Charles Jackson -

    They should add this to the guide! I didnt know that, and did some minor damage to the bottom piece where that main clip is.

    I dont mind because it's my own Xbox, but what if it belonged to a customer?

    💯% same opinion!

    profnussecke42o -

    This was hard! I tried using plastic pry tools, but they did not work. A metal tool did, but make sure to watch a video or two, to see what you actually are dealing with. After the videos it went quite smoothly.

    Peterdk -

    I legitimately cannot open the case where the warranty sticker is, ive tried everything, im resorting to a fork to try and open this

    Sohail ツShah -

  3. DGFtVxEdoZKRdLMd
    • Once all of the clips are opened, remove the bottom part of the case.

  4. GeIOPswgPOYsuGeJ
    GeIOPswgPOYsuGeJ
    uITOYPJDbxUgf4Lc
    • Use a T10 Torx screwdriver to remove the six green 50 mm long screws from the metal case labeled F1 through F6.

    My F3 isn't coming out. The screwdriver isn't sitting tight like it is for the other ones. Any idea on how to fix that?

    ben mccord -

  5. 3AbSAfsoTxUrMeTi
    3AbSAfsoTxUrMeTi
    wudY36aHJeyT6WjV
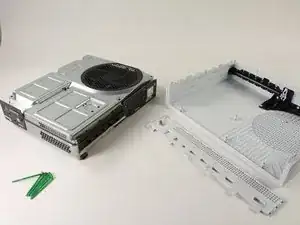
    • Gently separate the interior case from the white exterior case using the appropriate method.

    • Pry the white plastic sides outwards at the rear to separate from the plastic I/O shield

    Essential tip: be sure to slide the metal housing backward, away from the from of the case as pictured above, rather than upward. If not, you can easily break off the teeny momentary switches on the IR blaster board!

    Mark Ross -

    “appropriate method is not descriptive like Mr. Ross’s comment. The original poster should edit the description to ensure people do in fact remove the box from the case appropriately. I would also add arrows to the picture.

    Ryan A -

    ____________⬆️

    ↖️Yes! I see it the same way!↗️

    ⬅️Arrows are always a good thing!➡️

    ↙️Can't do anything wrong with them! ↘️

    ____________⬇️

    😅😅

    profnussecke42o -

    I didn't realize that metal ribbon was connecting the case to the console and I yanked it w out realizing it was there. How o I get a replacement?

    Jerianna Mike -

  6. IIrck1QmH5CfYc1k
    • Flip the interior case so it is fan side upward.

  7. 4PBmHOYGGLW51Ecb
    • To access the hardware within the casing, you can pop and lift the top panel of the casing. It should come right off.

  8. EFLSsRhhXsAEZnYh
    EFLSsRhhXsAEZnYh
    OjVWJsD26pdrus24
    • To replace the hard drive, flip over the console and remove the two 10 mm T-10 Torx screws, C3 and C5, from the backside of the Xbox One S.

    • Some models may require C4 and C5.

    • This will allow the plastic casing surrounding the hard drive to become detached from the rest of the console.

    Some of my silver were gold screws, so just letting people know to look out for that!

    jovialkitten -

    The Torx screw circled on the left is actually C5

    Jaryn Wickman -

    I found the same. On my Xbox One S, it's C3 and C5 that hold in the hard drive caddy. C4 holds in the optical disk caddy.

    jamesr -

    Yeah, C3 and C5 on my console too.

    Jahn Roux -

    Funny thing on my console rev t t3 built feb 2018 it’s C4 and C5

    KingofRome -

    The instructions fail to mention that the top metal cover can be lifted off at this point without undoing any more screws.

    CityZ -

  9. X2IJJg3NqtsnAcbY
    X2IJJg3NqtsnAcbY
    NAHJXCj1SgvQNjOx
    3fEHBmUuTGRL3omb
    • Gently disconnect the hard drive from the motherboard (at the two plastic connector bodies).

    Do not disconnect the connector in the second image! There are tiny prongs that bend easily and if bent just a tad bit they will break off. I had first hand experience with this and I ended up breaking my Xbox because I could not put that cable back on.

    [deleted] -

    Do not remove the cable!!!! You can change while the cables are plugged. It took 2 hours trying to put mm precisely all the little pins because of the removal of the cables.

    Please update the post, I could easily end up as the Aaron, breaking the XBOX completly.

    Botond Kopacz -

    Yes, this has also happened to me the connectors had broken and the pins bent and snapped off.

    Samuel Garbutt -

  10. yweA6WNjkTivqF6H
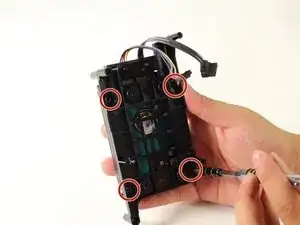
    • Remove the four black 10mm T10 Torx screws from the black plastic mount.

  11. Q2XSiAcmeTXNDWKc
    Q2XSiAcmeTXNDWKc
    fmV1xesqQUpDylqn
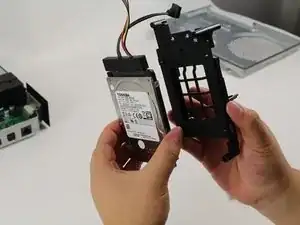
    • Detach the black plastic mount and the wires from the hard drive.

    • Now that your hard drive is removed, you can replace it and reassemble your Xbox One S following this guide in the reverse order.

    do you need to download anything on the hdd before you put it in or can you just put it straight in

    Jamie Amor -

    I really wish there was an answer to this question. Im also wondering

    Steven Estep -

    Yes to do that follow the Gide on the Xbox one s repair Gide.

    Seani M -

    You will need to copy the is or use a sub device with the is on it if you plug in the new had it should show you what you need to do

    Ahmad Bilal -

    Well they have a full Gide on the Xbox one s repair page

    Seani M -

Conclusion

To reassemble your device, follow these instructions in reverse order.

Andrew

Member since: 26/04/17

5144 Reputation

14 comments

Just swapping like this, will the xbox automatically install the os and drivers or do you need to download them with a computer prior to installation?

James Pedigo -

The drive requires formatting and some moderate configuration with a windows 10 PC prior to installation. I just installed a 500Gb SSD in my console yesterday. I will be creating a detailed guide soon.

MervDervis -

Just finished this guide for installing the firmware.

Install firmware on Xbox One S

KimJongIan -

Following this guide to upgrade the 500GB HDD to a 2TB SHDD worked just fine. You'll need to download some script to be able to format the larger HDDs to be able to access the larger available space on the Xbox - YouTube is your friend here.

Reinstalling the OS seemed to be simple enough. Until you realise that the bootanim file is missing. Taking out the HDD is required to put this file on via Windows.

Until Microsoft release a new update, of which the console was unable to update via internet. So I reverted to use a USB flash drive to perform an offline update, which was successful. BUT… the bootanim is again rendered missing. Not too sure if I fancy repeating the tear down again and again after every update. Doubt the clips of the underside of the console can handle such a beating…

David T -

Thank you for adding this. I wan unsure what the next process was but I found it on YouTube.

William Mills -

What is the max internal drive capacity of the XB one S?

l azu -

Missing the most important part! Installing the Xbox OS on the hard drive

Richard Cruz -

Step 5 (removing the port cover) is unnecessary. The drive slides right out and back in with the port cover in place.

Tom Maynard -

how much will it be if i give yall a brand new hardrive and yall script ad dowload the files for a xbox one s?

cody -

I was able to get the software on the drive using the offline update tool from the Microsoft website. It installed on the Xbox using a USB drive.

Chris Turgeon -

How u do the USB

jamesrandolph886 -

I saw a post on redit that said that running scripts to format the drive before installation are no longer required, anyone know if this is true?

Nick Scholefield -

I can confirm this works. I JUST did this today, with a 2TB hard drive I got for amazon. I got it for the PS4 but realized I had more xbox games I wanted to store. I didn't format the drive on windows first, I just swapped the hard drive for the old one immediately, used an 8GB thumb drive with the offline OS update - from here: https://support.xbox.com/en-US/help/hard... - and it worked! When you turn on your XBox with the new drive you will get an error code. Click the second option to troubleshoot with update(says something like that) then with your USB in your xbox do an 'offline update'. Your xbox will restart several times and it will work like a brand new xbox.

Christian Shaw -