Introduction
by the end of the guide you will have replaced your power supply
Tools
Parts
-
-
Procurement of a suitable commercially available power pack.
-
Type GST120A24R7B
-
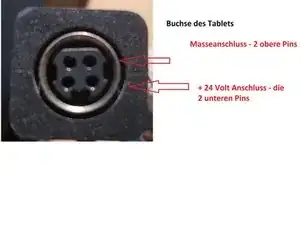
R7B is important as this is the only connector that fits the Wacom tablet. (Connector type KYCON KPPX-4).
-
Performance data 120W, 24 volts
-
The power pack opens. To do this, the four rubber plugs are removed and the four screws are removed with a Phillips screwdriver. The housing can then be easily removed.
-
The 24V side has four wires: black, blue, red and white. These are soldered and can be removed.
-
The black and blue wire is soldered to the minus output (V-). The red and white wire is soldered to the 24V (V+) output. Note: The black wire is connected to the metal body of the plug.
-
The power supply will reassemble and can now be connected to the Wacom Tablet.
-
-
-
Test: According to the assignment in the picture, after resoldering the lines, the ground line must be on the upper 2 pins and the +24V voltage on the lower 2 pins
-
Work the steps in reverse order to reassemble your device.
