Introduction

This guide shows the step by step process of how to disassemble a TI-89 Titanium calculator in order to replace the power button. This guide may also be followed in order to replace any of the other buttons on the calculator. This process requires few tools and should only take thirty minutes. Please be careful during the disassembly to not damage the internals of the calculator.

  1. gYgSxol3yYobVLqI
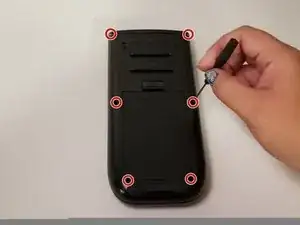
    • Remove the six T6 screws from the back of the calculator.

  2. vjOWZ2ac1nEld3XI
    • Remove the battery cover.

  3. kHGYLK41BVGDEUas
    • Unscrew the Phillips screw on the internal battery cover.

  4. qbhZYYa1M5UHpCJL
    • Using a spudger or similar prying tool carefully pop the back of the calculator off.

  5. jJKK3FI4ojtfwCir
    • Remove the back of the calculator.

  6. ROutnCvLwqFamQaT
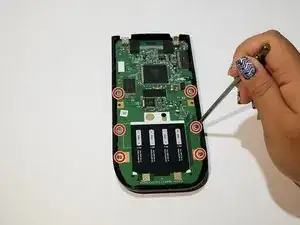
    • Remove the six Phillips head screws from the circuit board.

    Mine also had a aluminum shielding. No particular impact on the repair. ust removed it by unscrewing two lower screws.

    Martin Olsson -

  7. Dvi6ZMCCXwVVtqiF
    • Remove the circuit board and the attached display screen. Make sure not to damage the circuit board.

    It would be great if you always included a high res photo of the circuit board of both sides. I don’t usually repair my products, but I come to iFixit often to know what the inside of my devices looks like.

    rtourn -

  8. OeBTAsecefRgVoVD
    • Peel back the rubber grommet sheet.

    • Make sure that the buttons remain attached the the rubber grommet as you remove it.

  9. ODatvKKP3PKNeCJj
    • Remove and replace the On button.

Conclusion

To reassemble your device, follow these instructions in reverse order.

Dan Stahl

Member since: 01/10/17

156 Reputation

One comment

Thank you, fixed my sticky keys / juice spill damage.

Martin Olsson -