Introduction
I created this guide out of irritation for not being able to receive support from shark for what's a fairly simple mechanical error. While I was unable to perform a full teardown of the vacuum cleaner, in the images, you can nearly get there. (This guide was written primarily so that someone in this situation has at least something, and it's just not an exceptionally well-written guide, but at least someone knows it's possible. So a lot of times, you need to have the vacuum by your side to reference and see what I'm saying)
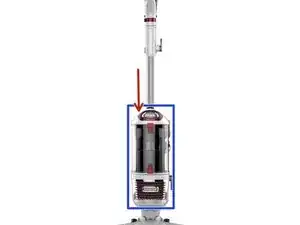
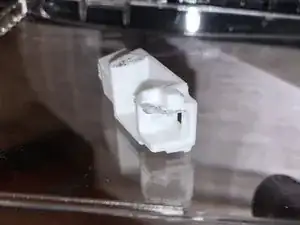
The problem is strange. The lift-away button actuates a long plastic arm with a hook on the end which when it goes down, it pushes a spring-loaded 'jammer' which is supposed to get the hook stuck. So then when it's stuck, the vaccum doesn't lift away and become to parts. But in my case, for some reason, the lift-away button became jammed and would never pop back up. The vacuum would then easily separate from the roller (bottom portion of the vacuum) and could always be lifted off. If I looked up the tube of the vacuum, from where it connects to the roller, I could see a small white triangular bump that helps to connect the roller to the bottom half of the vacuum. But this thing (triangle) was stuck too and pressing it didn't do anything.
Opening up the vacuum allowed me to 1. Simply just grab the lift-away plastic arm and move it back and 2. Make some really simple changes to this small plastic mechanism that got pushed by the lift-away arm.
This guide is not a complete guide as I only intended to take what pictures I could while it was convenient for me to do so. Use this as reference.
I show you how to tear down all the way to the place which the jamming may occur. I was not able to figure out how to open the vacuum all the way up from the bottom to the buttons on top (power button, lift-away button, "remove wand" button.)
The most significant change made here is a modification to a small piece of plastic which locks the lift-away button in place, which can be done without the recommended soldering iron. Hopefully it's enough.
I wrote this kit in case someone else has to deal with the same dumb problem. Not to write a good guide. This is so you can at least know what's going on if you have the same problem.
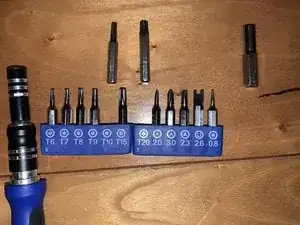
This guide does not fully account for the # of screws which you will need to remove. There are, however, only two types of screws which you will need to deal with: Torx T10 and T20.
If you haven't already, you should get a full 'computer repair kit'. These kits are very good comprehensive kits that will ensure that you will be able to deal with absolutely any teardown that you'll ever need to do at home. They're not just for computers. They are simply incredibly comprehensive. Think of their cost (20-70$) as a once-in-a-lifetime purchase requirement to never have to worry about teardowns ever again.
-
-
We will remove the wand, detach the body from the base.
-
For the teardown, we'll need the Torx T10 and T20. There are TWO screws at the bottom of vacuum cleaner that need a very long and thin reach. Somehow you will need something that can let you reach in. In the image with the screws, I used an extender that you can see is raised above and to the right. (The screwdriver handle was too thick.)
-
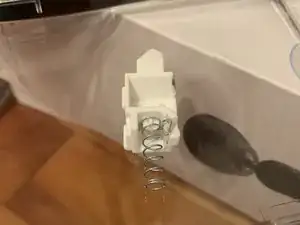
The image of the spring-loaded plastic thing is what we'll be modifying.
-
-
-
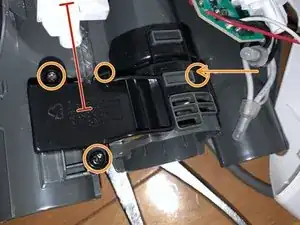
This is the panel that covers the small plastic item and the lift-away arm. Arm marked with red. Picture doesn't show every screw.
-
After opening the panel, be CAREFUL about removing the spring loaded plastic thing. 'cause it will jump and maybe get lost.
-
-
-
This is the complicated part. Let me explain why this modification was made: I couldn't figure out how to open the thing all the way up to the buttons. I could feel that most of the friction happened up by the lift-away button and NOT here with this thing.
-
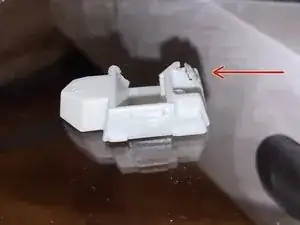
However, this white plastic thing can also push the lift-away's actuation arm if you push hard enough from inside the tube. So I decided to just modify this plastic thing. Try this: Put this thing and the spring back in there (don't put the cover back on) and press on the bump from inside the vaccum cleaner's dirty tube.
-
You can see that it CAN push the actuation arm. (Don't let it bounce out when you push on it) I'm hoping that by making it so that this thingy can push against the actuation arm even harder, it will dislodge the actuation arm next time it gets stuck.
-
-
-
Anything can get this done. I chose to use a hot object. If you can find something else to get the job done, that works too.
-
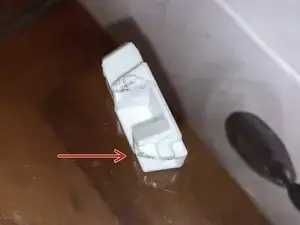
The red arrow points to an area which gets bumped against a solid object and PREVENTS this thing from hitting the actuation arm. I decided to burn it down with a soldering iron. You can find any other hot substitues. A hot spoon? Hot knife? Open flame?
-
IF YOU CHOOSE TO MELT IT DOWN WITH A SOLDER LIKE I DID, do this under the kitchen fan. YOU WILL BE INHALING PLASTIC VAPOR IF YOU DO NOT. OR do this outside with wind.
-
You can also use a knife or scissors or nail file but this is truly clumsy. Or whatever other ideas you have.
-
-
-
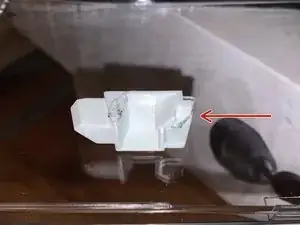
For whatever retarded reason, Ifixit doesn't let me use one image twice. But in short, this time look at the left lip/edge, indicated with a blue arrow. You see it's a bit bumpy.
-
I tried to add another 0.5mm of distance on the lip so it could push against the arm if it is depressed from the direction of the green arrow.
-
You do not need a solder.. if you can find a different way to make the left side a bit more raised then go ahead! Even stacking tape on the lip could work. It just might fall off after a while?
-
But if you use a solder, or heated metal object, again, be careful and do it outside or under the kitchen fan.
-
I did this by sort of brushing the plastic to the right, like repeated brushstrokes. Normally this wall that the blue arrow points at is FLAT/90 degrees sharp and not jagged!
-
-
-
The leidenfrost effect saved me from a burn when I accidentally grabbed the searing hot solder. So I guess you can keep your hands slightly wet when handling superhot objects. (The water is immediately vaporized and fails to transfer heat to your hands.) This doesn't work as well with objects that are only slightly above boiling temperatures.
-


To reassemble your device, follow these instructions in reverse order.
One comment
Help! I opened it up all the way and a metal spring came off. Now I can’t figure out the right way to put it back in. The spring keeps the handle upright. So, after you’ve vacuumed, when you put it back upright, there’s that kind of click you feel and the it stays upright instead of falling down. Any help would be greatly appreciated. Lad911@juno.com
Lanissa -