Introduction

If your stapler isn’t stapling, then there’s a good chance the spring is damaged. This guide's purpose is to assist users in replacing the stapler spring.

If you don’t replace the spring yourself, you’ll either have a broken stapler cluttering up your work space or will end up buying a new stapler altogether.

Before using this guide, check to see if the spring itself is damaged. Another possibility of a stapler not working is a staple jam. Be careful when handling the stapler, since it’s possible to staple yourself. We recommend that you empty the staples beforehand.

  1. 2R5lutKMU4HPtOBD
    2R5lutKMU4HPtOBD
    eyItKC1nIZEdaHt1
    • Open the stapler by gripping the handle to access the spring.

  2. XS3C3fBTSKWralFZ
    • Pry open the hook found on the pusher using the tweezers.

    • Hold the handle firmly to prevent the stapler from snapping back.

  3. 5xyJQOomw1HnPUIZ
    • Unhook the end of the spring from the pusher.

    • Pinch the spring firmly between your fingers to keep it from snapping back.

  4. dfHsaLpN6dhQjWFK
    dfHsaLpN6dhQjWFK
    TSRwRUSE6VJDMPqI
    • Unhook the other end of the spring from the inside of the handle.

    • The spring should be unthreaded from the holes on the handle's metal part.

  5. yfMBVFCgc45PWOk2
    yfMBVFCgc45PWOk2
    ZPPooXNbx5GEANgu
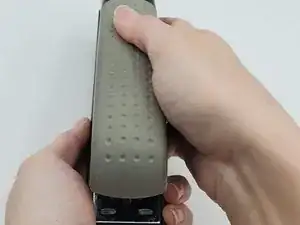
    • Press down on the metal part inside the handle with your thumbs until it will not go down anymore.

  6. QTJ2ulM1pLKfr5Ym
    QTJ2ulM1pLKfr5Ym
    x5hePYCkKFJPyIIF
    • Push the hammer, the rectangular piece, up and away from the metal part.

  7. XnMNsIYPXwYGBFgV
    • Release the metal part inside the handle so it comes away from the hammer.

    • Keep hold of the metal part to keep it from snapping closed.

    A side picture would be even better here, so the user could see the process more in detail.

    Penny -

    Este resorte que se ve, en que parte va?? Se salio y no se donde. Gracias

    Jose Luis Spadafora -

  8. IHXQGBlZUDDMgRQd
    • Hook one end of the new spring onto the pusher's hook.

  9. EegNie6F1FQV3gNH
    • Clamp the pusher's hook closed using your thumb.

  10. OIVLJ2MTW26QBtIO
    • Thread the other end of the new spring through the top rectangular hole toward the back.

  11. BLZWH6SLfZlyNNsA
    • Thread the new spring through the bottom hole, bringing the end of spring toward you.

    • The spring should create a loop when done threading.

  12. bcIIsrUEALfkGAxJ
    bcIIsrUEALfkGAxJ
    d1BwIBV4oprgFmd3
    • Hook the new spring to the hook on the inside of the handle's metal part.

  13. OAV2hEcHnVTZupmg
    OAV2hEcHnVTZupmg
    BAUvRxQHMNNG1SCE
    • Press the metal part down with your thumbs until it aligns with the hammer's hole.

  14. uyJmFsV4JEixLsKS
    uyJmFsV4JEixLsKS
    KTgRF2vLYpgJOMOm
    • Reattach the hammer back onto the metal part.

  15. 16eOwsPBOStcb2xn
    16eOwsPBOStcb2xn
    luTFhV2bHosn2MSn
    • Close the handle until it clicks back into place.

    • Be careful not to staple your fingers when closing the stapler.

Conclusion

To reassemble your device, follow these instructions in reverse order.

Lauren McCabe

Member since: 16/01/20

322 Reputation

9 comments

Just what I needed. Thank you! Super clear

Daniela Labra -

Can I replace the black rubber piece that goes on my swingling desk top stapler 70 sheet it came off and my dog chewed it up.

Edith Corkell -

fron this sale ski o donde venden los repuestos de esta engrapadora en Venezuela gran caracas

Romulo -

Ihr Artikel war sehr leicht zu verstehen und ich habe es geschafft, vielen Dank gacha life!

Lily Collins -

Where do I obtain a replacement spring for this stapler?

John Drake -

Thank you for this guide, just the ticket!

Chris Painter -

What size spring is used for yhe pusher and where can it be purchased?

MM ERICKSON -

At the top of the guide, click on the link at Parts.

Toon Konings -