Introduction
If your Galaxy A3 won't hold a charge you can use this guide to replace the worn-out battery. If your battery is swollen, take appropriate precautions.
This guide involves removing the rear glass cover and the mid frame. You will need replacement adhesive to reattach the back cover to the phone.
Before disassembling your phone, discharge the battery below 25%. The battery can catch fire and/or explode if accidentally punctured, but the chances of that happening are much lower if discharged.
Tools
Parts
-
-
Start by switching off your phone.
-
Take an iOpener to heat up and soften the glue behind the back cover.
-
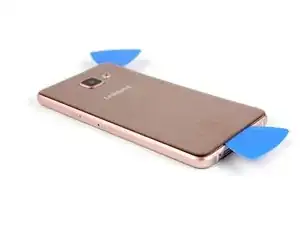
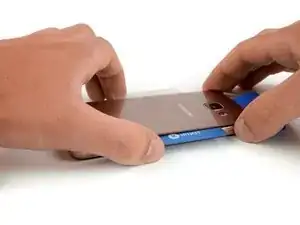
Lift the bottom part of your back cover with a suction handle and insert an opening pick.
-
-
-
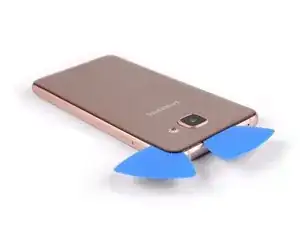
Insert a second opening pick and move around the other corner at the bottom part of the back cover.
-
-
-
Move the second pick along the left side of the back cover to loosen the adhesive.
-
Move around the upper left corner and loosen the adhesive above the rear camera.
-
After loosening all the edges and sides of the back cover use an iOpener to loosen the adhesive underneath the center of it.
-
-
-
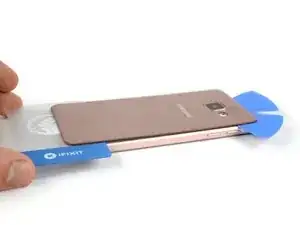
Insert a plastic card at the bottom and slide it underneath the back cover.
-
Separate the glue until you reach the rear camera.
-
Now you can slowly lift up the back cover and finally remove it.
-
-
-
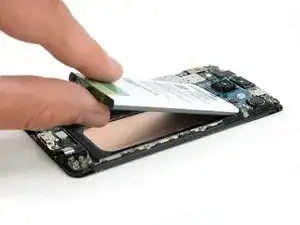
Push the exposed part of the battery away from the midframe to separate the components.
-
Remove the midframe.
-
-
-
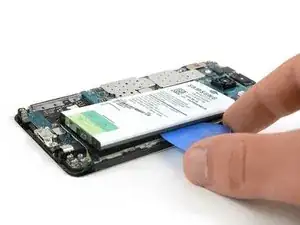
Insert an opening pick between the battery and the frame. Slide along the battery to separate the adhesive.
-
Remove the battery.
-
To reassemble your device, follow these instructions in reverse order. Reapply adhesive where necessary.
8 comments
Nice post on Samsung phone. People are courageous about Galaxy phones and there is lot of hype about Samsung.
I bought a budget j7 for my wife and I am sure this will have good review.
not sure why they are not talking about.
Thanks
Rakesh Birchi
Owner of http://www.birchi.in
Thank you so very much! I'm an ageing priest working in Transylvania and The Republic of moldova with victims of child trafficking. My battery has suffered extensive use and I believe it still should have lasted longer. I have limited resources to use for myself and feel attempting to replace the battery myself far more economical and funds conscious. Thanks to you I shall endeavour to replace it myself…thanks to your instruction.
May all your journeys be ones of discovery!
Fr Bill+
Projectnewlife.org
PNLMoldovaPrisons.blogspot.com
BigWorldSmallBoat.blogspot.com
ScmMoldova.blogspot.com
DogDogma.blogspot.com
Assolutamente insufficiente. L’iOpener non scioglie l’adesivo posteriore e quindi il vetro posteriore si rompe facilmente. Il tutorial indica una parte assolutamente inutile, ovvero lo smontaggio del telaio. Non serve basta estrarre la batteria con un piccolo cacciavite. I tutorial fateli scrivere a chi lavora sui device. Grazie
axlduri -
Hello axlduri,
thanks for your feedback. In case you weren’t able to loosen the adhesive beneath the back cover with an iOpener, you can use a heat gun to do so. However the iOpener should do the job and should be applied for at least 2 minutes to the back cover. Repeat this step several times until the adhesive is loose. Additionally the battery sits super tight in the mid frame and it’s nearly impossible to remove it safely, without removing the mid frame. You should never work or pry on batteries with metal tools like a screwdriver. If you accidentally puncture them, they can explode or catch fire. Thats the reason why we advise to remove the mid frame. It’s the safest way to remove the battery.









Dieser Schritt war der schwierigste für mich. Ohne iOpener und nach langem Fönen wollte sich immer noch keine Lücke für den Pick finden…
Was dann geholfen hatte, war eine Sticknadel, die ich vorsichtig auf der unteren Rückseite bei einer der beiden kleinen Plastikstreifen ansetzte. Mit dieser konnte ich die Rückabdeckung so weit anheben, dass ich mit dem Pick dazwischen kam.
Honigerdnussbrot -