Introduction

After a period of time, the device might run too hot, this guide will help to clean up or replace the cooling fan for the Samsung Chromebook XE550C22.

  1. Pa3EJruuDBsqk1fB
    Pa3EJruuDBsqk1fB
    XmwcQZiiPpwdOKRe
    NZErD1M5OTTKvWq1
    • Turn the power off before beginning this step.

    • Using the spudger, remove the four 1/2 inch skid pads from the back of the laptop.

  2. GUcwWCLjc5LAHMlM
    GUcwWCLjc5LAHMlM
    6i3soEnGl3N3BeWY
    • Remove the eight 7mm screws using the J0 Screwdriver.

  3. hPpIlFv2Wkeg6jEv
    hPpIlFv2Wkeg6jEv
    luIAuId3gDSo4sSX
    YFy4pjXwDTOKnLFB
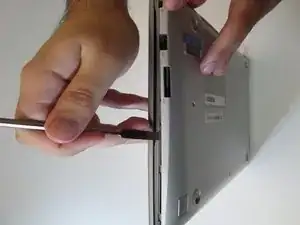
    • Starting at the center front of the laptop, insert the metal spudger between the keyboard panel and the bottom panel, separating the bottom panel from the laptop.

    • Continue prying around the sides to release more brackets.

  4. 5NvppG3PuAmIuVHi
    5NvppG3PuAmIuVHi
    vtDRPVgyFqPufGiD
    • After deconnecting all the brackets, pull the back panel away from the laptop.

    • Note: The back panel has some flex to it, don't be afraid to use some force.

  5. GpXm2kTIrxRJBvKi
    GpXm2kTIrxRJBvKi
    Xc5AjMP5QDc3QvHh
    • Remove the four 3mm screws holding the battery with the J0 screwdriver.

  6. OtBFF6pmwivgJRVm
    OtBFF6pmwivgJRVm
    nMBsnTxHfSM1S5Yi
    • Lift the battery up at an angle to disconnect the battery from the motherboard, then pull it away from the laptop.

    • Do not lift the battery straight up. This will damage the battery's connectors.

  7. Zok4PSxWfhhNMLXJ
    • Locate the cooling fan and the heat sink on the top center of the Chromebook.

  8. IAARltZFMwAObNQa
    IAARltZFMwAObNQa
    4DRskmnRuI3e2IgE
    llgQbGeiMXBoKi54
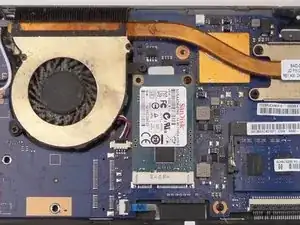
    • Rotate the Chromebook 180 degrees so the fan is closest to you, and locate the fan power cable.

    • Disconnect the fan cable from the motherboard with the angled tweezers.

    • Be gentle and do not pull out the fan cable with excessive force. It will result with a non-working cooling fan and a damaged wire.

  9. vZeIw2CMYqQcpLOf
    vZeIw2CMYqQcpLOf
    66DrSvyL2WKsbJOU
    CsCTJaLgPp2arFiu
    • Remove four identical 6mm screws from the heat sink labelled CPU using the J0 screwdriver.

    • Using your hands, gently lift up and pull away the heat sink.

  10. PLePodobeRBBiJXV
    PLePodobeRBBiJXV
    aJd6dbwJcxZKiMbI
    3JhAbLw4UkwKL2V3
    • Remove the three identical 6mm screws from around the fan using the J0 screwdriver.

    • Using your hands, gently lift up the fan and pull it away from the laptop.

Conclusion

To reassemble your device, follow these instructions in reverse order.

Linh Luu

Member since: 11/09/17

312 Reputation

0 comments