Introduction

You may need to perform this replacement if you are experiencing noticeably reduced battery life from your current unit, or your current battery will not recharge. Ensure your device is powered off before beginning this replacement.

  1. AMwGJuDSJYR1ERBD
    • Make sure your Chromebook is turned off before you begin.

    • Set the labtop face down on a flat surface.

  2. CtKArBwuKaMudEmb
    CtKArBwuKaMudEmb
    QmFRYmW4oLyIo5qY
    1BjflJm5WrkuShAK
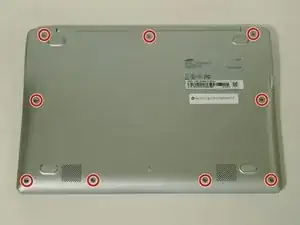
    • Remove the nine 5 mm screws on the bottom cover using a Phillips #0 screwdriver.

  3. OMAdWBvGo1qu3Wua
    OMAdWBvGo1qu3Wua
    Q3mSZHLhO1QaOpT4
    • Loosen the back cover panel with a plastic opening tool, and work it all the way around the computer.

  4. aAEARWARlIEUctsD
    aAEARWARlIEUctsD
    MWxYRUIg5BGr6OLp
    • Once the cover is loose, remove the back cover panel using your hands.

  5. lg5ZlvCTUHOOnA5O
    lg5ZlvCTUHOOnA5O
    TIXKejjiCOuIGCHj
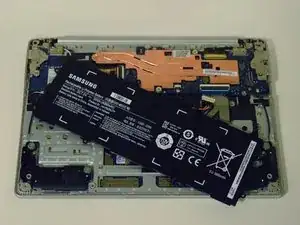
    • Unscrew the four 4 mm screws holding the battery in place with a Phillips #0 screwdriver.

  6. RbxUDlSjeOfM3B5A
    RbxUDlSjeOfM3B5A
    byDN21e4Wm6cGdlU
    ISgY11yn5xvuNdKo
    • Disconnect the wire that connects the battery to the motherboard by pulling upward.

Conclusion

To reassemble your device, follow these instructions in reverse order.
Allan

Member since: 02/02/16

115 Reputation

0 comments