Introduction

Prerequisite-only guide to open an iPhone 11, allowing access to internal components for service and repair.

  1. T2yIKTYtWTOpeGir
    T2yIKTYtWTOpeGir
    1BRQlG3vB6hGYvKS
    • Before you begin, discharge your iPhone battery below 25%. A charged lithium-ion battery can catch fire and/or explode if accidentally punctured.

    • Power off your iPhone before beginning disassembly.

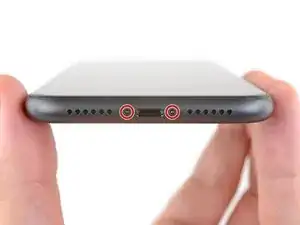
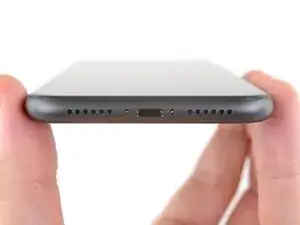
    • Remove the two 6.7 mm-long pentalobe screws at the bottom edge of the iPhone.

    • Opening the iPhone's display will compromise its waterproof seals. Have replacement seals ready before you proceed past this step, or take care to avoid liquid exposure if you reassemble your iPhone without replacing the seals.

    the right screws wouldn’t come off

    Yusef San Inocencio -

    ok one came of but my right wont come of either!!!!

    Aisa Jawara -

    Hello guys, I still haven't found away to power off the iphone without using the screen. Cheers!

    danielaguirre93 -

    You can try this.

    Quickly Press and release the volume up button.

    then Quickly Press and release the volume down button.

    then press and hold the power button and wait until it turns off.

    worked for me :D

    Benóný Egilson -

    Where does one get replacement seals? Is this the same as the display assembly adhesive?

    Brian Baker -

    not of the screwdrivers i have seem to be able to turn the screws

    Aisa Jawara -

  2. FLq6W2khWOq4uAQr
    FLq6W2khWOq4uAQr
    2XIfBVvS5Ty5QtZF
    4Df24ZLS6kBFTyVU
    • If your iPhone has a cracked screen, keep further breakage contained and prevent bodily harm during your repair by taping over the glass.

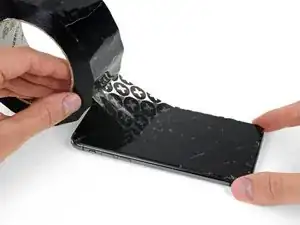
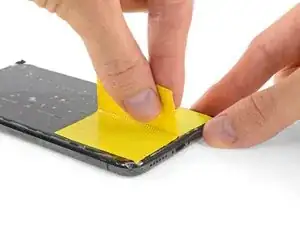
    • Lay overlapping strips of clear packing tape over the iPhone's screen until the whole face is covered.

    • Wear safety glasses to protect your eyes from any glass shaken free during the repair.

    • If you can't get the suction cup to stick in the next few steps, fold a strong piece of tape (such as duct tape) into a handle and lift the screen with that instead.

    • If all else fails, you can superglue the suction cup to the screen.

  3. 4fhdeZSxwgTn4VgI
    4fhdeZSxwgTn4VgI
    BxknskOQsXXo6dog
    NEQnchvrYpEJPYKS
    • The next three steps demonstrate the Anti-Clamp, a tool we designed to make the opening procedure easier. If you aren't using the Anti-Clamp, skip down three steps for an alternate method.

    • For complete instructions on how to use the Anti-Clamp, check out this guide.

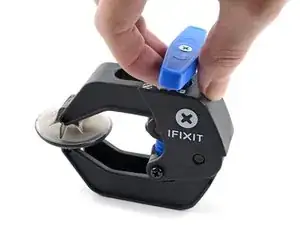
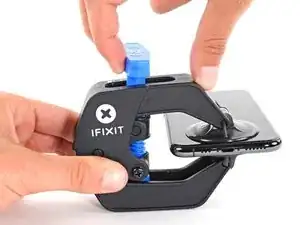
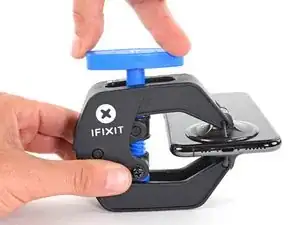
    • Pull the blue handle backwards to unlock the Anti-Clamp's arms.

    • Slide the arms over either the left or right edge of your iPhone.

    • Position the suction cups near the bottom edge of the iPhone—one on the top, and one on the bottom.

    • Squeeze the cups together to apply suction to the desired area.

    • If you find that the surface of your iPhone is too slippery for the Anti-Clamp to hold onto, you can use tape to create a grippier surface.

  4. DtDpThOATcyQb4yT
    DtDpThOATcyQb4yT
    MAGI2JXwXnS5LvCO
    NgpQQ6M1sP5xBcXQ
    • Pull the blue handle forward to lock the arms.

    • Turn the handle clockwise 360 degrees or until the cups start to stretch.

    • Make sure the suction cups remain aligned with each other. If they begin to slip out of alignment, loosen the suction cups slightly and realign the arms.

  5. oRZ6AXaleqoRTKND
    oRZ6AXaleqoRTKND
    bDhAC4ImHIc3XQdf
    HTQodvWRCjulrPCR
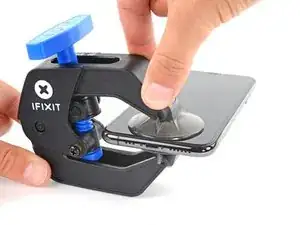
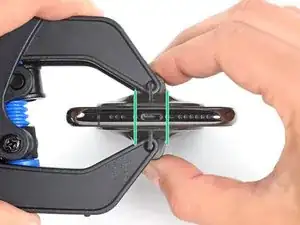
    • Heat an iOpener and thread it through the arms of the Anti-Clamp.

    • You can also use a hair dryer, heat gun, or hot plate—but extreme heat can damage the display and/or internal battery, so proceed with care.

    • Fold the iOpener so it lays on the bottom edge of the iPhone.

    • Wait one minute to give the adhesive a chance to release and present an opening gap.

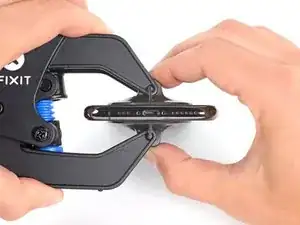
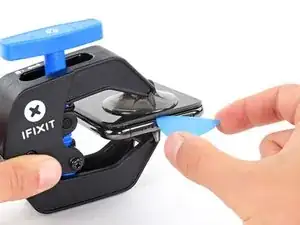
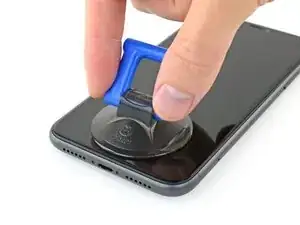
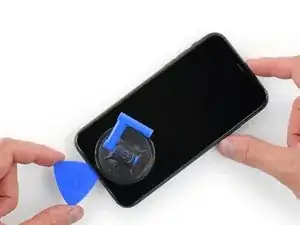
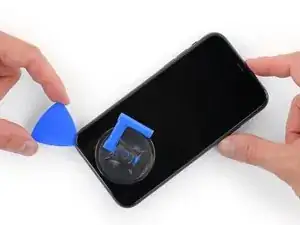
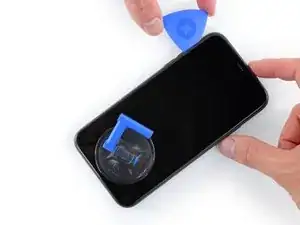
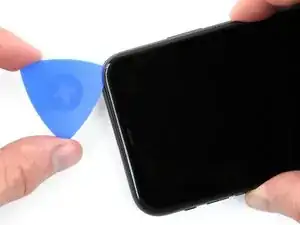
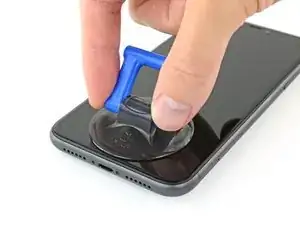
    • Insert an opening pick into the gap under the screen and the plastic bezel, not the screen itself.

    • If the Anti-Clamp doesn't create a sufficient gap, apply more heat to the area and rotate the handle a quarter turn.

    • Don't crank more than a quarter turn at a time, and wait one minute between turns. Let the Anti-Clamp and time do the work for you.

    • Skip the next three steps.

  6. yQbwAmoITNyEmrSn
    • Heating the lower edge of the iPhone helps soften the adhesive securing the display, making it easier to open.

    • Use a hairdryer or heat gun or prepare an iOpener and apply it to the lower edge of the iPhone for about a minute.

  7. aJCRTiaUBHVMoAUV
    aJCRTiaUBHVMoAUV
    YhJejcEpMhlQpvWX
    • If you're using a single suction handle, apply it to the bottom edge of the phone, while avoiding the curved portion of the glass.

  8. MKShqPOGkjD2vOPp
    MKShqPOGkjD2vOPp
    dJknkSwVsVBaZabR
    XgeYpSK2b4NpndCh
    • Pull up on the suction cup with firm, constant pressure to create a slight gap between the front panel and rear case.

    • Insert an opening pick into the gap under the screen and the plastic bezelnot the screen itself.

    • The watertight adhesive holding the display in place is very strong; creating this initial gap takes a significant amount of force. If you're having a hard time opening a gap, apply more heat, and gently rock the screen up and down to weaken the adhesive until you create enough of a gap to insert your tool.

    This turned out to be the most difficult part for me. My old ifixit suction cup didn't suck hard enough to generate enough force to pry the display from the case. I ended up applying heat at least a dozen times, and I had to pull up on the suction cup forcefully over and over and over while repositioning it several times. I finally had success inserting my pick into the tiny gap after 30 or so rapid tugs on the suction cup.

    matthew r -

    I pulled the screen by accident instead of the bottom layer, now what?

    Alvaro -

    I have the same question

    Konstantinos Solakoglou -

  9. BiTGA23MOOmtexSG
    BiTGA23MOOmtexSG
    l5NWMTOshIlqjNtG
    IfJRwFLPwsBL4klh
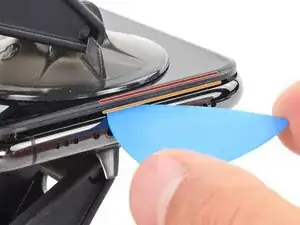
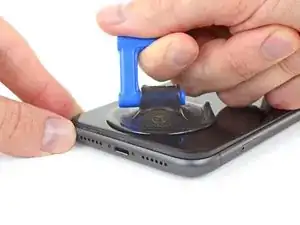
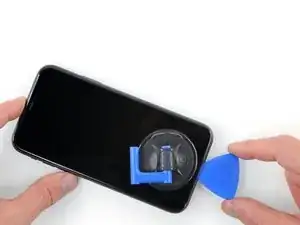
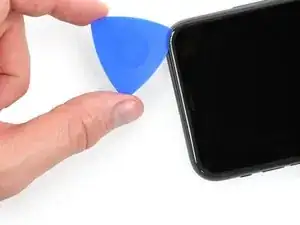
    • Slide the opening pick around the lower left corner and up the left edge of the iPhone, slicing through the adhesive holding the display in place.

    • Don't insert your pick more than 3 mm, as you may damage internal components.

  10. FCPAxbSlJhdAIRLG
    • There are delicate cables along the right edge of your iPhone. Don't insert your pick here, as you may damage the cables.

  11. K5iUxKTkELONJBVf
    K5iUxKTkELONJBVf
    ZhlLOMfaksHRxZJV
    yy5WtAu2UqSpCUTX
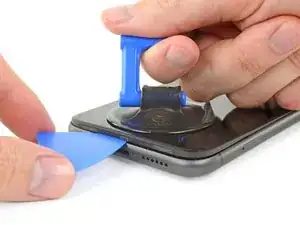
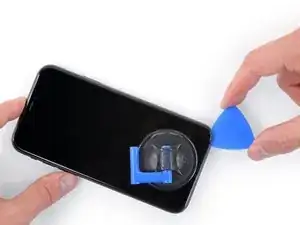
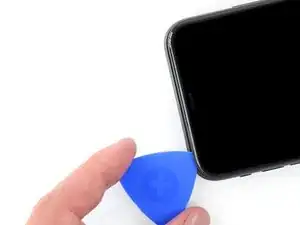
    • Re-insert your pick at the bottom edge of the iPhone, and slide it up the right side to continue separating the adhesive.

    • Don't insert your pick more than 3 mm, as you may damage the display cables.

    Instructions are confusing as the last step says not to insert at certain points, while this says to slide all the way up the right side - is it that sliding is ok but inserting isn't (whatever that might mean) or just not more than 3mm?

    Peter Hill -

    Just slide slightly and the display will rise without problems on all iPhone models, sometimes if I have long nails I even insert a fingernail and lift the display.

    Tonynox -

  12. J1ZVUrqQ61e4NOZ1
    J1ZVUrqQ61e4NOZ1
    HsxeMCkPLyCeHKpI
    tegZUpHyY4wGd2Ww
    • The top edge of the display is secured with both glue and clips.

    • Gently pull the right edge of the display down slightly (in the direction of the Lightning port).

    • Insert your pick into the top-right corner of the phone.

  13. 5mKceYJffKEaQo4L
    5mKceYJffKEaQo4L
    kQQD2XkOMWjrOjMu
    • Continue pulling the display down (toward the Lightning port) as needed in order to make a gap large enough for the pick.

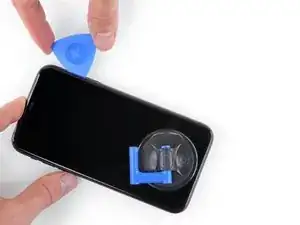
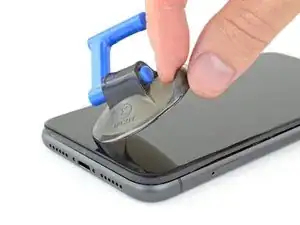
    • Slide the pick to the top left corner and cut any remaining adhesive securing the display.

    • Don't insert your pick more than 3 mm, as you may damage the Face ID sensor array.

  14. 24nVgAyDKPTICLhV
    • Pull the small nub on the suction cup to detach it from the front panel.

  15. IDOegN1rKCFFJMBF
    IDOegN1rKCFFJMBF
    QcgYHgKIt6XMTsnK
    xVdpJyR6i213HsJ2
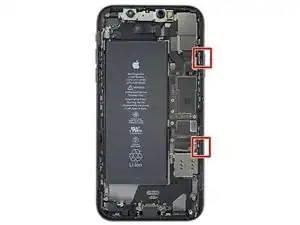
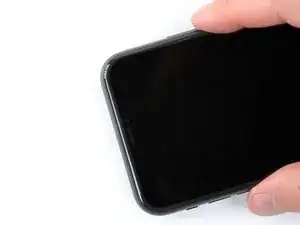
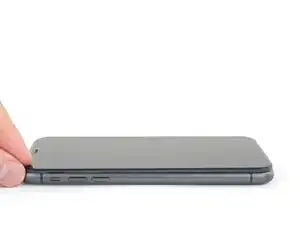
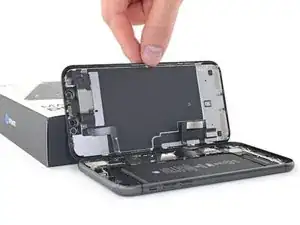
    • Open the iPhone by swinging the display up from the left side, like the back cover of a book.

    • Don't try to fully separate the display yet, as several fragile ribbon cables still connect it to the iPhone's logic board.

    • Prop the display up against something sturdy.

    • During reassembly, lay the display in position, align the clips along the top edge, and carefully press the top edge into place before snapping the rest of the display down. If it doesn't click easily into place, check the condition of the clips around the perimeter of the display and make sure they aren't bent.

Conclusion

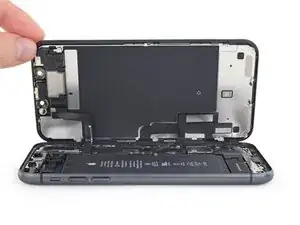
To reassemble your device, follow these instructions in reverse order.

Jeff Suovanen

Member since: 06/08/13

427153 Reputation

0 comments