Introduction

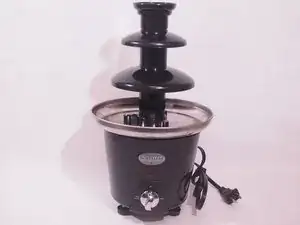
This guide will show you how to safely disassemble the Nostalgia Chocolate Fondue Fountain (model number CFF965). After the disassembly process, you will be able to access the contents of the fountain’s base (the switch, motor, heating plate, and thermostat) in addition to the tower, auger, and bowl.

Before starting disassembly, make sure that your device is clean from any chocolate (or other food or liquid) and that it is unplugged. No special skills are needed for this project.

  1. YvSayZ5KipG3sUFG
    • Lift the tiered tower away from the base bowl with your hands to remove it.

  2. qEYMTCLXBPRUULpX
    qEYMTCLXBPRUULpX
    AGtSkVELFEGXZXMm
    • Lift the auger up and away from the base bowl by hand to remove it.

  3. 2iEAeXJFwD6HUDiP
    • Flip the base over.

    • Unscrew the 21.3 mm "feet" screws by hand.

  4. HmkocncaZADWgUSd
    HmkocncaZADWgUSd
    6r3Vkkyk1Ym1enl5
    lCppYbdSbxrjKE4H
    • Unscrew the three 14.2 mm screws with a Phillips #2 screwdriver.

    • Unscrew the 9.1 mm screw near the switch with a Phillips #2 screwdriver.

    • Unscrew the two 14.2 mm spanner screws using a spanner screwdriver (size 6).

  5. dpdwgGBjSUrHGo1X
    dpdwgGBjSUrHGo1X
    KTsgWUoAc3gHJGNB
    • Pull up on the baseplate by hand to remove it.

    • Pull the switch component up by hand.

  6. AZ4D2wcMtPEOU6DL
    • Unscrew the two 22.1 mm machine screws that secure the motor with a Phillips #2 screwdriver.

    • Remove their adjoining 5.9 mm washers by hand.

  7. DZHZfFWIcNHcLkk6
    DZHZfFWIcNHcLkk6
    STnLAgcXAZsapvVh
    W4jSyW2VxqIIVA3A
    • Unscrew the three 25.4 mm Phillips #2 sheet metal screws that connect the base bowl to the white plastic structure.

    • When unscrewing, make sure to hold the metal tower studs on the opposite side of the base bowl (see the second picture). This will make it easier to unscrew the screws.

    • Flip the base over and remove the base bowl by hand.

  8. wTN35mqqcI6scuGK
    wTN35mqqcI6scuGK
    rNun6WPVIk4BsBK2
    • Flip the base over again to view the motor and fan.

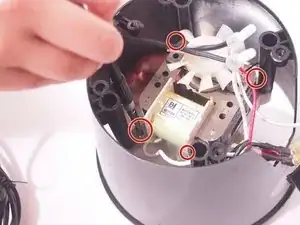
    • Unscrew the remaining four 14.2 mm Phillips #2 sheet metal screws on the white plastic structure.

  9. 1k4E2vZn5I4UxtrJ
    1k4E2vZn5I4UxtrJ
    ipZpOmkfjTyjgBPB
    FsrdBeEdy56mMMmW
    • Flip the entire base over.

    • Lift up the metal heater plate by hand.

    • Remove the top of the white plastic box by hand.

    • The top of the white box should have a white gear and metal axis attached as well.

  10. oV6K1uQBehAqkByq
    • Remove the yellow gear.

    • You can use your hands, but we recommend tweezers to avoid touching the lubrication.

  11. D2JSVX3uPfH5RXZF
    • Unscrew the four 9.1 mm Phillips #2 sheet metal screws.

  12. IJYuBFaCM2ZekqhN
    IJYuBFaCM2ZekqhN
    W5Aj1jHTVdaWAqEg
    jw1l6Re5pYUbwjdo
    • Remove the motor by hand.

Conclusion

To reassemble your device, follow these instructions in reverse order.
Caitlin Goldberg

Member since: 16/09/20

205 Reputation

0 comments