Introduction

The motherboard is an essential, key component that gaming consoles revolve around. If troubleshooting does not help your Wii U and you are in need of a motherboard replacement, this guide will easily walk you through the process.

  1. JCHLhn5MYdDxfPrg
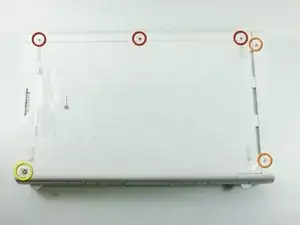
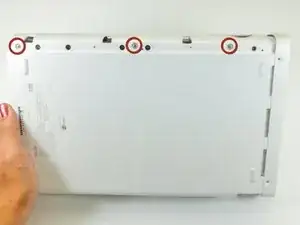
    • With the bottom of the console facing up, remove the following 6 screws hidden underneath the white square stickers:

    • Three 5.1mm Phillips #000 screws

    • Two 6.1mm Tri-wing Y0 screws

    • One 13.2mm Tri-wing Y1 screw

  2. aigP65yoJHPSGAir
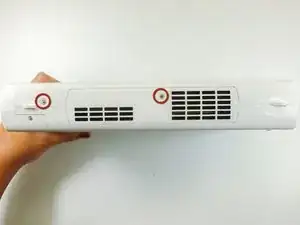
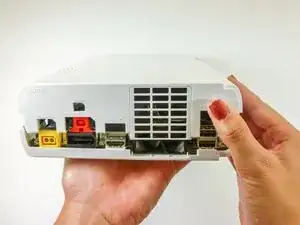
    • Rotate the console 180 degrees so that the exhaust vents are facing you.

    • Remove the two 7.1mm Phillips #00 screws.

    Both screws are not “7.1mm” in length, only the one to the right is (center of the console’s side). The left one (towards the front of the console) is 5.1mm.

    LogicalMadman -

    There’s a third screw to remove bottom-left corner of this picture. On step 9 it’s already been removed, and you need it to be removed in order to remove the metal casing in step 13.

    Pascal Dagenais -

  3. 1Iyrqx4nOFBdCJ2h
    1Iyrqx4nOFBdCJ2h
    2NCIyw2H2DATp1Mk
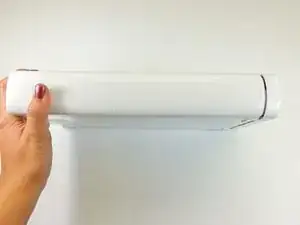
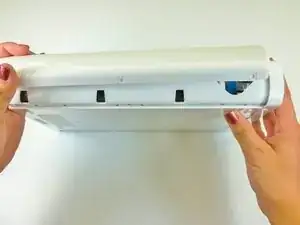
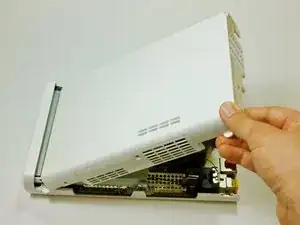
    • On the side opposite of the exhaust vents, slide the cover faceplate towards the back of the console and pull upwards to release it.

  4. BgtQWjfJFCI2Obtg
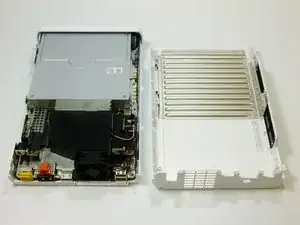
    • On the bottom of the console beneath the previously removed faceplate, remove the three 13.2mm Tri-wing Y1 screws.

  5. SFXFKigB4FgwXNHW
    SFXFKigB4FgwXNHW
    emE6ahHlKSKLyLVG
    XXLXP25j5OJr3Cu5
    • On the back of the console, lift up and release the main top cover.

    The front portion of the side of the cover with the vents was kind of stuck on mine. There’s a little rubber piece in there that was the cause of this. But that same rubber piece also makes up the little handle-shaped nub that sticks out of the side there. (There’s also one at the back of the same side, but that one didn’t stick for me.) Lifting also using the little handle made it easy to remove the cover.

    Nicholas Halderman -

  6. QANVbARsH6IjOTQI
    QANVbARsH6IjOTQI
    sPaqjSSEr66bZ6hX
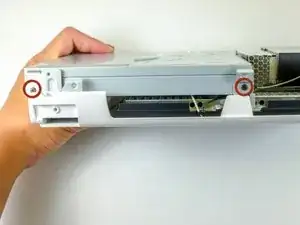
    • Rotate the device so that the front plate is facing you.

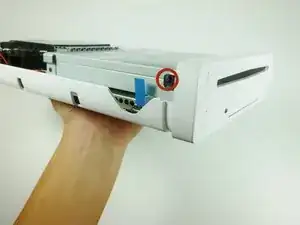
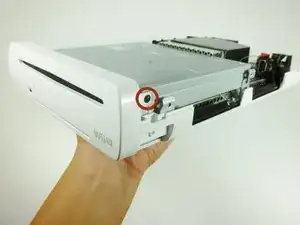
    • On each side of the console, remove the 3.5mm Phillips #0 screw connecting the DVD drive to the faceplate.

    My screw won't come out, and I feel as if my screw was screwed in too tight when they made the wii u, or the 3.5 #0 is too big. I have tried other screws and I think the screw might be done for because the metal is coming off of the top and deforming the shape. I am very lost and if anyone could help me, that would be amazing.

    Elijah Travers -

    Those #0 screws might be tight and they’re easy to strip. Put some force on the screwdriver to make sure you start unscrewing them and not stripping them.

    Pascal Dagenais -

    One of the screws started to deform instead of unscrewing. I used a bigger Philips screwdriver (size 1), added a rubberband between it and the screw and used more force to avoid stripping it more and make sure it would start unscrewing. It worked hopefully ! But I wasn’t sure it would.

    Pascal Dagenais -

  7. FGbMK3dG2BpKU2bJ
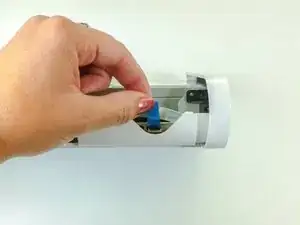
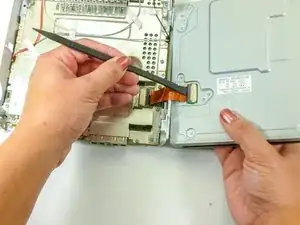
    • Rotate the device so that the front plate is on the right side and the ribbon cable is visible.

    • The ribbon cable is connected to the system by a latch which holds in the blue tab. Flip this latch up to unlock it.

    • Lift up on the blue tab to release the ribbon cable.

    There is a step to do before to "lift up on the blue tab in order to release the ribbon cable". We must lift up the connector who maintain the ribbon cable. By default, his position his locked and in order to unlock it, must put it in his top position.

    Frederic Morelli -

  8. K23ibnjRbkeVBBoW
    • Remove the front faceplate.

  9. 4FrjNj1QtjgIRGlf
    • On each side of the DVD drive, remove the two 4.6mm Phillips #0 mounting screws.

  10. VoPXvqqhXhCyhsDP
    VoPXvqqhXhCyhsDP
    4MFTPWX4oiWLTCZB
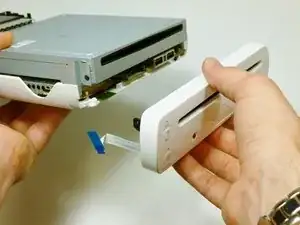
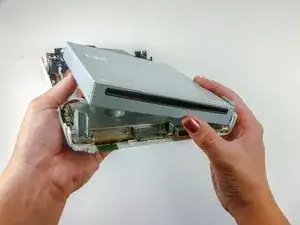
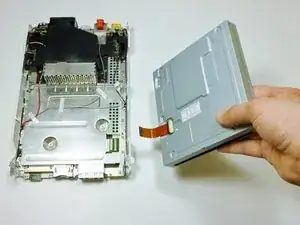
    • Rotate the device so that the disc drive slot is visible.

    • A ribbon cable is attached to the bottom right side of the disc drive. The ribbon cable can rip if it isn't removed properly.

    • Lift the disc drive out of the mount and turn over to the right so it lies like a book.

    • Use a spudger to release the ribbon cable.

    This step is not entirely clear on how to remove the ribbon cable with the spudger. It seems you need to pry up the black part.

    Daniel Green -

  11. YgDxgMZveOGqAWhv
    • Remove the disc drive.

    The Disc Drive Logic Board can but must not work with the Console, because there are different Drives. If you're lucky it'll work but sometimes it doesnt it happend to me often when i tried to change drives from 2013 and 2014 produced Consoles

    Mikitutin -

  12. SVfWjFfX4N1ZZ2Mf
    SVfWjFfX4N1ZZ2Mf
    IUxQeqI6KLQRKG4Z
    T2hijIGRsl1qpDfy
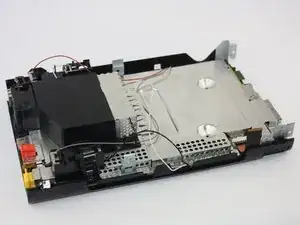
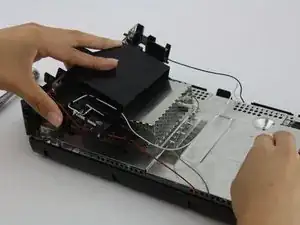
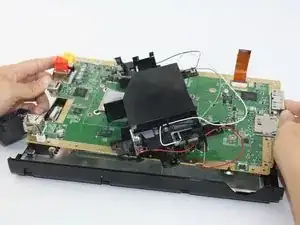
    • Remove the black plastic shielding by unscrewing connecting screws with a Phillip's Head screwdriver.

    • You will have to carefully adjust the antenna cables out of the way in order to proceed comfortably.

    It would be nice to add indications on the location of those screws.

    Pascal Dagenais -

    I agree with Pascal. I figured it out by taking my own pictures as I tore my unit apart. as I took each screw out I laid it beside the hole and took a picture when I was done. I also noticed that on the top shield look for arrows (put a screw here) and X (don’t put a screw here). It gets a little weird around those 4 standoffs that hold the disc drive. And by the way that standoff in the wrong place in the lower left in that first picture.

    Thomas King -

    If the black plastic shielding is not coming off once all the screws holding it down have been removed, try pushing it in the direction of the ports, and then try pulling up once the shielding has moved.

    Sussy Baka -

    There are four Philips #1 screws that need to be removed.

    DeKay -

  13. xnv6pIYxTlmYFQTy
    xnv6pIYxTlmYFQTy
    kPiVpCHWIgEfCQJL
    LrOWYv5GbPToo6lY
    • The metal cap does not require unscrewing and should lift up with ease.

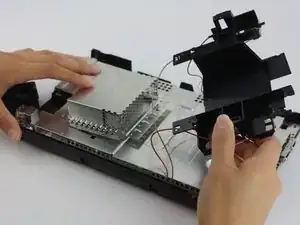
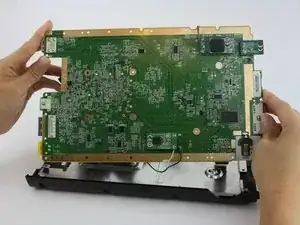
    • Unscrew all the screws that outline the perimeter of the board using a Phillips Head (PH1) screwdriver.

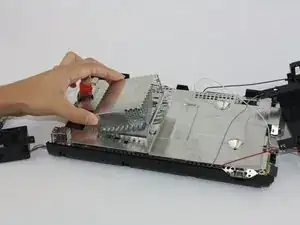
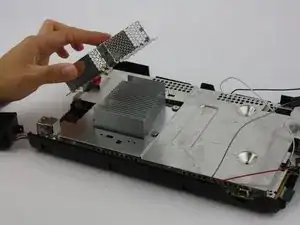
    • Remove the silver shielding plate once all screws are removed. Be careful when pulling it under the affixed antenna cables.

    This omits the step of undoing the 4 screws around the heatsink. That has to be done or the bottom shielding won’t come off.

    Petie Martin -

    Yup, This step is pretty critical. If you don't have the solid base of it in the plastic makes it hard to keep control of the heat sink when you take it off outside. ended up slicing something off my mainboard. Not sure why this critical step is left out. Rip me I guess.

    GARRETT KIPPS -

    There are twelve PH1 screws around the periphery of the shield and two more under the DVD drive. All screws are the same size.

    DeKay -

  14. mqMS3ImAQRBP1b1H
    mqMS3ImAQRBP1b1H
    OxDDjoPCfQMdufbr
    • At this point, the motherboard should easily separate from the lower tray.

    From step 13 to 14, you also need to unscrew the 2 screws in the hollow areas in the middle of the metalicboard and the 4 screws around the metallic square that was under the metal cap. Otherwise the motherboard will stay stuck with the metal layer underneath. You might also need to remove the black plastic pieces around the motherboard and the metal layer to separate them.

    Pascal Dagenais -

Conclusion

To reassemble your device, follow these instructions in reverse order.

Emily Vasquez

Member since: 24/02/16

884 Reputation

2 comments

Does anyone knows where I can buy a Wii U Motherboard? mine has a dead CPU/GPU :(((((

AppleTopic -

This really feels like a "draw the rest of the f***ing owl" kind of guide. "Remove the black plastic shielding by unscrewing connecting screws"? Which ones???

Lucas Newton -