Introduction

Follow this guide to replace a damaged or faulty microSD card reader on your Nintendo Switch game console.

The Switch uses JIS screws, but you can use a Phillips screwdriver in a pinch. Be very careful not to strip the screws. iFixit's Phillips bits are designed to be cross-compatible with JIS-style screws.

WARNING: The battery cannot be disconnected during this repair, so make sure to only use ESD-safe tools and be extra careful when using any metal tools. Not doing so could short a connection and damage the device.

Note: This guide, and the part we sell, are compatible with the original Nintendo Switch model released in 2017, as well as the newer refreshed model released in 2019 (model numbers HAC-001 and HAC-001(-01), respectively).

  1. CNuHIy3TUQngv26I
    CNuHIy3TUQngv26I
    pJdtPCFBx3XUI5mL
    IEsgSQkEkZF6cpMS
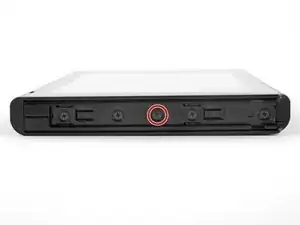
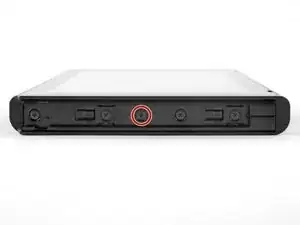
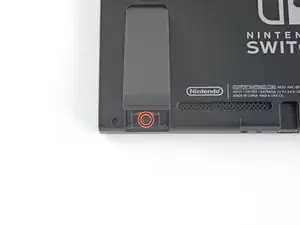
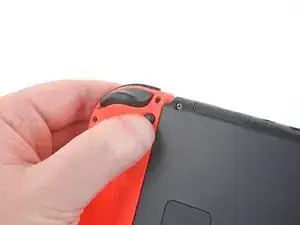
    • Before you begin this repair, make sure the device is completely powered off.

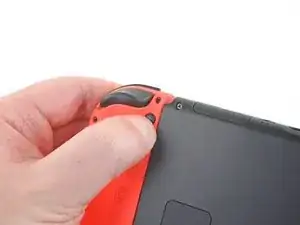
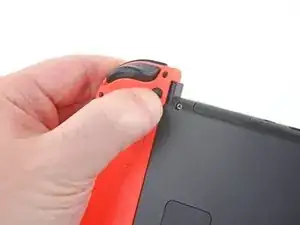
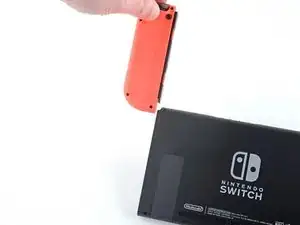
    • Press and hold down the small round button on the back of the Joy Con controller.

    • While you hold down the button, slide the controller upward.

    Kann ich diese Anleitung auch für die OLED anwenden? Habe im INet sonst leider nichts brauchbares gefunden.

    Ina Barz -

    backup all your sd card data i had to format mine after this tutorial and lost all my game data

    JustForThisComment?ComeOn -

  2. PhLTKTPxlZnWR1oL
    PhLTKTPxlZnWR1oL
    FnrSoBPlnixMVSse
    DtwKbJIU1bRDF2mt
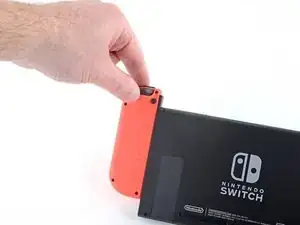
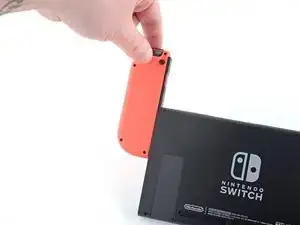
    • Continue sliding the Joy Con upward until it's completely removed from the console.

    • Repeat this same process for the other Joy Con.

  3. UM4r1BOEJDYmMfpC
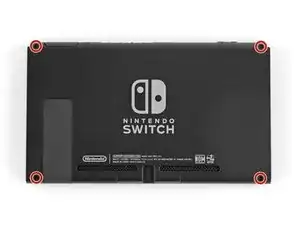
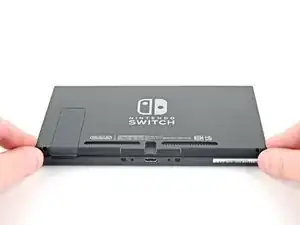
    • Use a Y00 screwdriver to remove the four 6.3 mm-long screws securing the rear panel.

    • Throughout this repair, keep track of each screw and make sure it goes back exactly where it came from.

    Had to use a Y0 from my kit - the Y00 was too small to get a grip on the screw.

    cday -

    I also had a much easier time with Y0 versus Y00. Y00 felt like it was starting to strip the first screw I tried to remove.

    Joe -

    My screws took a little coaxing before they were all ready to come out of the back plate, but I remedied this by turning the screwdriver as little as possible with each turn. Use almost no pressure, except for at the very beginning of each screw’s first turn.

    nin10doh -

    I think my screws are stripped, any way to get them out?

    Banjomanperson -

    I hear that using a rubber band can help? Not 100% sure on that though.

    Pifase -

    My top 2 screws are stripped, one into triangle, the other circle, rather than triangle spokes.

    AndrewDaPro -

    This happened when I replaced the micro-sd card slot, which turned out to have replaced the broken one with another one that turns out to be broken. I need to fix the fact that when I reapplied the back cover, the vent was misaligned.

    AndrewDaPro -

    I had huge problems removing the bottom two screws. I continued with the next steps and lifted the plastic shell as much as possible while using the screwdriver and it became an ease.

    JustForThisComment?ComeOn -

    y0 works best. Press HARD at beginning then ease off to finish.

    J LWsMommy -

  4. hGXGnEoQjvBhX3wm
    hGXGnEoQjvBhX3wm
    vEpL4RZKItZCNJlV
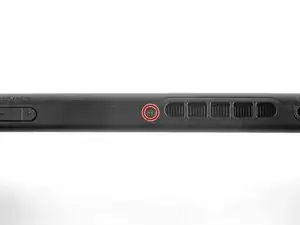
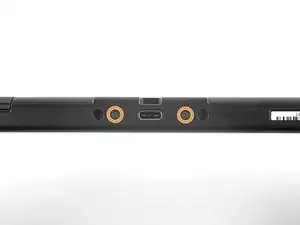
    • Use a JIS 000 driver or an official iFixit PH 000 driver to remove the following screws securing the rear panel:

    • One 2.5 mm-long screw on the top edge of the device

    • Two 2.5 mm-long screws on the bottom edge of the device

    • To prevent these tight screws from stripping, apply firm downward force, work slowly and try another JIS 000 or PH 000 driver if the screws won't come out.

    Hey guys, I tried removing the upper screw and it won't go out(neither will it go in) any tips how to fix this?

    Thanks

    Nemysis -

    The screw boss might be stripped out. Has the device been taken apart before? If you can unscrew it a little bit to get the screw to peek out, maybe try and grab it with some pliers as a last-ditch effort.

    Craig Lloyd -

    I have the same problem. The JIS 000 tool works great on the joy con rails per step 5 but refuses to turn the bottom two 2.5 mm screws as in step 4. These bottom screws are noticeably smaller than the screws as in step 5. The JIS 000 does not get down into these screws. Hopefully they haven’t been stripped by the wrong tool. So is there a JIS tool that is smaller than 000? I’m stuck at this point…

    david brown -

    We used the JIS 3.0mm screwdriver for both top and bottom screws and it worked

    Brooklyn Gardner -

    Used PH00 to get these out with no problem.

    cday -

    Fun fact: these screw into little plastic tabs that stick out of the rear panel. Apparently those tabs are fragile and easy to just break off…

    Benjamin Fritz -

    If the screw is turning but not coming out, the plastic tab that it screws into is probably damaged or broken. You’ll need to try to pry the screw out with tweezers as you unscrew it. It is not the end of the world if you can’t screw these back in during reassembly.

    claudio ocano -

    My screws came out fine. But they are easily stripped with too much pressure on reassmbly

    Jaxon Lee -

    this screws are way too fragile and way too small so be careful when taking them off dont use much force and unscrew also one of them fell somewhere and spent 30 mins searching for it

    Richard Aguirre -

    PH000 will work if you don’t have JIS000. The large IFIXIT kit has both and I lost JIS000. Just be very careful as you can strip the heads when removing or inserting easier.

    Shawn Spivey -

    One thing that worked pretty well for me with the screws not coming out is slightly prying on the back cover to put them under some tension

    Florian Kraupa -

    Quick note, these screws are not magnetic. A magnetic screwdriver will hold onto any of the others safely, but you need to be careful not to drop these ones in particular.

    Jason Lane -

    These would just keep rotating and not come out. What worked was, as Florian Kraupa suggested, i slid a plastic pick just between the 2 shells near the screws to prise it open slightly, then unscrewed and out they came. They're the smallest screws I've ever almost not seen before, so be careful with them.

    Susannah Carter -

  5. aygPfTuAlccxJXvj
    aygPfTuAlccxJXvj
    DTFNZI2ONKRcbQjd
    • Use a JIS 000 screwdriver or an official iFixit PH 000 driver to remove the two 3.8 mm center screws on the sides of the device (one on each side).

    I tried my JIS 000 on Step 5 and was unable to get the screw to budge. It’s partner from the other side came right out with no trouble. Don’t really want to narf up the screw, so I bailed out. Anyone else have this issue?

    mrhoyt -

    Could just be torqued down a bit more! I’d recommend making sure the driver bit seats nicely into the screw, apply some downward pressure, and slowly twist to try and back it out. Good luck!

    Craig Lloyd -

    Yeah I’m having this exact issue. Screw stripped and now I’m stuck. Wish I hadn’t even started.

    Ryan Quinn -

    I did finally get it out- one thing I noticed was some of the screws have blue Loctite on the threads. I guess they figure it’ll get tossed around. This underscores the importance of having the correct tools and making double darn sure you are using the correct size, etc.

    mrhoyt -

    What worked for me here was a Phillips 000, not a JIS 000

    Federico Zivolo -

    One of mine is totally stripped. Guess I can’t do anything now.

    Nick -

    My kit only has two screwdriver heads! The package was open when I received it!

    Cynthia Hyland -

    I had this issue as well. Screw was irreparably stripped. If you can get every other screw out, just keep applying pressure with a flat head screw driver right above the stripped screw and try to break the plastic piece holding onto the screw. It's a very minor invisible bit of damage that will allow you to continue the repair.

    Raymond Garrison -

    after getting all the other screws off I just hinged the back part away and it snapped off neatly where the rusted screw is. not the best solution but it worked.

    Steve T -

    One of my screws was SUPER attached too, but after following a bit noticed the one other in the left that got out nicely, had the plastic tab broken already! So I went ahead and broke the other tab too. So the two side screws are now holding nothing. But I think it will work thanks to the other 4 or 5 screws. Too bad!

    carolaclavo -

    i managed to get out one screw by putting a bit of paper over it which gave the screwdriver something to grip. The other side just won't budge and gets worse the more i try.

    Steve T -

  6. JXApmLipodX5R25H
    JXApmLipodX5R25H
    RSjFHQEoWWAEbSCr
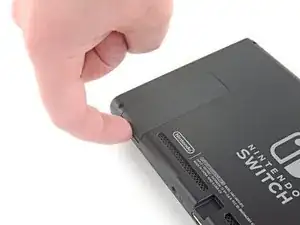
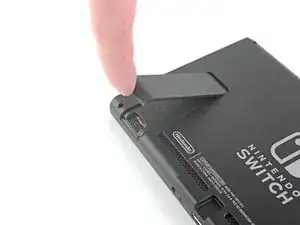
    • Use your finger to flip up the kickstand on the back of the device.

    • If there's a microSD card in the microSD card slot, remove it now before you continue to the next step.

    Don't put your SD card on your magnetic mat.

    Chris Cotter -

  7. rJ4M2PBV1Z5gOaPS
    • Use a JIS 000 screwdriver or an official iFixit PH 000 driver to remove the 1.6 mm screw in the kickstand well.

    • Close the kickstand.

  8. sJlDUdVfVekGVHQU
    sJlDUdVfVekGVHQU
    4WialnXAlRWtwINs
    tMSpAvarIRbjmCpW
    • Open the game card cartridge flap.

    • The game card cartridge flap attaches to the other half of the plastic shell, preventing you from completely lifting up the rear panel if it's closed.

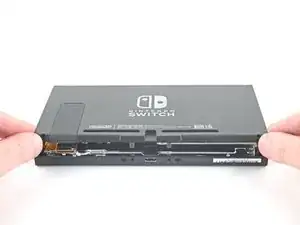
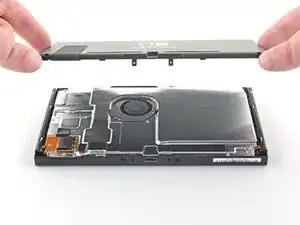
    • Lift the rear panel up from the bottom of the device and remove it.

    How to remove micro SD port?

    Pull straight up, press back into place when closing back up.

    Christopher Hernandez -

    This step is missing in this guide. Here are the steps from another guide:

    Step 9) Nintendo Switch Right Joy Con Sensor Rail Replacement

    Step 10) Nintendo Switch Right Joy Con Sensor Rail Replacement

    David -

    When I lifted up the back cover, it kind of stuck near the headphone port (even with cartridge slot open). But it wasn't a screw or anything and I kind of carefully pulled and wiggled and the cover came off ok

    Doe -

  9. mLOsk2yjpDAHKFQJ
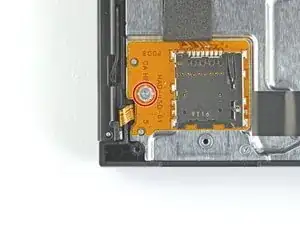
    • Use a JIS 000 screwdriver or an official iFixit PH 000 driver to remove the 3.1 mm screw securing the microSD card reader to the device.

  10. jlfUdiL4qMAqIyRa
    jlfUdiL4qMAqIyRa
    VGOrnHxPfWWlkXjs
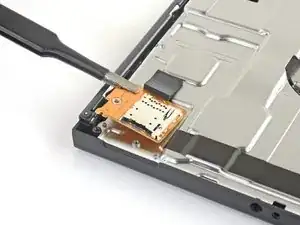
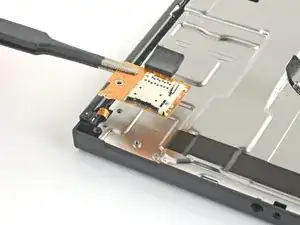
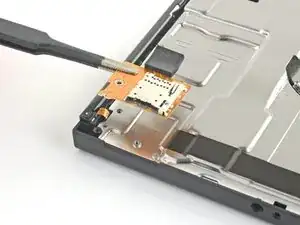
    • Use your fingers or a pair of tweezers to lift the microSD card reader straight up from the device to disconnect and remove it.

    • During reassembly, make sure the press connector underneath the foam pad is firmly connected to the motherboard. It may help to remove the foam pad before reinstalling the card reader.

    Yes. The reverse is not so simple- you can’t see what you’re doing when you attempt to reconnect and it only takes one small error to completely bend the contacts on the connector. Very delicate.

    if you very gently remove the foam pad sticker, you can at least see better how it lines up and can feel your way to a degree… then you can stick the pad back in. The pad seems pretty critical in keeping things in place once reassembled.

    holmzee -

    Definitely agree about not sticking the foam pad back on until the new SD card slot is connected. Saved a lot of headache. Great walkthrough and easy repair!

    Jonathan Stachewicz -

    Tried several times to replace this SD reader module. As mentioned above, the issue is aligning the connectors together. It appears the foam tape is being used to hold the connection in place. (assuming you can make a viable connection) I am rather surprised at this design. In my experience, mylar ribbon cables like this usually slide into a small PC mounted socket. It appears Nintendo went the cheap route here. This design is prone to failure since it does not enable a positive connection - at least from what I can see.

    Bill Little -

    Alors je suis en détresse total . Jai cassé les bouches en or sur le connecteur qui est soudé sur la carte mère.. comment changer cette toute petite pièces, oû la trouver . Cela fais 1 mois que je cherche partout. Sans remplacer la carte mère. Merci pour vos réponses

    Mike Snow -

    I found it easier to connect it without the black foam pad so I could see and than add the foam pad over it. It was super easy and I an I 33 Mom doing this for my son. Was well worth the money for the kit saved us almost 100 bucks

    Katherine Harrison -

    Had my son follow this guide to fix his own switch where the ad card reader didn't work. And he did. Great instructions!!!! Thanks a million!

    William Scott -

    The only difficult part of following this guide is connecting the new sd card reader into the poorly designed motherboard connector. Its quite possible the sd card reader that came in the console wasnt broken at all.

    The repair kit works just as advertised and even comes with stickers.

    Matthias_ Links -

    I’m still getting error 2002-2054 even after replacing memory card reader module. Thanks, Nintendo!

    Wes Stephenson -

    My switch won’t read my microSD card after I reassembled it (error 2016-0641) please help!

    Nate Topical -

    Tip: Keep the old SD reader piece loosely attached while you line up and gently press the new SD component into the connector on the motherboard. Once the new piece is snug, then carefully remove the old piece keeping the sticky foam in place.

    I am a middle-aged mom with absolutely no special tech skills and I easily followed the directions and successfully fixed the broken SD drive. ifixit is the best!

    Wende David -

    Ah good! i have more confidence now in doing it once you said you're a middle age mom with no experience

    Mohammad Hosein Yavari -

    I missed this bit about reconnecting the SD card reader under the foam pad and didn’t realise until my son pointed out a data storage problem?. All fixed in about 5 minutes taking advice from the replacing the SD card reader fix, especially removing the foam pad from the connector to better see and feel what you’re doing. All sorted!

    Stuart Farquharson-Roberts -

    Awesome guide! Very easy to do with the supplied kit

    cravenkeo khamone -

    Tank you very much, and by tank I mean M1 Abrams, jokes apart easy and simple to follow

    Elia Veschi -

    Thanks for the guide, I was struggling to find a solution, replaced more sd cards, before I stumbled upon this post. The Switch of my children works flawless again!

    Robert Morvai -

    Doesn’t work! I have spent 4 hours and $26 on a tiny screwdriver and some stickers.. I just gave up and replaced the Switch instead.

    I even contacted a local shop to have them fix it and they told me it really isn’t possible. Thanks for taking my money Ifixit!

    J.R. Wood -

    This helped me to reseat my SD card reader ribbon cable. I was getting the 2016-0641 error and no card work. A drop had dislodged the cable partially. And yes remove the foam pad gently to properly connect the cable. You can reuse the foam pad.

    Kris Morey -

    For anyone who ends up bending the pins like I did while trying to reseat the microSD card reader…

    I suggest gently placing very thin tweezers (like the curved ones in the Pro Tool Kit) in the gap and very, very gently pressing them back into alignment. Took a little effort but I was able to realign them enough to sit it in place and have it later working after reassembling the console.

    Yakarot Sennin -

    Anyone have a suggestion where I can purchase replacement foam for this sticker?

    Rob M -

    When reassembling, note the alignment pins in the left and bottom notches before tightening the screw

    Jason Lane -

    Super gemakkelijk te installeren met behulp van deze zeer duidelijke handleiding (met dank aan de vertalers!)

    Wel even goed opletten op de aansluiting op het moederbord is zeer fragiel.

    R de Bruijne -

    It is key to remember most out of the box issues with the SD card reader, do not require a replacement part and can be solved with disconnecting then re-connecting the reader at the motherboard.

    Only when a simple re-seating at the connector doesn't work should you buy the replacement part.

    Jonathon Sinclair -

    I bought the kit and followed the directions. I plucked the black rubber foam off with a pair of eyelash tweezers. Putting the tiny screws back in place also was made easier using the tweezers. As for placing the SD card in place I think I got a bit lucky. I lined it up and gently pressed until it simply went into place. I do believe being gentle is the key there. But it went in and I put it back together. The deconstructing and reconstructing is what took the longest for me at least. I turned it on to verify it worked and then unpowered the unit and inserted the card. The system recognized and update right away and did it and then recognized the card! Just what I need for 20 something dollars. Son is happy and back to gaming.

    Albert Baker -

    Thank you for postingthis fix. The original sd card reader had come unplugged from the motherboard, so replacement reader will be a spare.

    Anybody found a way to ensure the sd reader stays in place?

    Craig Thwaites -

    It was my first time repairing a Switch and the fan replacement wasn't too hard, but unfortunately I think there should be a better warning about the SD card connector because I damaged it while trying to put it back in. I couldn't hear any click and it didn't seem to stay put and I think I ended up applying to much force and damaging the pins.

    Serge Huber -

    What are the foam black squares called and where can I get a replacement for one?

    Marcus -

    It’s called Foam tape

    Alberto -

    What is the error code 404 for

    Alberto -

Conclusion

Compare your new replacement part to the original part. You may need to transfer remaining components or remove adhesive backings from the new part before installing.

To reassemble your device, follow these instructions in reverse order.

Take your e-waste to an R2 or e-Stewards certified recycler.

Repair didn’t go as planned? Try some basic troubleshooting, or ask our Nintendo Switch Answers community for help.

Craig Lloyd

Member since: 10/02/16

35240 Reputation

49 comments

My SD reader never worked.

Used this guide to find that it was never seated correctly. Reseated and now works perfectly. THANK YOU!

Finx O'Mally -

My console won’t boot if I have an SD card inserted after reseating it. What should I do?

Ewan MacInnis -

Easy guide, fixed my problem. Changed the SD card reader cause I was abusing of it by putting SD in and out constantly.
Nicola Bonardi -

Great guide! My 11-year-old son was able to fix his Switch himself with no difficulty.

Matt -

Some one can help me, when I tried to put the connector again I damage the fpc connector of the motherboard so I try to find out again can any one know the kind of model of this connector I really appreciate the help

Best regards

Philip Milian -

Worked perfectly! The only issue I had was the Tripoint 000 bit that I ordered from here didn’t fit any screwdriver that I owned. So I used a vice grip to hold the bit.

Patrick Kremer -

Gracias, tenía el boot.bat error y esto me ayudó

Thanks i had boot.bat error and this help me

patricio Herrera -

I have to give a BIG thanks to this thread! Nintendo offered to fix it for me with a 4 week wait, I didn’t want to give up my switch. So I bought all the tools and SD card reader suggested on this thread! Fixing it was super easy, mind u, I don’t have a steady hand so it took longer than the estimated time! But my switch now reads SD cards, I had already bought a 64 gig one, but since mine was faulty it wouldn’t read.

now I have all my games back, and didn’t have to send my switch anywhere! Thank u so much for having this post! I never would’ve thought to fix it myself.

FLLOH -

Is it just me or does the parts listed under ‘Buy these parts’ link not include the needed tri-wing screwdriver?

Robert Petersen -

sorry I haven’t repaired something before, what are those things that look like tweezers called? I don’t want to perm damage my console

Beat -

I ordered this kit about a week ago and installed it today and Voila

ShaaRonn Lindsey -

Thanks ifixit.com for your website and Easy instructions for beginners like Me. Everything worked perfectly- from ordering the kit to repairing the card reader. I will definitely recommend your site to others and might be back to order anything else I might need in the future

ShaaRonn Lindsey -

be very careful when doing this. i did mine. then i turned it on to test, without putting all the screws back in. now my switch wont turn on.

Hazreena Aida Illias -

It worked! My switch would never read the sd cards. Just got this today, followed the instructions and it worked! Make sure that it clicks on right, I had to re do it a second time to get it correctly but finally I have space in my sons switch!! Thank you!

Coralice Diaz -

I installed a new MicroSD card in my two year old switch for the first time today only to find out there was a fault. Followed your tutorial by disassembling the switch only to find the ribbon loosely connected.

Reconnected the ribbon, powered up the switch and it works perfectly!

Drop me your PayPal, would love to buy you a pint!

dvdaf -

In the end the problem wasn’t solved by the card reader. Luckily Nintendo is opening up their repair centers again.

Garrett ewald -

Super Einfach vielen Dank

Hat wunderbar geklappt

silvio -

Awesome - was experiencing error codes 2002-2039 which I tracked down to the SD card or reader. Tried a couple of cards and then swapped out the reader using this guide. The Switch works fine now so thanks very much!

Chris Williams -

This was super easy to repair with the kit and walk through. The 15 year old is happy once again!

Sarah Engstrom -

Ordered the parts and used this guide. Turns out my OM card reader wasn't seated properly, so it wasn't actually connected.

Nintendo would have asked for $100 for what turned out to be a 15minute fix. Keeping the parts I ordered just in case, plus they were only $15.

Kristy brandon -

Thank you so much!

Fixed my nephews switch!

Joshua McVey -

My SD card reader stopped working back in March. I was really dreading having to send my switch in for repairs, but when I found out I could do it myself I was really excited! I bought the part from here and I just finished the replacement. It reads my card just fine! The guide was really easy to follow for a beginner like me.

Leticia M -

i installed this new card reader and it did not fix my sd card not reading issue. same exact no card reading as the original sd card reader

carmine colangelo -

I bought my Nintendo Switch in January two years ago. Months later that I discovered that the SD memory card reader wasn’t working due to faulty connections or faulty part. It wasn’t until this month that I saw this replacement part on Amazon that I decided to buy it along with the necessary device-repair screwdriver kit. The kit and replacement part was under $20 excluding shipping, and I ordered it five days ago, and it arrived yesterday, and today I decided to do the repair following this instruction. It was easy, and fast as well. I did need to use tape to put the loose screws on in a way that kept the screws located similar to when screwed in, and I had to be careful as they’re so tiny, but fortunately the screwdriver was magnetic enough to help avoid losing any of them. I tried my Nintendo Switch compatible SD memory card, and turned it on. The new card reader works perfectly now. Thank you so much for this repair manual and the replacement part and repair kit. I definitely recommend this site and shop.

Samuel Kent -

Great guide, just replaced my SD card reader with no problem!

ben parsonage -

This guide helped me replace the SD card reader. Easy to follow. Thanks for the guide! ?

Matthew Fredericks -

Thanks for this great effort. I am not sure if the pins are attached correctly in the last step. unfortunately, the sd card still not working :(

Hussein Abdulhalim -

Great guide up until the part where you have to, you know, actually replace the sd card reader. I watched this video to help with that part, but even then they weren’t clear about how they re-attached the sd card reader. What I did was remove the black foam thing and the old sd card reader, then aligned the connector of my new sd card reader with where the connector on the motherboard is. Holding that in place with one thumb, I held the metal part (where the actual slot is) in place with my other thumb (make sure you align it with the two gray pins on the left side) and then use another finger to press down on the ribbon. If you hear and a feel a click you know you did it correctly. Then just place the black foam piece back on and put everything back together :DD

You’re gonna have to do some guesswork about aligning the connector and the ribbon correctly, just don’t press too hard. I didn’t have to. Hope this helps

Jonathan Zhang -

Dude thank you so much for going into the specifics on this- no other tutorial I found went into how to assure the connection to the motherboard was secure. I was trying to angle it flat and click it in but could't until I followed your steps. You rock.

Mat Merritt -

My Switch had been randomly stating SD card removed when playing games, after trying a different SD card and having the same issue I concluded it was probably an issue with the SD card reader. I found the replacement part sold by iFixit, along with this guide.

No real problems following this guide, the main somewhat difficult part is aligning the connector for the SD card reader with the Switch’s motherboard. I used a torch so I could better see the connector on the motherboard then just did my best to accurately lay the connector over and gently press it in, that took a few minutes to eventually do as I didn’t want to force it and potentially break something.

SD card issues resolved and my Switch has plenty of storage once more!

Thank you to all involved making this possible!

Matt Hill -

Followed all of the steps above and the switch still says the MicroSD card is not inserted. Any other advice?

Allison Wiers -

Fait à l'instant, fonctionne très bien.

Je recommande les tournevis vendu sur le site qui sont au top.

LEBEAU -

Even after replacing it, my SD card reader still won't work correctly, and I'm pretty sure it has something to do with the foam pad next to it. Is it safe to remove? Or should I replace it?

Kaden Peterson -

Sd card on my device never worked. Replaced it with this, still doesn’t work. Another $20 wasted.

Tim Clayton -

It is key to remember most out of the box issues with the SD card reader, do not require a replacement part and can be solved with disconnecting then re-connecting the reader at the motherboard.

Only when a simple re-seating at the connector doesn't work should you buy the replacement part.

Jonathon Sinclair -

Thanks to this guide I could reconnect the sd card reader ribbon , everything is working ok

JC Escalona -

This guide was well-written. I could follow directions clearly and my sd reader works again!

marcosdelhierro -

This worked perfectly and took less than 15 minutes from top to bottom. As a result, my switch recognize again my SD-Card. Thanks for this tutorial.

Fixator -

My first ever fix! Thank you so much. What a great company :)

Cameron Naylor -

So worth it! totk boots up super quickly now :)

AemVR -

Worked! Thanks!

Radko Madzharov -

Does this work on Switch lite?

Master -

Es el mismo procedimiento para una oled???

Victor Jair Salazar Cartajena -

This is a perfect walk-through. Thank you! I've completed this three time now. All three times the reader had simply disconnected itself. I didn't even need the card reader replacement.

Ezra Lange -

BACK UP YOUR SDCaRD BEFORE DOING THIS TUTORIAL!! I HAD TO FORMAT MINE AGAIN AFTER CHANGING THE READER AND LOST ALL MY SAVE FILES ON IT!

JustForThisComment?ComeOn -

Nice guide. 5/5. But my Sd card reader wouldn’t eject my Sd card and didn’t register when it was installed. So the product gets a 1. I ended up buying a used original card reader and I’ll see if that works instead.

John murray -

you are a genius! my switch works perfectly! now I can download many more games. THANKS DUDE!!!

Samuele Matranga -

Guida perfetta per cambiare il lettore di micro sd non più funzionante...ora la switch è di nuovo utilizzabile a pieno! Grazie ancora per la precisione

Giovanni Simeone -

AMAZING GUIDE!! I thought my micro sd reader had gone bust but I followed this AMAZING guide and reseated reader and followed it backwards just for it too work and allow me to use my new sd card. THANK YOU IFIXIT

Tyler Davey -