Introduction

Replacing the hard drive on a Unibody is simple - it only requires removing one screw!

  1. qPsGdXwUZZBT6RJa
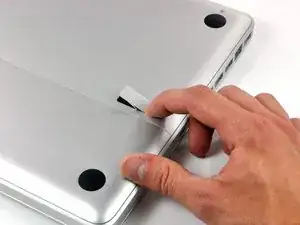
    • With the case closed, place the Unibody top-side down on a flat surface.

    • Depress the grooved side of the access door release latch enough to grab the free end. Lift the release latch until it is vertical.

    This is not a a1278 unibody MacBook Pro. A1278 MacBooks backs are one solid metal piece not two separate pieces. This guide is for a different MacBook Pro.

    Brad Burgeson -

    This guide isn’t for a pro; it’s a MacBook unibody.

    Nicholas -

    So, it turns out that Apple used the model code A1278 for quite a few different Mac models, including both Pro and non-Pro versions! This guide is for the non-Pro Macbooks. There’s also one for the Pro models with the same A1278 identifier.

    tempelmann -

  2. Pf4wGUpXWyJ3tAfH
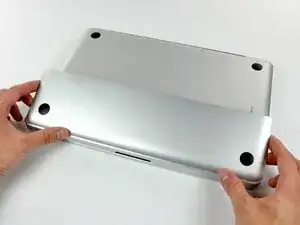
    • The access door should now be raised enough to lift it up and out of the Unibody.

  3. WkwQip2DfR1iJLMX
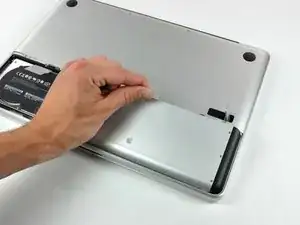
    • Be sure the access door release latch is vertical before proceeding.

    • Grab the white plastic tab and pull the battery up and out of the Unibody.

    Great tutorial ! great step !

    Leo Etcheverry -

    Even though it’s specifically stated, you have to make sure the access door latch is vertical or the battery won’t be removable.

    Henry Kim -

  4. iOkdv1JNl1NiJQqp
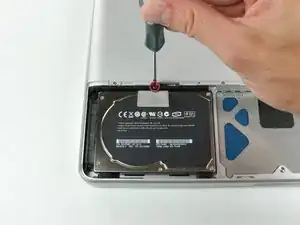
    • Remove the single Phillips screw securing the hard drive bracket to the upper case.

    • This screw is captive to the hard drive bracket.

    My Phillips #00 screwdriver does not fit here. In fact, I´ve tried every Phillips screwdriver I have. Nothing fits. I am losing my mind trying to get that screw out.

    Glenn Gukild -

    Turns out I have a stripped screw...

    Glenn Gukild -

    My drive screw head was pre-stripped. I had to drill through it to remove the drive bracket. Any idea what the specification of this screw is? It appears to be around 12mm long and 1.5mm diameter but M1.5 does not appear to exist.

    tim -

    Here my screw head is worn out. Thinking of drilling it myself as well. Not happy ☹️ Any tips to the rescue to solve this without drilling?

    Robin Harleman -

  5. YOBccGSPpCWHBK4S
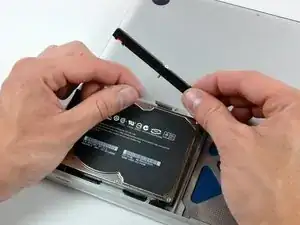
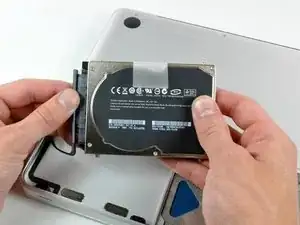
    • Lift the hard drive by its pull tab enough to grab and remove the retaining bracket.

    • Lift the hard drive out of the chassis, minding the cable attaching it to the computer.

  6. vjtxNTlAGWwbhYaN
    • Remove the hard drive from its cable by pulling the cable connector straight away from the drive.

    • Hard drive remains.

    Is this SATA 1, 2 or 3? I'm buying a SSD and am wondering if it would take advantage of Sata 3.

    Eugene -

    I'm also considering an SSD, any help with this question?

    bryanlatchford -

    I did some some looking around for specs at everymac.com and I came up with this.

    http://www.everymac.com/systems/apple/ma...

    From the link there it says the SATA interface is 3Gb/s, which would be SATA II.

    As for whether or not an SSD is worth it on SATA II, I found a Tom's Hardware article which explains the problem a little bit more.

    http://www.tomshardware.com/reviews/ssd-...

    Hope this helps!

    Chris Opperwall -

Conclusion

To reassemble your device, follow these instructions in reverse order.
Andrew Bookholt

585795 Reputation

0 comments