Introduction
Use this guide to replace your MacBook Core Duo's upper case, which also contains the trackpad and keyboard.
Tools
Parts
-
-
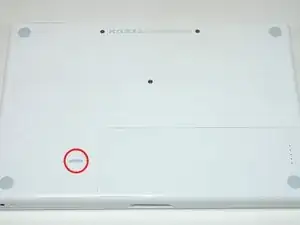
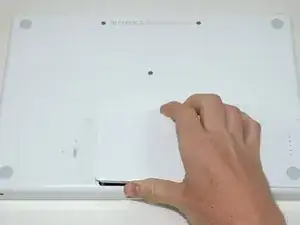
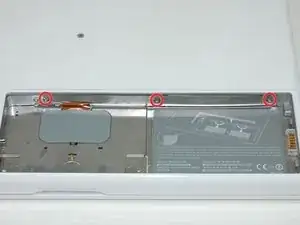
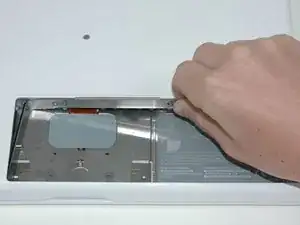
Remove the three evenly-spaced Phillips screws from along the rear wall of the battery compartment.
-
-
-
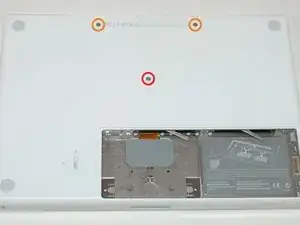
Remove the following 3 screws:
-
One 11 mm Phillips #00 in the middle of the case.
-
Two 14.5 mm Phillips #00.
-
-
-
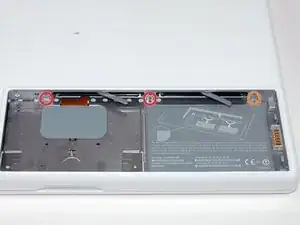
Remove the following 3 screws from the rear wall of the battery compartment:
-
Two 3 mm Phillips #00. (A1181 has three 3 mm screws and one 4 mm.)
-
One 4 mm Phillips #00 on the right side.
-
-
-
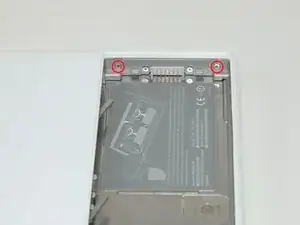
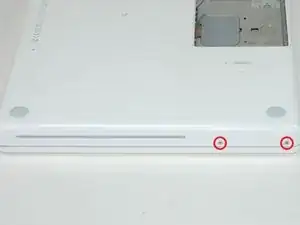
Remove the two 6 mm Phillips #00 screws from either side of the right wall of the battery compartment (not the ones closest to the battery connector).
-
-
-
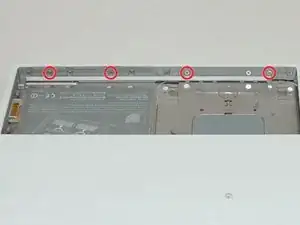
Remove the four 3 mm indicated Phillips #00 screws from the front wall of the battery compartment. When working from the left, remove the 2nd, 4th, 7th and 9th screw.
-
-
-
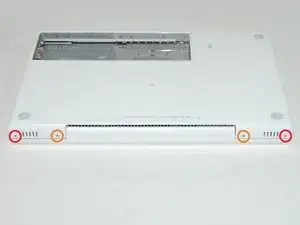
Remove the following 4 screws from the back of the computer:
-
Two 7 mm shouldered Phillips on the far sides.
-
Two 10.5 mm Phillips toward the center.
-
-
-
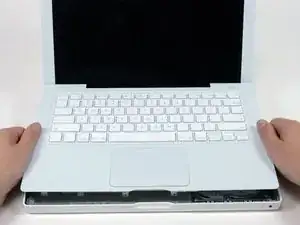
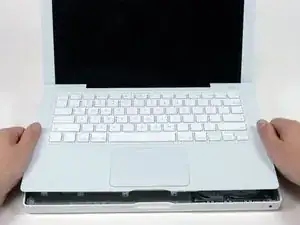
Starting near the display and working around to the front of the computer, pry up on the upper case. It is held with clips on the right above the optical drive. These will release with some firm lifting pressure.
-
Be careful when prying up the upper case. It's very easy to slice open a fingertip and thus provide the blood sacrifice the Mac gods sometimes require of those who insist on doing their own repairs.
-
-
-
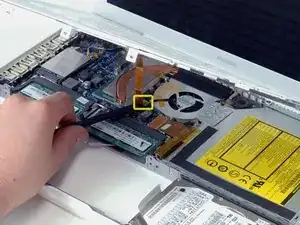
While holding up the upper case (from the bottom or the top), use a spudger to pry up the orange trackpad and keyboard cable from its connector.
-
To reassemble your device, follow these instructions in reverse order.
7 comments
I'm working on 3 different Macbooks, and having Keyboard/Trackpad probs with a 2.0 Mid-2007, a 2.16 Mid-2007, and a 2.1 Early 2008.
The Black 2.16 Black seemed to have a faulty logic board and wouldn't start up. I swapped the logic board from the 2.0 White into the Black and it fired up right away. Good news. I then put the Black 2.16 logic board into the White "just for fun". And it started up just fine too! Weird, but good news.
But the new Black KB/TP (from eBay) has just stopped working after 2 weeks. The power button works to start up, but that's it. No KB or TP activity at all. I've tried it on both Macbooks.
And now the White KB/TP, installed on the Black, stopped working. Starts up, but no KB/TP. Causes? Any compatibility problems? IIRC the cables are all silver.
And the 2.1 2008: it starts and works fine, but NOT the KB/TP: either its own, or from a 2.0 C2D. And its KB/TP works on OTHER Macbooks. Any ideas?
P.S. know of any guides on replacing upper case Flex Cables (2007-08)?
Matt -
Well I did the keyboard replacement with ease. I was fooling around back and forth with other things but my best guess is that it took less than one hour total. Yes I did make a one drop blood sacrifice. Be careful when reaching under that keyboard as there are some sharp metal edges. One thing I did do was write the step numbers in scraps of paper and placed the screws on those. In reality it is probably not needed.
These instructions are some of the clearest, easy to follow guides I have ever run across. Thanks Ifixit!
The only thing that spooked me was that I removed a battery that was near fully charged. When I put all back together it showed a 0% battery and the mac would shut down immediately after unhooking the charger. Now about a couple hours later it is showing over 75%. I am guessing maybe the removal of the battery resets things inside the mac and it thinks the battery is dead? No idea why but it seems to be charging up. Just a mystery that bugs me.
Followed the Guide to replace hard drive (blank, recently formatted) and dvd drive. When I turned on the Macbook Pro, the screen was dark but the push button latch LED was lit, but the power button wasn't lighting up. Anyone run across this problem?
Did you recheck all of the cables? If those things were working properly before, then replacement of just the hard drive and/or dvd player, would not cause it to start happening. Make sure you didn't disturb any of the other cables while you were in there. Sometimes it just takes a nudge. I've been inside laptops that had never been opened before, and found cables that had loosened just over time and the movement of the laptop.
Also, did you "zap" the PRAM when you first started the MacBook up? The laptop might not be recognizing the new drive and software on it. Hold down this key combination (in the order presented) after pressing the power button, "apple control" + "option" + "p" + "r". It is usually recommended to hold them all down until the computer restarts itself two or three times - then release the keys and let the computer start again on it's own. I often hold them down for five or six restarts though, especially if the computer has already exhibited errors. See if that helps.
Check also that the RAM has been reseated properly and that no dust or fine hairs, or even fingerprints on the gold pins of the pieces, between the pieces and where they make contact with the ram holder contacts.

This is a difficult project. It is imperative that you read the entire guide before you proceed. Have a system in place to keep track of the screws so you know what goes where. Budget several hours for this.
jonathan55 -