-
-
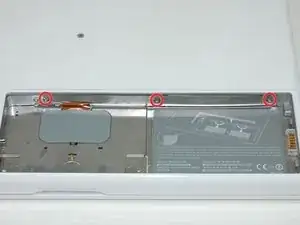
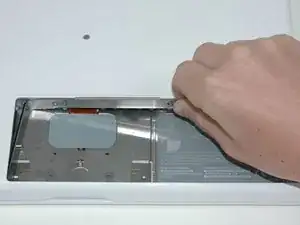
Remove the three evenly-spaced Phillips screws from along the rear wall of the battery compartment.
-
-
-
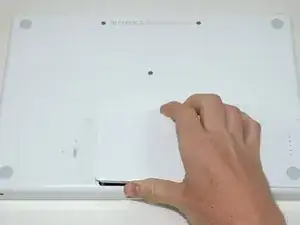
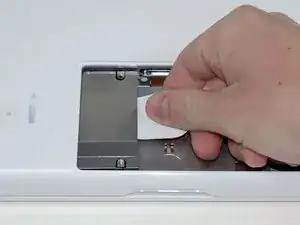
Grasp the white plastic tab attached to the hard drive and pull it to the right, removing the hard drive from the computer.
-
-
-
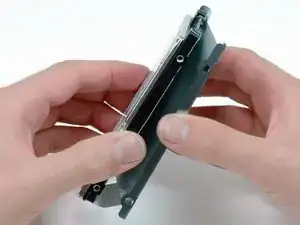
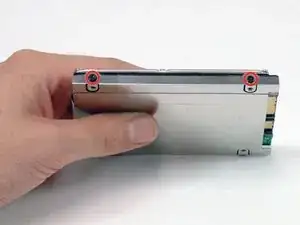
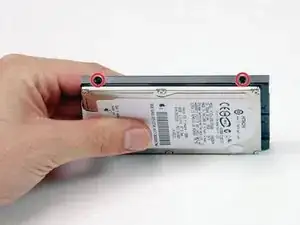
Rotate the hard drive and remove the two black T8 Torx screws on the other side of the drive.
-

To reassemble your device, follow these instructions in reverse order.

20 comments
Thanks iFixit for this great walkthrough. Yes, it worked find. Have a look: http://www.vimeo.com/17134347 ;) Keep on rockin' /Sebastian
Any suggestions for when the rubber track comes out with the hard disk? Short of dismantling the whole thing?
I saw no replies to the "black rubber lip in the slot" comment. What is the fix for that rubber liner track strip coming loose from the inside of the HD enclosure, please?
Mike -
Thanks for the guide, iFixit! It worked like a cham.
This is a difficult project. It is imperative that you read the entire guide before you proceed. Have a system in place to keep track of the screws so you know what goes where. Budget several hours for this.
jonathan55 -
I found this to be the easiest upgrade I have ever done. New HDD and memory in ten minutes, start to finish. The hardest part was getting the #8 Torx screwdriver. Booted from the OSX disk, formatted the drive, (use the GUID scheme) and we're screaming along.
This is a great guide.
steve52 -
Brilliant guide from you guys. I tackled a cd drive replacement on my Dad's MacBook a little while ago, but my skills were really tested when I accidentally stood on my laptop - new LCD needed. A visit to Ebay (don't forget duties when importing!), and this LCD Display replacement guide are all I needed. Yes it took a while (2-3 hours), but as long as you remember you need to do everything backwards then it's straightforward. I wouldn't have known where to start without this guide so thanks for creating them.
Laurence
lglew -
The guide is fantastic and the Airport Extreme Card upgrade took me less than an hour to complete. It wasn't very difficult. Some pointers: read the entire guide before undertaking the project; keep the screws from each step separated in labeled containers; buy a spludger if you don't already have one; keep a tweezer handy for the tiny screws; and take your time separating the keyboard from the computer so as to not crack/break the plastic bezel.
bvancott -
Nonsense! Even a non-technical person could follow this guide and do the job in 15 minutes. Anyone who's done any work on any kind of computer will be able to do this in 5-10 minutes.
eflyguy -
i agree, me and my friend (both) 14, took this underway to clean out the inside of my computer for recreational purposes, piece of cake!
keeganmerom -
This nontechnical person took about two hours to get the optical drive out and stripped down enough to take it apart and look for fragments of a CD. and then reassemble it. I'm sure other people are faster than me, they usually are, but newbees should set aside the time just in case. Also, jonathan55 is right about those screws, keep track of them and the other in which they come out as there are several different lengths.
adamorth -
Umm, that's the ORDER in which they came out. Sheesh.
adamorth -
Great guide. Very easy to follow. I put in a replacement hard drive in less than 30 minutes.
prax5487 -
Extremely useful guide. Just replaced the topcase/trackpad/keyboard assembly in ~15 minutes. I've had a moderate amount of previous experience with computer repairs, but even so, anyone should be able to do this project successfully.
snharris -
The replacement takes about 10 minutes from start to finish. The longest part is the OS Backup/Restore...
BTW, you might want to know before you begin: if you have a similar size backup hard drive that you originally have in your computer, you should "Restore" the contents of the original hard drive onto it before starting this manual, using the Disk Utility. (Yes it's called Restore. You restore the original to the backup. lol.)
Your other alternative is to get an external enclosure for your SATA Laptop hard drive that has a Firewire port on it.
After the swap, you connect either the backup drive or the original drive in the external enclosure using Firewire, then boot while pressing the Option key. The backup drive will show up (possibly as the only boot option.) (In fact, now that I think about it, you might not even have to press the Option key, since the external drive should be the only boot option unless there is something in your DVD drive...)
Boot to the backup drive, then "Restore" its contents to the new internal hard drive using the Disk Utility. You should be set with your original OS, settings, etc.
Gyuri Ordody -
Overall I'd say this was easy if you've taken apart any computer-like device before. Total time was a little less than hour for me, and the most difficult part was getting all of the tiny screws back in; fan installation was a breeze.
paul46 -
There is a simpler way of installing the operating system than described in the notes. First do a time machine backup to a new external drive. This will force a total back-up and prevent problems of restoring everything as it was. Follow steps 1-8. Instead of quitting disk utility as described in step 9, go back into disk utility menu and on the very last line you will see the option to restore the operating system and all its files via the time machine option. It was a breeze, and I did not have to deal with steps 10-28
newsletter68 -
I am so grateful for this website! This is the first time I have opened a computer and the instillation is now done, 45 minutes later.
The key, as many others have written is the organization of the screws. It was very helpful for me to print out the individual pictures of the steps to follow. I then laid the screws, as I took them out, on the printed pictures that I placed on a table.
The key is a little mindfulness...relax... and it is fun! Enjoy!
juztino -
This is a terrific guide. Thank you very much for providing it.
Some of the screws may be different sizes in different 'books. Keeping them separated, or measuring as you remove them, helps. Also, a few of the rubber spacers, etc are not the same in mine as in the photos, and some connectors also differ. I found it helpful to take notes at each Step when they differed from the picture. A guitar pick helps when trying to get the top case free.
RichR -
Not quite sure what this guy is smoking, but he didn't share with the class. The hard drive replacement takes less than 5 minutes and is absolutely within the ability of anyone over the age of 7.
paul9 -
I'm not a super techy guy, but this as much easier than I expected it to be. Just make sure you've got the Torx and mini-screw drivers handy.
BillB -
The instructions were excellent and the job of removing & replacing the hard-drive went like clockwork. A novice could handle this task easily with modest mechanical skills. Someone previously suggested putting aside several hours to do this..... I disagree as I replaced the HD & both RAM chips in approx. 10 minutes & I was pacing myself. As far as hardware is concerned, I found a total of 7 screws to deal with! You don't have to be too anal to keep track of 7 screws especially when 3 of them are captive in the memory cover. Unless you are mechanically inept, go ahead and do this simple job!
RAIB -
Several HOURS?!? It took me 10 minutes.
Scott -
I just finished this installation, and it went very smoothly. Your instructions were excellent, as were your step-by-step pictures. I couldn't be happier....I saved alot of money because of IFixit, and really appreciate it!
Amy -
Muchas Grazias, i did the steps to replug the isight cable. And its working again. Maybe doing all the steps was a bit overdressed for my problem. My only tool was a knife. Now only two parts aren´t reassemled: a little screw and a magnet. Thanks a lot again, the camera is working again!
seb -
This was an easy installation. I am NOT a tech type, just a mom who wants a better hard drive.
I installed the new hard drive into the MacBook and moved the old hard drive into the new housing in less time than it took my husband to put the baby to bed. Yeah, his bedtime routine with her takes longer than mine, but it's still less than half an hour.
I just cleared off part of the dining room table, put down a towel to keep all the parts from rolling around and followed the step-by-step directions provided here. Sooo easy. Almost too easy.
I look forward to my next MacBook repair, and I will absolutely come back to ifixit.com to get the parts and learn how to do it. I'll be here for support on my iPhone and iPods, too.
momside -
Just did an LCD replacement on a white old model MacBook. Followed this guide to a the letter. IT WORKS! I'm commenting on my fixed mac now. Excellent guide. Things I would suggest are to read through everything first and keep a note of screws labeling etc. you'll be grateful on the return trip. Also watch the routing of the cables when working on the lcd housing and right hand side of the lower laptop. Not only have I fixed my problem. I've realized that customizing macs and doing your own repairs is relatively straight forward if you follow instructions.
This website really empowers the apple product user. Shop around for parts, ebay is a good place to start. I got my screen for £65 (UK).
Final word take your time and if you are replacing LCD screens expect it to take up to 6 hours.
Also if you are replacing Samsung LCD screen it has a test port (on left back) which most replacements do not. Don't worry about it, it is nothing to do with a Mac.
thanks again ifixit.com!
alex Bayly -
Best way I've found to keep track of the screws is to use an ice cube tray. Just make sure you don't knock it over by mistake ;P
maccentric -
thursday: made the order on ifixit.com for ldc, spudger, size 0 screwdriver.
monday: items delivered to my place in NY.
monday night: new LCD installed.
thank you ifixit. parts ordered were perfect LCD crisper than the original one. spudger came in handy. this manual was spot on.
thanks again.
-j
NY, NY.
jose -
The instructions were more than helpful. Very well written. I just need to be better about following them. It was a easy process, it took me about 20 minutes all together. The only thing I ran across it was putting the keyboard back in place. Make sure it's all line up before you start putting screws back in place.
pdeoliveira -
Thanks a lot for this guide. It would have been much more difficult without knowing what to do.
When I was done, the LCD backlight flickered somewhat occasionally. The owner said that had not happened before. I cleaned the LCD plug by blowing with a straw into it but the flickering still happened. Dunno if this was related to my work.
darsie -
Doe's anybody know if its possible to install a second generation logic board with the core 2 duo in the first generation MacBook?
off course I'm looking to upgrade my first gen MacBook 1,1 using the newer generation MacBook logic board, so may be one of you know whether this process is possible...
Thank you :-)
Dudi -
One note on the fan replacement, or really any MacBook repairs. If you fire your MacBook up and nothing happens but the sleep light is blinking then make sure your memory is seated correctly. I freaked out after installing my new fan but it turns out that all I needed to do was reseat the memory.
jeffbacher -
THANK YOU for that great guideline! I did it step by step with my iPhone next to the workbench and it went well. One hour to open, one hour to close for me as a complete beginner.
annokluss -
Jonathon55 was referring to the whole pram replacement. I tore apart an ibook years ago and it had less steps then this and I am quite technically adept. Going to pay for apple store to replace, not going to waste half a day doing.
Bill Conners -
Thank you for this guide. I appreciate the time you took to photograph this and document it.
Don't take notice of the I did it in 10 minutes brigade, replacing the HDd might take 10 minutes but the other jobs will take longer.
Also those that are dissing the author re screws etc. The screws are different lengths. Take the commentators hint and use an ice cube tray, label it 1, 2, 3, .... and put the screws in there. THe difference if 1-2 mm is enough to have a slightly long screw go through a component and kill it.
Again thanks.
Flugan -
The second time i replace the heat sink glue with new stuff.
Today, my over 10 year old mac is still running like a young rabbit. Maybe this glue replacement was helpful to keep it young.
Keep on running for some more years my friend and big thanx to IFIXIT for all these well-made tutorials!
Fabien -
Most of these comments DO NOT refer to the PRAM Battery Replacement — a process which does take two full hours and requires skill and patience to dismantle the MacBook to get to the point of flipping the logicboard to access (and swap out) the bizarre, old-fashioned battery.
The real question has to be: What is this battery? Specifically, does anyone have a part number/voltage specification for it?
If you know, please post the answer here.
Thank you so much!
Steve Arkwright -