Introduction

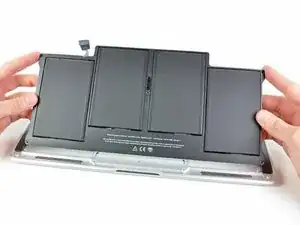
Use this guide to replace a dead battery.

Note: If there is a thin plastic film on your replacement battery, do not attempt to remove it. It is glued on and protects the battery pack while it is inside the MacBook.

  1. 3bTejPotVlS4MkaI
    • Before proceeding, power off the device, close the lid and lay it on a soft surface top-side down.

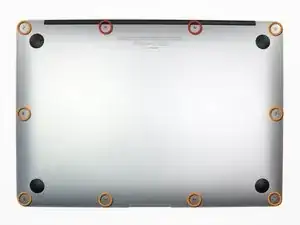
    • Remove the following ten screws:

    • Two 9 mm 5-point Pentalobe screws

    • Eight 2.6 mm 5-point Pentalobe screws

    • The special screwdriver needed to remove the eight 5-point Pentalobe screws can be found here.

  2. WwI3rtRnhTEHj54C
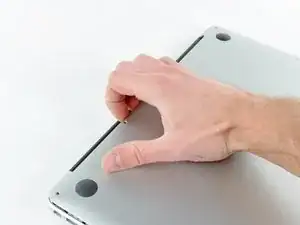
    • Wedge your fingers between the display and the lower case and pull upward to pop the lower case off the Air.

    • Remove the lower case and set it aside.

  3. N4ACcJX3UJrBILst
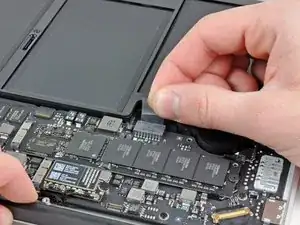
    • Grab the clear plastic pull tab attached to the battery connector and pull it toward the front edge of the Air to disconnect the battery from the logic board.

    • Do not lift upward on the connector as you disconnect it.

  4. y3TUhCKKYPlT2GMN
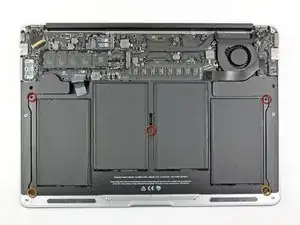
    • Remove the following five screws securing the battery to the upper case:

    • Three 6.3 mm T5 Torx screws

    • Two 2.4 mm T5 Torx screws

  5. Q6nMUHBqq3Ao6jyi
    • When handling the battery, avoid squeezing or touching the four exposed lithium polymer cells.

    • Lift the battery from its edge nearest the logic board and remove it from the upper case.

    • If you're installing a new battery, you should calibrate it after installation:

    • Charge it to 100%, and then keep charging it for at least 2 more hours. Then, unplug and use it normally to drain the battery. When you see the low battery warning, save your work, and keep your laptop on until it goes to sleep due to low battery. Wait at least 5 hours, then charge your laptop uninterrupted to 100%.

    • If you notice any unusual behavior or problems after installing your new battery, you may need to reset your MacBook's SMC.

    • The replacement battery may arrive with plastic liners and films. The plastic film is easily removable and should be removed before installation. The liner is thicker and acts as a layer of defense against punctures. Do not remove the liner from the battery.

    Thanks for the easy step by step guide. MacBook working like a dream again

    Peter atkins -

Conclusion

To reassemble your device, follow these instructions in reverse order.

Andrew Bookholt

585795 Reputation

18 comments

I received the batter for my late 2010 in good order. The instructions were easy to follow and the replacement went well. The two tools mentioned are a must - the P5 pentalobe and T5 torx.

My disappointment is that the battery from iFixit is, in fact, not new. No, it has not been used and shows 6700 mAh design capacity. However, Coconut Battery reports the manufacture date of the battery as 12-14-2011 or 1134 days. Also, I am getting 4-6 hours when I expected 5-7. What is the shelf life of an unused battery?

Perhaps iFixit may wish to change the battery description from "Brand New" to "Never Used" and put the manufacture date.

Thanks

fwunder -

Great post and thanks for this tips.

see more : http://www.geeksonsite.co.nz/

lalit -

Just arrived the battery.

Replaced in 5 minutes.

Perfect!

My Mac is up, running and charging the new battery.

Thank you

Vinicio

vgusv -

Sounds like you did not follow the conditioning procedure?

grant varga -

My battery arrived today and I was able to install it in about 30 minutes (I have not done this before). My Mac is up and running and the battery has charged up and is in use.

Thanks for all the help.

SG 03/22/2017

Saadia Greenberg -

I followed this instructions. Everything is fine except that I cannot fully insert the pull tab back into the battery connector. How hard do you have to push ? Does it have to make a click ?

Julien Salort -

Hello Julien,

It will not click, but it will need about the same amount of force to push it in as the amount needed to pull it out. This being said, you should check the battery connector for any debris, and look at all the pins to make sure nothing is broken. Let us know if you succeed!

Scott

Scott Havard -

Worked great! I used an egg carton for the screws, an ifixit 52 piece toolkit — which I love! — and the battery switch was painless and worked immediately. Many thanks! The sixteen year old girl can get back to her tweeting now. Thank God.

Best,

Ira

airira -

All went smoothly! A little bit more explanantion about re-inserting the power connector would have been nice. . . . . . .

Saved my 2011 MacAir.

thanks!!!

Paul Harris -

If you don’t already have these tiny screwdrivers, you might want to also buy the P-5 Pentalobe screwdriver and the little plastic tool (“Spudger”) from IFIXIT. My local hardware store did not have the P-5, so it was a good thing I had ordered it. And the little plastic spudger was helpful in pushing the new battery connector plug into the jack on the board. Getting the T-5 Torx, too, could be handy just to avoid a trip to the hardware store. The price on IFIXIT was not significantly more than I paid at the local Ace hardware.

Jason D -

The instructions you have given to calibrate the new battery are different from the ones that came with it. How do I proceed?

Patricia Lacerda -

I have found the answer. There are 2 different procedures, one is called CONDITIONING and the other is CALIBRATING. Conditioning of a brand new battery involves one cycle of 12 h uninterrupted charging followed by complete drainage of the battery until MacBook shuts down (repeat this 3 times). Calibrating can be done afterwards on old batteries and involves the usual instructions given by many websites (here, Lifewire, Apple, etc).

Patricia Lacerda -

Hi. I did also reset the SMC after replacing the batteries.

Fabrice -

Do i remove the plastic film on the new battery?

John -

Hi John,

If the plastic film is an easily removable layer, you can remove it. If it is glued onto the battery, do not remove the layer.

Arthur Shi -

how important is it to keep the plastic film on the battery? i didn’t see the message at the beginning and removed it :(

if it is important, i would include that message to the step where the new battery is installed.

matthewyo -

Good point! I will add a note in the last step. The battery may come installed with a liner and/or thin plastic film. The plastic film is easily removable and should be removed before installation. The liner helps with installation and acts as a layer of defense against punctures.

Arthur Shi -

Instructions simples, il suffit de les suivre et c’est parfait.

10 minutes chrono sans se presser.

Avec le kit de tournevis c’est pratique.

Celina -