Introduction
Be careful as the LED ribbon cable is fragile and prone to breaking.
Tools
-
-
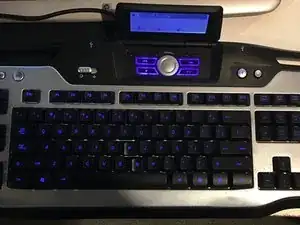
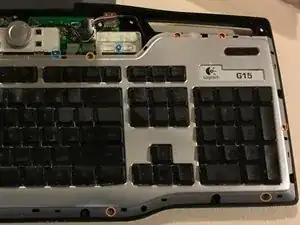
This is what your keyboard should look like. If you don't have a swing type LED screen then you might be on the wrong tutorial. I have no idea if any of this applies to the newer fixed LED type keyboard.
-
Now if you DO have this version of the G15 then you are in the right place. So step 1: Unplug the keyboard. (DUH)
-
-
-
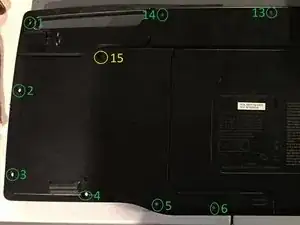
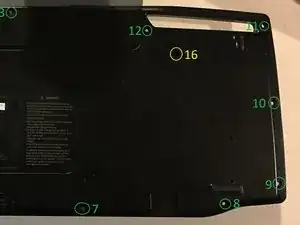
Next you need to flip over the keyboard in removed the 16 black screws holding the outer black shell on.
-
In the picture the holes are circled and numbered.
-
The two black screws closer to the "core" of the keyboard (circled in yellow) hold the back light to the back cover so if you opt to, you can keep those in place for now and remove them later.
-
-
-
****WARNING: Be VERY careful in this step as the ribbon cable is very fragile.
-
Flip the keyboard back over.
-
CAREFULLY use a flat head screw driver to pry the edges of the front cover up from the back of the keyboard. But DO NOT yet attempt to remove it all the way.
-
You may break some of the retainers. You might consider gluing them back on later but they don't seem to be overly important with the screws doing most of the work. I found that starting from the BACK edge and lifting that slightly first and then working towards the front so it could slide forward and free the front retainers worked well.
-
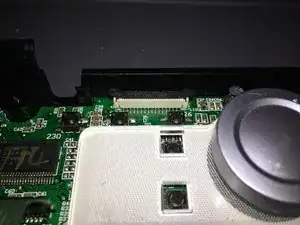
CAREFULLY tilt the FRONT of the keyboard up and look for where the LED screen's ribbon cable attache to the main board in the far back center.
-
Lift up CAREFULLY on the black retainer tab on each side of the slot until the ribbon cable releases (less than a millimeter or two) and pops out of it's slot. Be careful to not wreck the ribbon or the LED won't work ever again (at least not without some very complicated repairing).
-
-
-
Now would be a good time to get the USB cable out of the way.
-
The rubber retainer that is part of the wire that fits into the shell of the keyboard slides up and out easily.
-
Remove the usb cable's female end from the five pin male white connector and set it aside.
-
-
-
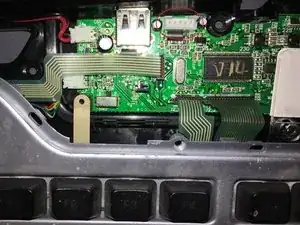
Remove the three silver Philips head screws (circled in blue in the pictures) holding the control pad and light button pad against the motherboard and set them aside.
-
You have been putting all the screws in a safe place haven't you?
-
-
-
Using a smaller or jeweler size screw driver, remove the 12 smaller silver Philips head screws (circled in orange in the pictures) that hold the light and key panel to the motherboard.
-
[I dunno if there are more proper terms for them. Don't hate. Let me know and I'll edit.]
-
-
-
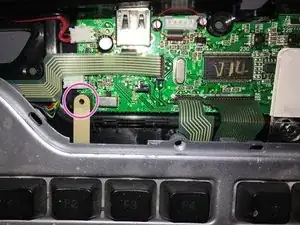
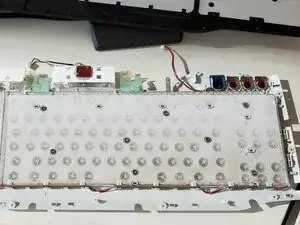
CAREFULLY unplug the NINE (circled in yellow) connectors that connect the key/light board to the main board.
-
Some are ribbon style and slide out with the little bit of ugga-dugga (very little), the others are more typical connectors. None of them are as delicate as the LED one you dealt with before so this should be cake.
-
The main one of interest is in the upper left that connects the LED lights to the main board.
-
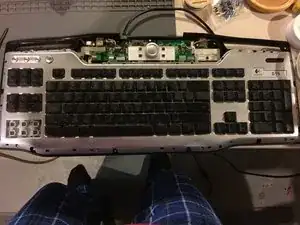
Now slowly and CAREFULLY lift the keyboard away from the main board and set the main board aside.
-
-
-
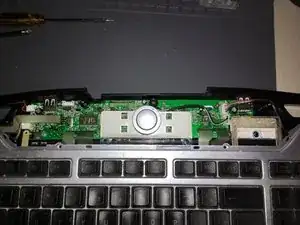
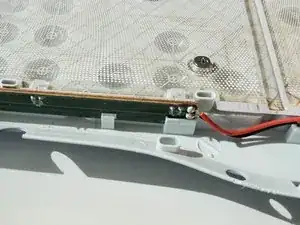
As you now have the main board separated from the back panel, turn it over.
-
You can now extract the LED plates from the bottom of the keyboard.
-
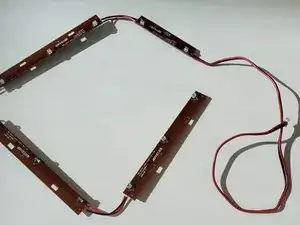
Now it's time to install the replacement board, or to replace the LEDs on this plate.
-
-
-
It's St. Patrick's Day. I'm going to get some corned beef even if all the bars are closed due to coronavirus.
-
Let me know if anyone is alive out there.
-


To reassemble your device, follow these instructions in reverse order.

12 comments
Separating the ‘light’ plate and removing the LED’s what type I replace them with, comes to mind.
I ended up getting these: https://www.ebay.com/itm/120973346340
I was optimistic about the result when it was apart but when all back together and it had time to “burn in” the lights still seem a bit dim. If you can get your hands on something brighter, I might suggest using that but YMMV. The stats on those bulbs could provide with at least a starting point.
PsiFire -
Here’s a page that describes a lot of the basics of LEDs in general: http://www.gizmology.net/LEDs.htm
I’d posit that perhaps a wider viewing angle might be as if not more beneficial than higher MCD, but more MCD likely couldn’t hurt.
PsiFire -