Introduction

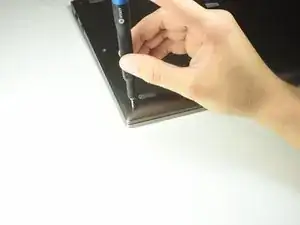
This guide shows how to replace the fingerprint sensor on the Lenovo Yoga 920-13IKB.

  1. AID2BQdmpeC1JvNe
    AID2BQdmpeC1JvNe
    qMh6tfLuJMt5xwjM
    • Flip the device over to access the screws on the back cover.

    • Remove the ten 5mm Torx T5 screws on the back cover to loosen the back cover.

  2. mxS5m6auTObfv6PO
    mxS5m6auTObfv6PO
    I5E36gGiNCDeVhV5
    fHNC3jBueRYYesEh
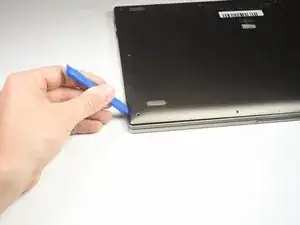
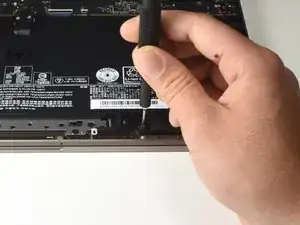
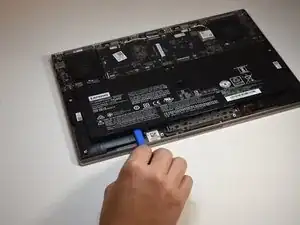
    • Slide the iFixit Opening Tool under the back cover to lift it up.

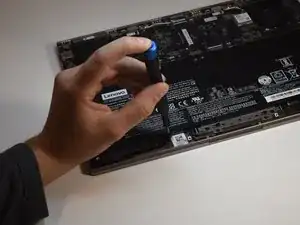
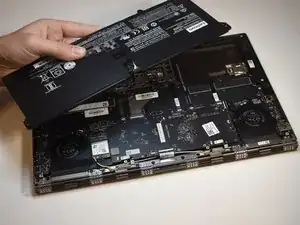
    • Pull up on the cover with your hand to release the tab holding the center of the cover in place.

    Die Mitte der unteren Abdeckung wird von zwei Plastiknoppen am Gerät gehalten. Wenn die Schrauben gelöst sind, mit beiden Händen unter die Abdeckung greifen und nach oben gerade wegziehen.

    Captainquark -

    The center of the bottom cover is held to the device by a two pronged plastic clip. When the screws are loosened, I reached under to the center of the cover with a dinner knife and pried straight up.

    gert 7to3 -

  3. QiMFZPM26PIKefg3
    QiMFZPM26PIKefg3
    e4WQCAx4FCX6jioD
    FyhnGjYkSyXJUfdi
    • Remove the four 5mm Phillips #00 screws that hold the battery in place.

  4. PqyHWOynOwcUHJam
    PqyHWOynOwcUHJam
    TDVCyqHAP6FGIHIF
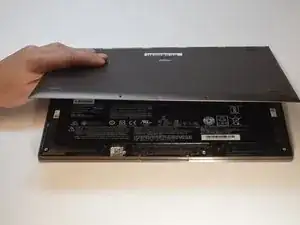
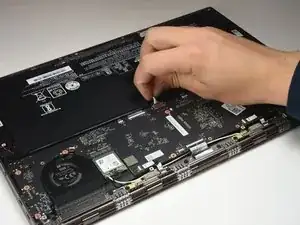
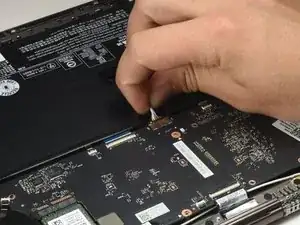
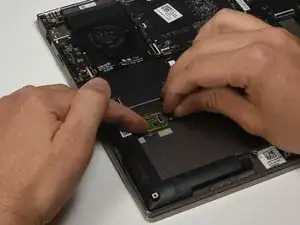
    • Grab the grouping of wires with your fingers close to the connector and gently pull to disconnect the battery from the motherboard.

    • The wire grouping is located underneath the thin flap near the center of the battery.

    • Do not lift the battery out before disconnection from the motherboard to prevent shortages or damage.

    This was the hardest step for me. My comments: The thin flap covering the wires is just a flap of the plastic covering around the battery. The connector fits tightly, needs to be really tugged out. You may need to bend the group of wires to get the new connector to seat in place. There will be a thin edge of the connector still sticking out when you have it seated. I needed to use a very thin bit from the ifixit kit to press the new connector into place. Great guide, worked perfectly!

    Spr -

    Das Kabel ließ sich bei mir tatsächlich relativ leicht vom Akku ziehen. Das Aufstecken war dann aber umso schwerer und ich hatte zwischenzeitlich Angst, die Steckeraufnahme am Motherboard zu beschädigen. Der Stecker muss wirklich tief in die Aufnahme geschoben werden und bei mir war das nur unter Zuhilfenahme von Werkzeug möglich. Die iFixit-Plastiktools waren leider wenig hilfreich. Am Ende habe ich es nur mit Unterstützung der Griffstücke (hinteren Enden) der beiden Pinzetten meines Pro Tech Toolkits geschafft. Der Rest war dann einfach - auch wenn der Stecker des rückseitigen Deckels nicht mehr in die dafür vorgesehene Aufnahme des Akku geklippt werden konnte. Leider hat der Torx-Aufsatz (T5) etwas gelitten und musste nach dem Lösen und Befestigen der 10 Yoga-Schrauben getauscht werden. Die Spitze scheint etwas zu weich zu sein. Ansonsten gute Anleitung und perfektes Konzept.

    M. Timmler -

  5. roifTytbQL4kikqB
    • Use the iFixit Opening Tool to lift the battery up enough to grab it with your hands.

  6. EYMm5PwvwPEC42O3
    • Remove the battery.

  7. HsLVOqdfoyFV1DEY
    • Remove the 3mm Phillips #00 Screw to loosen the sensor.

  8. Zf46SRUC5ygysUn2
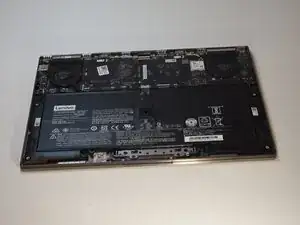
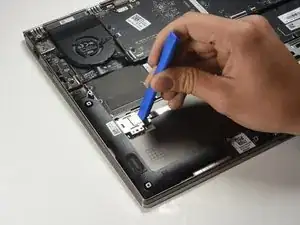
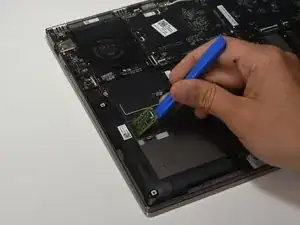
    • Lift up the cover on the fingerprint sensor using the iFixit Opening Tool and remove the cover from the sensor.

  9. Z5G4VmXNnZIErZtM
    • Flip up the cable connector tab using the iFixit Opening Tool to release the ribbon wire.

  10. gIl2gSNyvQWQEYLw
    • Unplug the ribbon wire from the sensor to completely free the sensor.

  11. MVgU4EchLMRBYIUP
    • Lift the fingerprint sensor with the iFixit Opening Tool and remove it from the device.

Conclusion

To reassemble your device, follow these instructions in reverse order.

Alyssa McCulloch

Member since: 24/01/19

1906 Reputation

0 comments