Introduction

Do your stored files appear corrupted for no reason? Does your laptop have a slow boot time? Then this guide should help you either replace the hard disk drive (HDD) or solid-state drive (SSD) installed within your device. Keep in mind that this device does not support SSDs with M.2. slots.

  1. 1bDnD2OAMZHyoAMI
    1bDnD2OAMZHyoAMI
    iVVsnLH4yV2eNp5M
    • Flip the laptop to the bottom so the backplate is shown.

    • Use a Phillips #0 screwdriver to unscrew the 2 captive screws that secure the backplate.

    • These screws should hold on to the backplate even after removal. So, you shouldn't worry about losing them.

  2. ABXqiMnKUgJBSAMe
    ABXqiMnKUgJBSAMe
    OWQ6sUYtxWHMXlOP
    • Use a Phillips #00 screwdriver to unscrew the single 3 mm screw that secures the hard drive.

  3. 2AyrAlcoL35kp5NB
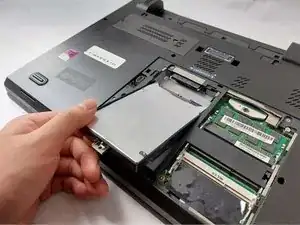
    • Lift up the bottom half of the hard drive at a 25 degree angle.

    • Simply pull out the hard drive.

  4. d3mdUmWCNsGNHAAq
    d3mdUmWCNsGNHAAq
    5kUUF323m4hNL4MB
    uq3txBwIJHARmUcf
    • Safely remove the plastic guard surrounding both the hard drive and ESD shielding.

  5. YBwjXOnFreYS3B4u
    YBwjXOnFreYS3B4u
    YmFNQTcvuCpRoBQM
    • Carefully removing the ESD shielding surrounding the hard drive.

    • Do not disregard the ESD shielding unless your new hard drive or SSD comes with its own shielding. Failure to do so will lead to severe damage to your device.

Conclusion

To reassemble your device, follow these instructions in reverse order.
Kevin Dang

Member since: 30/10/23

309 Reputation

0 comments