Introduction
This guide will show you how to replace the motherboard in your Lenovo Ideapad 320-15IAP. In the simplest terms, the motherboard is responsible for processing all input and displaying the output on your screen. It facilitates the communication between the various other components of your computer. Motherboard failures are typically expressed in an inability to turn the computer on, trouble during startup, frequent and excessive glitching or crashes, and overall malfunctioning of the computer. If experiencing any of these problems, and troubleshooting has ruled out most other components, a motherboard replacement may bring new life to your otherwise busted machine.
Tools
-
-
Unscrew thirteen 6.5mm screws from the back panel with the Phillips #0 screwdriver.
-
Pull the CD tray out with the opening tool once all screws are removed.
-
Use the opening tool to pull the case off the laptop by prying up the back panel along the edges of the computer.
-
-
-
Unscrew four 4.5mm screws from the screen brackets using a Phillips #0 screwdriver.
-
Gently pull the wire protector from the back of the computer. You may hear cracking sounds but this is normal, as the locks are disengaging as you pull.
-
-
-
Disconnect the display cable by lifting the black tab of the ZIF connector with the opening tool and gently pulling out the cable.
-
Disconnect the two coaxial cables on the WiFi card by gently pulling up on the wires.
-
Lift up the screen brackets by prying upwards on them with an opening tool.
-
-
-
Unscrew four 3mm silver screws on the motherboard using the Phillips #0 screwdriver.
-
Unscrew the single 6mm black screw with a Phillips #0 screwdriver.
-
-
-
Remove the six ribbon cables by lifting up the locking black tabs from their ZIF connectors with a spudger, then gently pulling out the cables.
-
-
-
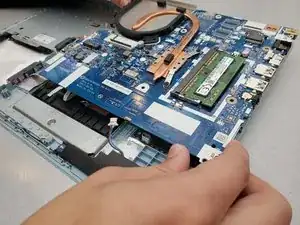
Gently remove the motherboard, being sure that no cables are being pulled or snagged in the process.
-
To reassemble your device, follow these instructions in reverse order.
One comment
I used this for the IdeaPad 330. Worked pretty much the same except in step 2 I broke all the tabs on the wire cover. The cracking sounds definitely were not normal for me on this model.


