Introduction

Use this guide to remove and replace the check valve on the underside of a Karcher Carpet Cleaner BRC3015C 2018.

  1. pNqt2DcHcIBsjlFH
    pNqt2DcHcIBsjlFH
    5jSCUHmwHiSNxITL
    • Make sure the carpet cleaner is turned off and completely disconnected from power.

    • Pull the hose on the rear of the carpet cleaner straight down to disconnect it.

  2. gCtnWEeg46xAhkvr
    • Use a 3 mm hex key to remove two bolts securing the bottom cover.

    4 mm hex key

    ZOLTAN -

  3. aLyde3UsFEeIIGAd
    aLyde3UsFEeIIGAd
    x6KCMpHOFSvbcLCW
    R2LTq1mX6uoJYxGJ
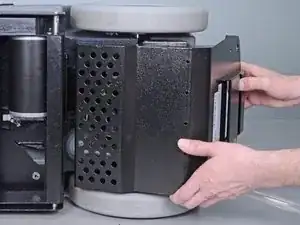
    • Rotate the bottom cover down toward the bottom of the carpet cleaner, then pull it straight back toward the rear of the carpet cleaner to remove it.

    • Don't completely remove the cover yet. There is a ground wire connecting the cover to the carpet cleaner that must be disconnected first.

  4. N1ZZv1WoZO3qVOSb
    • Pull the yellow and green ground wire connectors straight apart to disconnect the bottom cover's ground wire.

  5. kmhvPuDnNTliqVwx
    kmhvPuDnNTliqVwx
    Io4GEbcFdNLROoIk
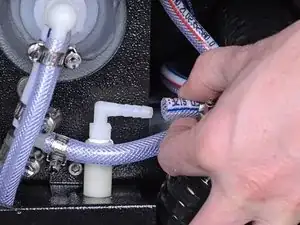
    • Use a flathead screwdriver to loosen the hose clamps at each end of the check valve hose.

  6. Vvi6gvHWwSMubaxP
    • Pull the check valve hose straight off of its hose barb to remove it.

  7. s1auOaLBmO1mjXKu
    s1auOaLBmO1mjXKu
    EFj6ISs2aUgDIKIR
    xVn1LYMOgVVZdbT2
    • Use an angled pick or your fingers to pull the clamp securing the check valve hose nozzle straight out and off of its bracket.

  8. gWWLjCICQA5pofSH
    gWWLjCICQA5pofSH
    huQ6CuQeHalJlhrC
    1EFpXPT6XZbiwnrA
    • Pull the nozzle straight down and out of its bracket.

    • Slide the entire check valve hose up and out of the carpet cleaner.

  9. cqQEfZiqdJS5Gay2
    cqQEfZiqdJS5Gay2
    6cu4cdRPPtSPpgTD
    • Pull the shorter hose straight off of the check valve to remove it.

  10. m2pBHeX5xHDMuOff
    m2pBHeX5xHDMuOff
    vMxTZXIjHe5YeHIT
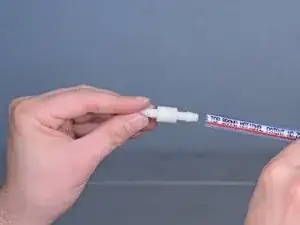
    • Pull the check valve straight out of the hose to remove it.

    • Replace the check valve with a 1/4" x 1/4" hose barb.

    • Make sure to slide the hose clamps back onto the hose before reinstalling the hose.

Conclusion

To reassemble your device, follow these instructions in reverse order.
Adam O'Camb

Member since: 11/04/15

195421 Reputation

0 comments