Introduction

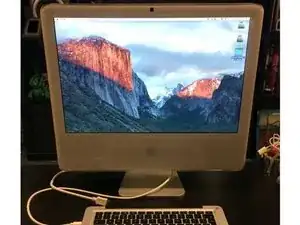
I had a 2006 Intel iMac that died (logic board / graphics card failure) and instead of consigning it to the bin, I aimed to turn it both an external monitor for my screen-less 2009 MacBook Pro (LCD driver failure, failing battery) and any HDMI device I wanted. I had seen this done with G5 iMacs, but never with Intel ones, which use different display types, so decided to have a go!

  1. 2dF5toxEG1hSRGOG
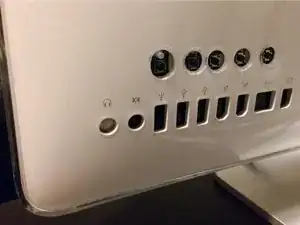
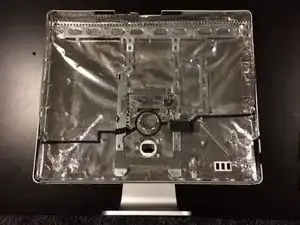
    • Firstly, I completely gutted the iMac, safely keeping the LCD screen to one side. I also repaired any torn EMI shielding and shielded all holes, with the exception of the power in, vent above this. (I also left the 3x USB ports free to fit a USB hub, but this didn't work great, so ended up being removed).

    What did you use to patch the shielding?

    Scott Lawrence -

    Just used some aluminium tape - a couple of layers as the stuff I had was quite thin

    Michael -

  2. RPipUmZohGB2EMKP
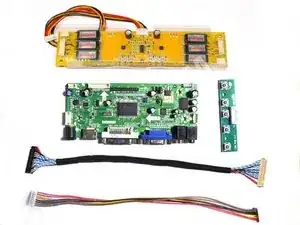
    • I next found out that my screen was a Samsung LTM201M1-L01 and after scouring eBay with this model number, I managed to find a display driver for this screen from eBay - just search for your screen model number

    • My LCD driver board has VGA, DVI and HDMI in and is powered by a 12V 4A external PSU - the eBay seller also sold PSUs, but I had one kicking about from another LCD screen.

    Hi, this is a great guide, I just have one question for you: How did you figure out your screen was a Samsung LTM201M1-L01?

    I have an iMac G5 I’d like to do this with but I can’t figure out what model the LCD is (so I can’t figure out which kit to buy).

    (PS: Sorry about the delete and repost, I didn’t realize my full name would be attached and wanted to change that).

    Ms Sir -

    I think it was written on the back / edge of the monitor panel, so only accessible after you deconstruct the iMac. You may need to carefully remove some of the fools shielding if it is covering the back of the panel.

    I believe the iMac G5 monitor is different and has a self-contained driver board already as part of it.

    I am aware that some people have used a different approach with the G5 iMac, self-constructing a DVI cable (using its existing display controller board and power supply - see here https://forums.macrumors.com/attachments...

    Aside from that route, whether kits like the ones used for Intel iMacs exist / same process can be done instead, I am not sure - first things first you need to work out why panel you have :-)

    Michael -

    This ebay shop doesn’t exist anymore. Is it possible to mention the specs of the driver board (set) ?

    Peter Bakker -

    Afraid not, as I have no details of that now - just search eBay for your LCD screen model number and get something from a seller with good rating and the item looks similar! (Input board, inverter board, controller board + cables - presuming you are doing this process for the same iMac model as I did)

    Thanks for pointing out this though, I have updated the guide accordingly.

    Michael -

    I have very basic questions - sorry if i am completely off base - I have located my screen model number and I am looking on eBay for the driver board and PSU. I had been attempting to use this older iMac as a second screen for my new iMac since there is no value to the machine anymore. It took lots of digging to realize the mini DVI on this model is output only. Just so things are clear to me - would getting this new driver board and a PSU allow this unit to be a second screen for my new iMac so i can better multitask - OR do I need to do something different? If I purchase the driver that looks similar to the one you have pictured, where do I find the suitable PSU?

    LERW -

    In short - yes; you are basically taking all the internals out the imac, leaving just the screen then adding in the necessary hardware to power and drive the screen - you would find a power supply on ebay / Amazon; most likely would be 12v 5A, but that would be dependant on your driver board. Some places sell power supplies with the driver boards, but I would probably be more inclined to find a higher quality supply with reviews, shipped from whatever country you are in. I happened to have the required power supply from an old 19” 4:3 LCD monitor that met the specs. This subsequent guide has a little more info on the initial steps - How to Identify The Make & Model Of An iMac's Screen, In Order To Buy The Correct Video Driver Board

    Michael -

    Just got hold of one of these, and it’s GREAT - it breathes life into an iMac whose power supply / logic board (didn’t figure out which) had finally given up. My question is - these boards have a connector labelled “speaker”, and I’ve got no idea what it does. I hoped I’d be able to plug one of the iMac’s speakers onto it, but it doesn’t fit. Is there an adapter available?

    Ritchie Swann -

    It is likely possible - you would probably need to make your own adaptor by splicing wires together though - I am not sure if sound would be taken into the display adaptor via hdmi/mini display port, or if it would have to be a separate 3.5mm in - have a Google about as I think some other people have tried doing this.

    I just removed the speakers from mine, as always used external ones anyway :-)

    Michael -

  3. wXjMqaqUARSYFJVT
    • Before assembling it all, it is worth testing the driver board works fine - I had some issues with the Mini Display port to HDMI cable I bought, so returned this and bought a 1M Mini Display port to DVI cable instead which worked fine.

    • I also bought a 1M white HDMI cable to have as an extra input cable for everything else and a 0.5 Metre 2.1mm DC Barrel Extension Cable, to allow me to connect and disconnect the PSU from outside the case.

    Ciao, un info, ma per alimentare lo schermo hai riutilizzato l'alimentatore del Mac stesso o l'hai attaccato ad un altro alimentatore.

    Grazie

    Massimo Battista -

    Ciao! Attaccato ad un altro alimentatore

    Michael -

  4. QWCL5virmhVNlFHA
    QWCL5virmhVNlFHA
    Eqm5GyogRArjPlxl
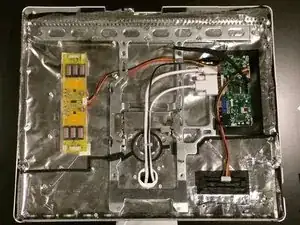
    • The various mounting posts inside the iMac were not suitable, so I purchased some PCB self-adhesive mounting posts (9.5mm) to mount the driver board, inverter and controller board.

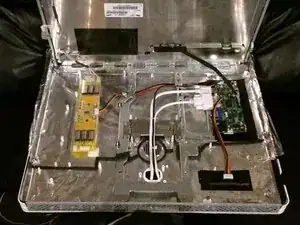
    • To ensure the mounting posts were mounted correctly, I cut squares out of the EMI shielding before attaching the posts to the inner of the iMac casing. I also drilled holes for the power / adjustment board, so the buttons could be accessed from the rear of the machine.

    • From here it was a just a matter of attaching the boards to the PCB posts, hooking up the various cables and feeding through them through the former power in cut-out. I also insulated under the LCD driver board, as it was a bare circuit board. The inverter came contained within a clear plastic case.

    • As with the original setup, the LVDS cable and bottom inverter cables could only be attached with the screen in place.

    Can you point me to the kind of mounting posits you used? (And the EMI shielding tape?)

    Scott Lawrence -

    Just searched eBay for PCB self-adhesive mounting posts (9.5mm) and used a roll of aluminium tape from a local hardware store.

    Michael -

    Also, what were the specs of your power adapter? Output 12v, I assume, how many amps?

    Scott Lawrence -

    Yup 12v - mine is a 5A output

    Michael -

    I could not find self-adhesive mounting posts. I opted for regular posts with some epoxy putty. Will see how it goes.

    Scott Lawrence -

    Good luck - sure that will work fine :-)

    Michael -

    My iMac 2008 has the inverter board included with the panel - apparently i need 24v but need the pinouts. Any idea where I can get the info? Panel Part # LM240WU2-SLB2

    Sean Dunlop -

    No idea - maybe simpler to get a kit that includes a separate inverter?

    Michael -

  5. uyAgJUAvGIQxYP3F
    uyAgJUAvGIQxYP3F
    U2W4mZvJROOwumFX
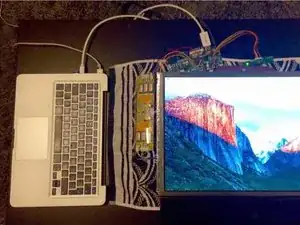
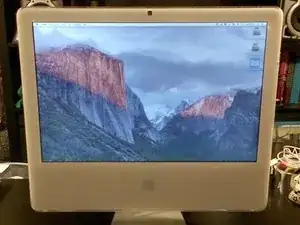
    • I then reassembled the iMac, attaching the screen, repairing EMI tape then putting the front on! It now works perfectly with the Mini DisplayPort output of my screen-less MacBook Pro and I have an available HDMI cable to attach any other device.

    • The only thing that was not changeable was the CCFL brightness, but using Shades preference pane solves this satisfactorily for me.

  6. xGL1gaPUAnt6stwn
    xGL1gaPUAnt6stwn
    W5MeQ3XUlHCyIGq4
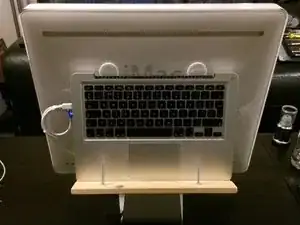
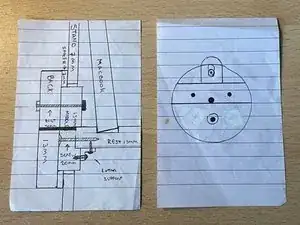
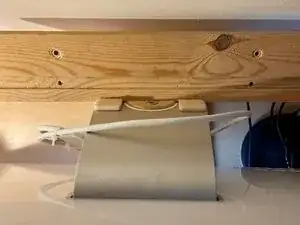
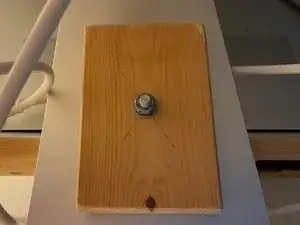
    • To keep everything neat, and as I had a separate keyboard and Magic Mouse, I also wanted to rear mount the Macbook - I created a mount from wood in a similar style to the AluRack, mounting onto the cable hole on the iMac stand - perfect!

    Interessant wäre zu sehen, wie diese Ablage auf dem Fuß hergestellt ist. Ich weiß, daß man komerzielle Lösungen kaufen kann. Heißen "Backpack". Sind aber extrem teuer. Selbstgemacht ist billiger und oft besser.

    Eugen Mezei -

    Hi! Ich habe einen weiteren Schritt mit einigen weiteren Bildern der Halterung hinzugefügt - hoffe, Sie finden sie nützlich!

    Michael -

  7. HejOCHdEWxTJUbfm
    HejOCHdEWxTJUbfm
    IXSKySCyaw3TYFkJ
    pdQdWXETYI14YyjZ
    • I have added a few further images of the MacBook mount I made - hopefully they are decipherable / useful!

Conclusion

To reassemble your device, follow these instructions in reverse order.

Michael

Member since: 14/05/16

1223 Reputation

75 comments

Hi, Michael!

I found this guide while searching for re-usability of my iMac. I have iMac of late 2006, and I want to use it as an external monitor or as TV.

So, is it possible to make it using this guide?

Thanks.

Kirtan Patel -

Hi there, yes it was a late 2006 model I used, so yes it is possible. I would recommend checking what LCD screen you have inside the iMac first though, then whether you can get a driver board. You can use it with any device with a HDMI/DVI/HDMI output :-)

Michael -

Hello Michael!

I need your help, because Im trying to do the same with my imac, I have all the components, but I am having some issues with the inverter, Can you show me how you connect yours?

Brandon -

Hi Brandon,

What are the problems you are having?

Do you have the exact same looking inverter and controller board? I have some photos of the controller connection to the inverter at both controller and inverter side, would this help?

I have no photos of the inverter cables connected to the inverter though - I do remember that the red dot on the converter cables should be facing you when looking at the inverter board.

Michael -

Can we convert imac display as TV

Vasanthakumar -

You could convert them attach a TV tuner by HDMI?

Michael -
Hello Michael!

I have an old dead imac model no - LM215WF3 how can i convert it into an external monitor

i am little bit confused with kits on ebay

which one i should buy ?

I am also confused with the cables which one is temperature sensor ? which cables i need to insert in that kit ?

Plz help soon

alokmittaljr -

Afraid I have no experience with the newer iMac models

Michael -

Hi, I have ordered the driver board and power supply for my 2006 24 inch iMac, can you direct me to the mounting posts and insulation I will need?

Also, are there any other general tips you can give me that will help make my project successful?

Thanks!

Ryan Konarska -

These are the posts I used in 9.5mm height - https://www.ebay.co.uk/itm/162113127488 but any self-adhesive posts around 9.5mm would work.

For insulation underneath it and other areas, I used plain black insulation tape. For any EM shielding repair, I used some aluminium foil tape.

Tips? Just follow the instructions carefully, and be delicate with the LVDS cable, it is delicate. As it is a larger monitor, it is possible you might need to position components slightly differently to ensure cables reach.

Good luck! :-)

Michael -

Is it possible to use the original Inverter that comes with the iMac?

if not, why?

JahRom -

It would probably be possible, but would not make sense to do so - the LCD driver boards normally come with an inverter.

To use the original inverter, you would need some way to power it - maybe the driver board could do this, but if it has different power requirements, you will need a separate power supply for the inverter. And a way to control it. And a way to power it on and off...

I can think of no reason for wanting to do this.

Michael -

Hi Michael - thanks for this guide! I just ordered my inverter kit, and will take a few weeks to arrive. I have a few questions, though, even before I start this project :)

1) you used PCB self-adhesive mounting posts to mount the driver board, inverter and controller board, but I also see black tape on 2 of the boards? What’s that?

2) are these 2 boards taped right against the back of the iMac? Doesn’t the EMI short the boards out?!

3) Is EMI shielding a common item that I could buy at an electronics supply store? (in case mine is in bad condition …or I tear it, etc)

Thanks!

Steve Diniro -

Hi Steve,

The black tape is just standard electrical tape.

Although the inverter and LCD driver board are mounted on posts, away from the EMI, I used electrical tape to insulate under the LCD driver board, just to be safe. I didn't need to do this, as with my inverter, as it came contained within a clear plastic case.

I also used electrical tape to attach the controller board to the back of the iMac directly - I possibly cut away the EMI, but I can't say for sure - however the button side of the controller board doesn't have any contacts that could short anyway.

I just used standard aluminium foil tape - the thicker the better, my stuff was very thin, so I used a couple of layers, didn't need much though.

Hope this helps!

Michael -

Hello again Michael

I got my kit and connected it to my iMac LCD, but it did not work.

The LCD lights up (white), but when I connect it to a device, there is no image

I've tried the "CN6" jumper in BOTH positions [and even tried removing it], but nothing works.

Do you have any advice? Thanks

Steve Diniro -

If it lights up, it sounds like the inverter is working fine,

Is the OSD appearing on the screen “saying no signal” or anything if you press the buttons on the driver?

If not, I would check the LVDS connection:

- is it in the correct way round at the screen and / or the driver side? (Normally fits in either way, but should be marked with a dot to indicate)

- check it for any damage to the cable - the pins at the monitor side on my cable were actually bent and I needed a replacement cable initially.

Hope this helps!

Mike

Michael -

Hi there, I'm glad you came across this build, I also have it and begin to try it but with the birth of my little daughter things are kind of stopped at the moment till now, a year and a half later I have some spare moments to stuck mi head again in this…”project". So Michael, this is a 24"? Mines is 24 and the screen is different and so the cable I had with the kit and the kit is diferent, mi screen is a lm240wu2-sla1 and I'm getting a real problem to make this thing works,I'm using an external psu and the original inverter, I managed to get the back light works rewiring the pin 4 with 3.3v instead of 12view and see image clear but still can get a correct color matching, so I guess I have to rewire all the cable. If anyone has other idea it would be very welcome since I order some dupont jumpers to rewire the cable those guys send me. thanks in advance.

Luis -

Hi Luis,

This build is a 20”, not 24”. Well done on getting the original inverter to work, it isn’t something I looked into much as seemed problematic to get working right - and my kit came with an inverter, but I see your kit seems different and doesn’t - does it look something like this - http://www.b2cqshop.com/yourqshop/Q06215... ?

I presume you have been referring to the service manual for pin outs and such? http://www.beyondinfinite.com/lcd/Librar...

Seems to be someone with a similar problem maybe - https://www.youtube.com/watch?v=z3LGwZq_... ?

Sorry I can’t be of any further help, good luck!

Michael -

Hello Michael, thanks for answer me so quickly, yes, the kit you mention is from the same shop, mine’s doesn’t have dvi port, the t.vst59.31 with the tsum29lu IC and i have that psu to power the original inverter, none of those builds on the page are good for me and the support from the shop it was poor, i have no big acknowledgments in these kind of stuff but when i see the pin outs of the board and compare to the panel is cristal clear that the cable is not ok.

But what can i do a year and a half later….rewire an Do It Myself lol.

If i achieve this build i will post it a few pics to show you how i did it.

Thanks again for reply.

Luis -

I have a 2008 imac that I want to try to do this with in hopes of using it as a normal monitor for a windows PC. I was wondering if you could help me find the logic board for it if possible?

David Hua -

Hey thanks for the guide! I didn’t even know this was possible before reading this!

Couple of links and tips that may be helpful: (Links here, tips in reply)

Adhesive PCB mounting posts: http://www.newark.com/duratool/dtrlcbsbm...

The monitor on my machine was an LG LM201W01(SL)(A3), not a Samsung model. I don’t know if the driver boards are the same but in case they’re not here’s a link for the LG: https://www.ebay.com/itm/HDMI-DVI-VGA-Au...

Eric Boccaccio -

Important Tips:

If you want to use DVI, you can, but the wire is too big to fit through the hole for the power cord or the back cooling grate so you will need to shove it through the RAM slot on the bottom of the machine. HDMI will fit so you’re better off using that if possible.

Hardest part of disassembling this thing is getting the front white panel and monitor off. There are videos on YouTube that show you how to do it. After that it’s a matter of unscrewing literally every screw you see and removing most of the tape (but be careful not to unscrew the back stand).

Instead of cutting holes, I used the RAM slot to fit the buttons (in addition to the DVI cable). The buttons don’t seem to do anything for me though — the green light lights up but the only way to turn off my monitor is literally just to unplug the power supply. If anyone knows how to use the button panel, let me know.

This thing actually makes a great external monitor once it’s freed from the ancient components inside

Good luck!!!

Eric Boccaccio -

Glad you find it useful! And thanks for adding some tips - good point about the screens, different variants have different screens - always search for the model number wrote on your screen as a different driver board will not work.

I hadn’t thought about a DVI cable, but great info and workaround. I had thought about mounting the buttons at the RAM slot, but for some reason decided aganst it but glad it worked for you.

On my screen the buttons do work, but it stays lit up even when it has gone to sleep - I also just unplug.

Glad this guide has been useful to so many people over a year since I wrote it :-)

Michael -

If I were you I would disassemble the Macbook and install it’s components inside the iMac casing. It has no screen anyway and the parts should easily fit even with the control boards for the display. I found your article because I was looking to pick up an old dead iMac and replace it’s motherboard with something like a low power Celeron N3150 based board and a display driver board. Make a hackintosh out of a real mac just for giggles.

Xaltar -

There is actually way less space available than it would appear and the whole structure of the MacBook is based around its unibody frame - without that, you would need a whole lot of mounting posts etc, need sufficient cooling etc - not worth the effort when all I wanted was a cheap fix - I also use the screenless MacBook with other monitors at times too.

I can imagine standard components to make a Hackintosh inside an iMac case would be easier, especially if using a 24” case - check our this epic build https://www.tonymacx86.com/threads/erste...

Michael -

I cant find a controller for mine. Its an LG lm201w01

Gage Parker -

Just search on eBay! Many for sale from China - you may need to change the “Item location” filter to “Worldwide”.

Please note that I note that that probably isn’t your screen’s full model number - it should be suffixed with four characters like (SL)(C1) or (SL)(A3) - make sure to note this and order the correct controller board. Good luck!

Michael -

Hello Michael, nice write up. So I am looking to do something similar but with my 17” macbook pro 2010. And i want to keep the display, and the keyboard/trackpad. Then i want to stuff a macmini 2018 in it. So it will be the 2010 macbook pro running 2018 apple tech and software. The 2010 doesnt upgrade anymore. Anyway, i need to look into how to get the display to hdmi, the. How to unassemble the 2018 MM and fit it in the case of the MBPro. Should be cool. Thanks for the post.

Gerry Horton -

Hi,

This is exactly what I wanted to do. However, the screen of my iMac is broken. I want to install a 144hz 24 inch monitor into my 24 inch iMac. Since I want to use it for gaming. Is it possible to use a different panel instead of the one Apple uses?

Riduan -

Great write-up. Thanks!

I’m trying to get a mid-2007 panel to work. LM240WU2 (SL)(B1). I’m using the inverter that’s already attached to the monitor. I’m running power from the original power supply, and the Brightness/Backlight controls wired to the inverter pins on the LCD control board.

I’ve connected everything it all, and all of the controls work, both from my computer and the control panel for the LCD board itself. However, the screen looks overly bright or “washed out.” Adjusting the brightness/contrast/gamma has an effect on the image, but not on the washed-out aspect of it.

I know it has the potential to work because when I hold down the “Auto” button on the LCD Controls the monitor auto-calibrates. While it does this it briefly passes through the perfect image on the monitor before over-brightening and washing out.

Any help would be greatly appreciated. Thanks!

bziggz -

Hi there,

Sounds like a gamma profile issue - have you tried different profiles?

Or calibrating manually? http://osxdaily.com/2015/10/14/access-ex...

The brightness is something never managed to adjust properly, but find using Shades as a passable alternative http://www.charcoaldesign.co.uk/shades

Hope this helps!

Michael -

Thanks Michael! I’ll give that a try!

bziggz -

Michael,

great posting! I am considering doing something like this and am looking for your opinion/guidance I plan on hitting the inside of the iMac and replacing it with a H170n-WiFi MB, 16 gigs and a low profile CPU fan I’m wondering if I could use the same method you did here in order to use the onboard HDMI output from the MB. I will be using a NMVe HDD and am looking into the best approach for the PSU at the moment

Respectfully,

Jeremy

papu_1371 -

Not sure tbh! It is quite a tight fit inside, the output ports of the H170n might be too deep - the iMac MB is obv designed to specifically fit the space. Potentially the existing PSU might power the MB? Good luck!

Michael -

Thanks for this - gave me the guts to dismantle it at least. I think I’ve decided, mostly from the comments, that given my complete technical ineptitude / ignorance the chances of me spending time and money on this for a non-functional or poor result are high ! I’d better keep an eye out for a second hand monitor instead. It does seem a shame to not re-use what was a rather nice form factor device.

Peter Beatty -

Given the cheapness of monitors these days, I wouldn’t say this is necessarily the most economical option - I just liked the quality of colour rendering my iMac screen gave, so seemed worth it :-)

Michael -

Privet Michael,

I know, what a controller board is, but what is this converter? This yellow one in your photos. Do I need this?

Best regards

My iMac

2006 24” - LM240WU2-SLA1

Dozent Udachi -

The yellow part is the LCD backlight inverter board - used to power the CCFL backlight tubes within the monitor - my kit came with the controller board and backlight inverter board together, and I would recommend looking for a similar kit :-)

Michael -

One last question dear Michael, which power supply did you use? Is it right: 24v out for Backlight and 12v out for the board? But is it DC or AC?

Dozent Udachi -

Looking further, it seems the way for connecting up your monitor is quite different - this image which comes with a converter kit seems to show using the existing iMac power supply / inverter - https://i.ebayimg.com/00/s/NjAxWDgwMQ==/... - rather than the kit coming with it included - it might be worth asking this seller for more advice http://stores.ebay.co.uk/eqstore/

My kit was just powered by a single 12V DC 4A external PSU.

Thanks and good luck!

Michael -

I have a LM270WQ1-SDC1 from a 27” imac. I purchased a controller board on ebay. I’ve connected it and it works - but I only get a maximum resolution of 1280x720. I’ve manually changed the monitor definition in windows but no matter what I do I can only get that resolution. The panel is obviously capable of much higher. The seller has been no help. Any idea how I can get the native resolution of this LCD panel? Do I need to replace something else?

Jeremy Olmen -

Only thing I can think of is connecting with a different cable (so if using VGA cable, try DVI or HDMI etc)?

If still no luck sounds like that is the max res the controller board OR the graphics card on your computer supports…

Michael -

It’s a Displayport only controller board. I have a high end graphics card and it is running three monitors at 1920x1080, I unplug one and plug this board in. The seller on ebay said I needed to replace the LCD tcon board - which seems to be integrated into the monitor - and that doesn’t make sense to me because it was obviously doing higher resolution than this when it was inside the iMac. All I can think is it is the Displayport controller board I purchased from them and they aren’t owning up to it.

Jeremy Olmen -

hI michael, thanks for this Tuto. it s exactly what i was looking for.

I have a question anyway :)

I have found the board linked to the philips LCD I have on my IMAC 2008 24 inches.

https://www.ebay.com/itm/HDMI-DVI-VGA-LC...

looking to the offer.

it seems that for the power supply, it will require to have 2, one for the board and one for the monitor.

like they proposed on this :

https://www.ebay.com/itm/HDMI-DVI-VGA-LC...

do you have any advice on ?

je_f -

Ok, so the process for your monitor is different - the backlight cannot be driven by the controller board + new inverter like it is with my setup.

You will be using the existing inverter attached to the monitor, and to drive that you need a separate 24v power supply.

The second eBay item you have listed includes a power supply (the black square object to the bottom right) and this will drive both the inverter / backlight as well as the controller board (so you will not need a separate supply for the controller board).

See this page for someone you has done this - https://pbase.com/brucemac/2019octdispla... and have a look at the comments / links on the photo.

I think the second eBay item should get you completely sorted with all parts you need - but looking at the price, a new 24” monitor probably wouldn’t cost a huge amount more…

So depends if you are just trying to save money / recycle or looking for a project to work on and have hopefully have a cool monitor at the end!?

Michael -

Hi michael , thank you for the reply. Well appreciated.

it is right that the second item has a higher cost. fact is I m not trying to save money, I am more looking on assuring a second live on those electronic devices , and it’s a good opportunity to learn more on those things. I have also loved that screen when the mother board was working (maybe my memory of it makes it better than it is)

it is true that a 24 inches lcd can be found for 100€, on16:9 ratio for 16:10 that’s more 200€ !!!! :)

thank you for the link, that will help moving forward.

have a great day.

je_f -

My iMac 2008 has the inverter board included with the panel - apparently i need 24v but need the pinouts. Any idea where I can get the info? Panel Part # LM240WU2-SLB2

Sean Dunlop -

This page seems to have a manual with pin outs http://www.datasheet39.com/download.php?... (scroll down to and click “Download[ LM240WU2-SLB2.PDF Datasheet ]”

Michael -

is there a way i can also use the camera, maybe with an adaptor to usb or something like that?

Francesco Sacco -

It is probably not impossible, but probably tricky - don’t believe the iSight camera is USB - it has separate video and microphone cables.

I just removed the camera, as never used it - how times change!

Maybe try commenting on the camera replacement page? Might be simpler to try and find another webcam that would fit in that space.

Michael -

Hi Franchesco, your comment prompted me thinking and I found the iSight camera I had taken out - turn out it is pretty simple - the camera cables are standard USB colours (red, green, white, black), so a quick splice together and it works!

I have not got the microphone working (it is an analogue output, so would need to be input into a microphone socket) and my screen less MacBook’s internal microphone picks up my speech fine, but might try this further before I solder the wires and mount back inside the iMac case - thanks for the inspiration!

Michael -

Thanks this was a great help

Marcel Geczy -

Wiring the usb compatible iSight camera, and a sata to usb for the slot loading drive would have brought this to the next level. I would try to make the original speakers work as well. A cheap amplifier off eBay would do the trick.

Joseph Saltz -

All possible, but make the build a lot trickier;

- The PATA (not SATA) optical drive fills the space the main driver board and cables connectors sit, so would need to find an alternative location for the driver board. At the point I did this, the included drive was almost dead, and couldn’t remember last time actually used a CD/DVD.

- The screw mounts holding the speakers in place were actually on the logic board, so you would need to add new suitable mounts. Also have a power supply for an amp (probably usb). Lastly, I never actually used the internal speakers as they were pretty poor.

- Not keeping the iSight in place was a regret especially since I have lost the mount for it, although I have now mounted the iSight in a small external box which sits on top of the screen. Also need to wire the analogue microphone to a 3.5mm output (and use with a male 3.5mmTRRS (4 pole) to 2x female 3.5mm adaptor if using with a MacBook). This unfortunately isn’t supported via Bootcamp.

Let me know if you try this though!

Michael -

Hello, thanks for a great guide. I have installed the kit on my 2006 iMac and am able to have it operational but the display is very dim. I can use the menu, use as an external display etc but the display backlight seems dim, is there something on the board that needs adjusting or my display has gone bad? Thanks

Asad Ahmed -

Hi there, I can’t say for sure - CCFL backlight tubes do tend to dim over time, but if it was working brightly prior to this, that seems less likely.

Are you using it connected to a Mac? My screen was overall very dark when I first used it (not the backlight as such, just all the colours etc) and to correct this, I needed to calibrate the screen (https://support.apple.com/en-gb/guide/ma...) so I would try this if you have not yet.

The controller I have does not have controllable backlight, but there is a noticeable brightness between colour modes - I would try all the different settings when pressing the menu button.

Lastly, if none of that helps, it could be the inverter supplied or your power supply is underpowered?

Michael -

Hi Michael and everyone else who might find this useful. I figured out the issue, I was using a lower power adapter which left my display dim. I got a 12v 4amp adapter that was advised in the ebay listing and it works perfectly.

Asad Ahmed -

Thanks for letting us know and glad you got it fixed :-)

Michael -

Ciao Michael, grande guida che ho trovato solo ora.

Io ho due iMac 24 2006, perfettamente funzionanti, ma chiaramente obsoleti. Come potrei utilizzarli com monitor esterno?

Non c’è la possibilità di fare una piccola modifica per poter montare un ingresso video? Tipo DVI o HDMI?

Grazie , Valter

Valter Cremonini -

Ciao Valter, spero che questo abbia senso dato che sto usando Google Translate! Per quanto ne so, il processo che ho delineato dovrebbe essere lo stesso per gli iMac 2006 da 24" - se trovi il numero di modello dello schermo all'interno del tuo iMac (e ognuno potrebbe essere diverso) dovresti essere in grado di trovare un adattatore su eBay per consentirti di collegarti HDMI / DVI come descrive la mia guida. Buona fortuna!

Michael -

Ciao Michael, grazie del suggerimento. appena avrò tempo proverò a seguire la tua guida.

Valter

Valter Cremonini -

This is such an epically awesome post/ string! I have a 2010 27” imac we are just replacing and I am toying with the idea of retrofitting it to be a monitor. Hmm… you guys show it is possible, but no small task. Anyone do it with a 2010? I am so tempted but probably don’t have the time :)

Culley Parris -

Hi Culley, glad to hear you have found it interesting! And I am glad this guide is still getting comments / views six years later! I am still using this monitor I pulled together - 15 years and 4 months after the iMac was purchased!

I am presuming you know about Target Display Mode on the 2010 27” iMacs - https://support.apple.com/en-gb/HT204592

Its usage is quite limited however, and is no good if your iMac is actually broken, but I have found a video of someone doing the same process with a 27” 2011 iMac, which is the same physical design as your one - https://www.youtube.com/watch?v=wWoc59OR... - hope this helps / encourages you!

Michael -

I was inspired to do the same. Had it all working on the bench, put the display back together, no video. Mac shows IPS 2700 in display control panel, display backlight comes on, but just a black screen. Should I just conclude my display died on the operating table, or is there anything else I can try?

Andrew Sheppard -

Hi Andrew, so I think the display may show in the display control panel even if the a panel is not connected to the LCD driver board (so the Mac may be successfully be connected to the LCD driver board, but the LCD driver board may not be successfully connected to the panel) - I would suggest carefully checking the video cable from the LCD driver board to the panel for any damage, check inserted firmly and correct orientation on both sides. Also, I am presuming the LCD driver board you have has multiple video inputs, and a controller board with buttons - could it be set to the wrong input? Lastly, please check the PSU is of sufficient amperage.

Hope this helps!

Michael -

Hello Michael,

Greetings from India.

I have a 27inch iMac - Late 2013, that is dead now and sitting ideally. I'm not in a mood to give-up on this as this was my first ever apple product purchased with the savings of a full year. It would be great if you can guide me through the process of converting my dead iMac into an external monitor.

Thanks.

- Kamal

Kamal Nagula -

Hi Kamal,

I’m afraid I can’t really, as it was a 2006 iMac with a very different design that I converted and created this guide on.

Maybe this video could help you (if the 2013 design is the same as the 2011 design) - https://youtu.be/wWoc59ORRlA

Good luck!

Michael -

Hi! Love the guide, I have a 2009 IMac collecting dust, would this be possible on my IMac?

Nash -

The principal is likely the same (remove mac stuff from inside the case, find a driver board for the panel, re-assemble) but technique likely different - search about, sure someone else has done this with a 2009 iMac :-)

Michael -

hi , i have a 20" iMac middle 2007 , Mod: A1224 4324A-BRCM1022 where can i find a right kit for this conversion? Many Thanks

NickNick76 -

You will need to open up your mac and see what it says the panel model number is, likely on a sticker on the rear of the actual screen - a wide range of makes and models have actually been used in iMacs, so this is the only way to tell. When you have the model nuber, search eBay for that and hopefully a kit will come up :-)

Michael -

Hi Michael,
I connected a Samsung LTM201M1-L01 LCD to the controller, the inverter and the power supply, but it doesn't light up.
How can I solve this issue?

domenicocarloromeo -

What happens exactly - is there a LED on the controller board, does it light up? What is the voltage / a page of your power adaptor? Are your LVDS and inverter cables inserted the correct way round (in particular it can be unclear what way round the LVDS cable should connect to the driver board)

Michael -

Couldn’t you fit the macbook inside the imac?:p

Thierry Wilders -

Possibly if stripped the MacBook out of its case, otherwise too tight and concerns over cooling etc.

Also at the time I wanted to use the screen-less MacBook at other locations also, and be able to use the monitor for other things.

Still using the monitor as main working monitor - albeit with a work HP laptop sitting on the laptop ledge :-)

Michael -