Introduction

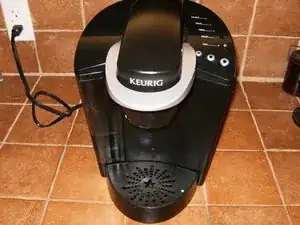
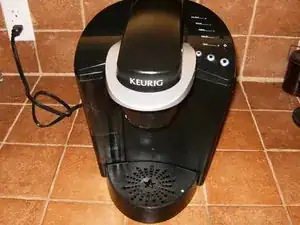
There seems to be an issue with the Keurig Single Serve Coffeemaker Brewing System. After a while it appears as if scale build-up or other contaminants prevent the Keurig from brewing full 12oz. It takes longer to brew, the Keurig becomes louder and it dispense on the average 4oz or less. This is a "quick and dirty" guide only to assist in fixing this. The Keurig for this guide came from a workshop and is used quite frequently under less than optimal conditions.

  1. jVkSNDQDo2INdcFh
    jVkSNDQDo2INdcFh
    A2uUUgFoZfYNxiKZ
    nwgrr4hlGhTPuGKc
    • Keurig K40 not brewing/dispensing 12oz

    • Open the Keurig all the way to remove the K-cup Holder

    • The K-cup holder simply pulls straight up. There might be a bit of resistance from some spring clips. The flaky debris is actually coffee from reusable K-cup filters.

    I think the first step before disassembly should be to unplug the machine FOR SAFETY!

    netdude21 -

    According to Keurig (and my own experience), you can press up on the K-cup holder from the underside to pop it out of the brewer. I find this much easier than trying to lift from the top.

    shamino -

    Right??

    Directions from the manual definitely say to pull from the top of the k cup holder, while pushing the bottom of it upwards, so that's what I've been doing.

    Today I pushed the bottom upwards with one hand, kept the machine open n stable with the other. Removed holder quickly and instantly wondered why the manual directions are that bad lol

    It was noticably easier.

    Bonus: doing it this way means not being right near the huge needle inside the holder. ?

    H Johnson -

    Thank You SO MUCH!!! I was getting so frustrated! I did everything but unplug the bottom needle. Now it works great again!!!

    Alice Baker -

    Thanks you for the advice about pushing up from the bottom. I had just given up until I saw that. It was way easier. Now I’m all set. This was a great place to find the information I was looking for without a whole lot of fluff that was not necessary.

    Denise Ming -

    The best thing to do when having this problem is to pick up the machine and throw it in the dumpster.

    Angela White -

    I am sorry you feel this way. I do understand, but I dislike throwing my money in the dumpster. Fix it, use it and never buy stuff like this again. What's wrong with using a pour-over set that will never fail ;-)

    oldturkey03 -

  2. ISImG1BKlyO2WhhQ
    ISImG1BKlyO2WhhQ
    NunxBvurMBSL1ohA
    mMHYalmEaNwcQ1k1
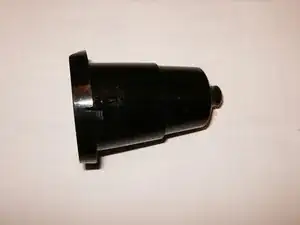
    • K-cup insert removed. Clean with hot water as needed.

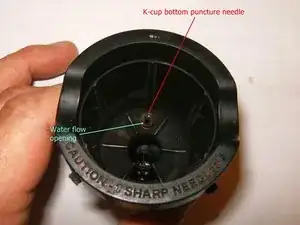
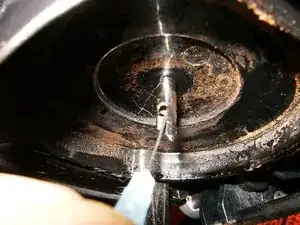
    • On the bottom of the K-cup insert is a tapered needle that punctures the bottom of the K-cup. On the side of it is a small hole. Use a paper clip (or similar) and insert it in there to remove any scale, coffee grounds etc.

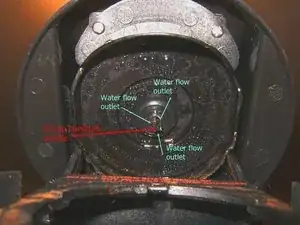
    • Next is to clean the top needle. It is trickier since it is somewhat hard to reach around the sides of the needle. There will be three holes around the needle. Open the Keurig all the way, and again use a paper clip (or similar).

    I recommend using a pipe cleaner. Slide it in and out to ream the passage. Discoloration provides evidence of progress.

    Jim Cahir -

    The plastic insert shown in the first photo easily separates into two pieces, giving direct access to the bottom end of the needle .

    Tom Sager -

    Lay the unit on its side. There is a rubber fitting around the upper needle you can easily remove and clean. Use a q-tip to clean on and around the needle.

    Dave Behre -

  3. 4rkRtBBkICZ5a2U5
    4rkRtBBkICZ5a2U5
    fIqam4SeNwjYcj2o
    TVEhQkOELgZEQSVB
    • A hypodermic needle or similar can also be used to open up the water outlet

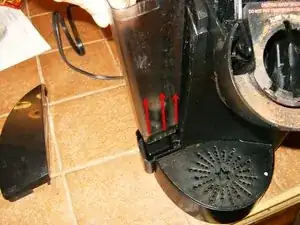
    • Next remove the water tank by simply lifting it up.

    • On the inside bottom of the tank is a simple check valve that allows the removal of the tank, then empty the tank.

    This was so helpful. I was not able to use my Keurig. I followed serval YouTube videos with no results. After reading this I saw the close-up of the bottom needle and realized that the needle was bent from putting the K-cup I bought on wrong. It had bent it in half. I simply used some needle nose pliers and straightened it out. I now have a beautiful fresh machine that works like new and brews a great cup of coffee. Thank you.

    Alina Lopez -

  4. XykFoBaxY2KWX4Qh
    XykFoBaxY2KWX4Qh
    heCreYfJxvSMQjfn
    RbfoIB2M6CR4VEyB
    • Top part of the check valve on the bottom. there is a fine screen that acts as a filter. Remove that by removing the three Phillips screws with a long #2 Phillips screwdriver. Clean the screen under running water with a brush. Reassemble after proper cleaning.

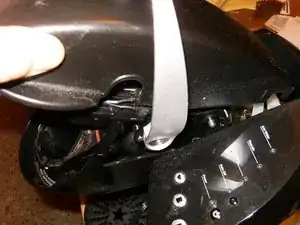
    • Next step is to remove the top cover to get to the water supply to the K-cup. Open the Keurig. remove two Phillips screws that hold it in place.

    • Lift the top cover up and forward to remove it.

    This step..."Next step is to remove the top cover to get to the water supply to the K-cup. Open the Keurig. remove two Phillips screws that hold it in place."

    Where are these screws?? Need picture of this

    cashnic72 -

    cashnic72 step 4 second image has them outlined....

    oldturkey03 -

    They're circled in the middle picture.

    David Baldon -

    After removing the screws, it was a little difficult to get the top off. Had to wiggle it around a bit and move the arm up and down to get it off

    Rich Sigle -

    Impossible to get the the top back on and functioning properly. I had to leave it just propped there without the screws back in place. Otherwise this page was extremely helpful in fixing my Keurig water flow issue!

    Sarah Fraser -

    Was impossible to get the top back on and functioning properly. Had to leave it loose on top without putting the screws back in. Other than that, this post was extremely helpful in fixing the water flow in my Keurig. Thank you.

    Sarah Fraser -

    OMG. You're awesome!!!

    Jennifer -

    I don’t have anything that looks like pic 2, step 4.

    Kevin W Burley -

    Lid impossible to lift & move forward. Spent 45 minutes. Cracked lid. Thanks.

    twohaleys -

    I found it helpful to use a Torx driver to remove the handle in order to remove the top cover. In replacing the cover, before you replace the Phillips screws by the needle, be sure to align the cover so that it closes correctly. THEN tighten both handle screws and both needle screws.

    kurt sokol -

    Your instructions are wonderful. Everything went very well until I went to put the lid back on with the two screws. My lid accidentally closed and I cannot get it back open. This was before putting the two screws back in near the needles.

    dawndascenzi -

    UPDATE

    I just had to pry it open. The thing was stuck shut so hard and it finally popped open after struggling with it for about a half an hour.

    dawndascenzi -

    Dropped both screws while putting back together and can’t find them. Need screw size so I can try to put back together

    edmryderz -

    I would strongly suggest that after cleaning the screen in the tank (the first bullet of this step), you assemble everything and give it a test. Everything from that point forward is more difficult and may result in damage if you’re not very careful, so it’s better to not proceed further if you don’t have to.

    shamino -

    I had the same issue. Lid didn’t go back on. After wasting 30 minutes, I decided to experiment. I found out that without the screws in place the handle worked just fine. Using painter’s blue tape, I taped the cup receptacle in place with tape so that it closed nicely but would not move. Then I moved the handle up to get at the screws and tightened them down. Worked the first time great!

    Gregory Schepers -

    Thank you for this! I was struggling so much. Tape worked like a charm!

    Jennifer Collins -

    This worked for us! Took top apart and cleaned/blew out check valve. Works perfect again after a white vinegar soak. Thank you!

    Phillip Reynolds -

    Puis-je voir les commentaires en français ?

    borghilddahl -

    try Google Translate to translate the complete site

    essayez Google Translate pour traduire le site complet

    How to open and clean Keurig Coffee Maker - iFixit Repair Guide (www-ifixit-com.translate.goog)

    oldturkey03 -

  5. vcsfEd6hDmNEJT4j
    vcsfEd6hDmNEJT4j
    JwU2LP2MQIy1KTyk
    FFHPiB1fDkSnBxEr
    • Water supply from the boiler to the K-cup needle is via a water hose through a check valve.

    • Remove the two small screws that hold the water line to the inlet

    • Unhook the water line from the connector above the K-cup needle. it is a simple press fit.

    • Next remove the tie straps. (You don't have to do this step) Just remove the other end of hose from pump. You might have to use a flat head screwdriver to lift up on end of hose while pulling up

    Mine looks different inside

    Jaime Pretell -

    Thank you so much sir!!

    Micdelos -

    I dropped the tiny screw inside. What can i do? Can i remove the metal bottom?

    Kathy Johnson -

    Kathy Johnson tiny screw inside where;-)?

    oldturkey03 -

    Wow, thanks. My dear “Madame Keurig” had been atherosclerotic — just wall-to-wall high-stress and noisy “short cups” with no hope in sight. I had run this device for 26 months with no problem, and never installed the recommended filter that snaps down on top the water input. So I did that — and a couple weeks later, Madame started getting balky and sick — not to mention very noisy. So today thanks to this suggestion, I got a long Phillips head screwdriver and got the filter out. I tried blowing through it — it was very hard to blow through. So I washed it under running water with a tooth brush and tried blowing through it again. Night and day — there was no comparison. Air went straight through it with no resistance. I put the filter back in, and Madame immediately began to perform correctly. Happy day!

    originresearch -

    Merci!!! j’ai réussi à avoir mon café ce matin grâce a vous!!!!

    tanyaeboivin -

  6. tcAeeKLcfVRUhWAd
    • Test the check valve. Blowing air in it from the boiler side should cause it to open. Repeat that a couple of times to loosen any sediments etc. It will also help to run some hot water from the K-cup side into the check valve and shake it up. Once it is cleaned, replace the check valve and the tie straps. Reassemble the Keurig

    This was so awesome and fixed the problem thank you so much very clear detailed instructions

    kimbasstyle -

    Problem solved. I think it was actually the first fix of clearing out the air slot in the bottom needle that did the trick. Thanks! $179.00 saves from not buying a new machine. ;-)

    Ray -

    what if you cannot blow air into the valve? Does that mean you have a bad valve and need to replace the entire machine?

    Kristal -

    @gold0348 if you are trying it from the boiler side but cannot pass air through it, could be a stuck valve. You would not have to replace the machine but you’d have to try to find a valve. You could also try to use a small wooden pencil etc. to gently apply pressure against the valve by inserting the pencil into the boiler side opening.

    oldturkey03 -

    According to Kuerig, the machine has a lifetime warranty. That said, Normally all you need is a paperclip to clean the ports as described above. I ran a pot of vinegar through mine to remove all the scale inside but Kuerig says this normally isn’t necessary. Don’t forget to run a couple of tanks of clean water afterwards to remove the vinegar taste. They have a descaling powder mix they recommend but told me vinegar was fine too. In any case, if you can’t get it working right, just take it over to Bed Bath and Beyond and exchange it for a new one.

    stevem -

    Ours is only 2 Christmas’s old and won’t heat water, how the heck do I fix that?

    Monica Jackson -

    In taking this area apart, I think I may have damaged the hose leading to the check valve, is there a way to get that hose replaced?

    netdude21 -

    our machine wont even turn on…..!!!! .no power….all i did was empty the water reservior by tipping upside down…..was this a bad thing to do..???????

    Gayle -

    Gayle, I’ve seen this numerous times. I fix a lot of machines for friends. Here is what you do if it won’t power on. The obvious, first test is to make sure that your outlet is working. As long as that’s not an issue:

    1. Unplug your Keurig.

    2. You’ll need 2 hands or a helper with this step… (By the way, there are several variations based on which model you have) so; With the unit unplugged, press and hold the power button and the two “serving size” buttons down all at the same time. With all of the buttons depressed, plug in the keurig while continuing to hold the buttons for at least 3 seconds. This is like a reboot, and should reset your coffee maker to power back on. If it doesn’t work the first time, try again with different buttons depressed when you plug it in. You’ll need to unplug it each time before trying a new set of buttons to reset. If you know your model number, you can just search “resetting keurig model______. There are also YouTube videos that will pop up to help you.

    Good Luck!

    Mr FixIt -

    Thank you soooooo much for this fix!!!! Saved me tons of money!!! My problem was the check valve!!

    Heidi locks -

    Me too, a clogged check valve. I had almost given up when I found this. The directions and pictures are perfect and super easy to follow, and it worked!! Thank you and God bless you ❤️

    Selena Johnson -

    I did everthing, save tearing it completely apart. I get 1 oz. of water thru the dispenser, on LG size coffee selection and almost none with SM size!

    Robert Green -

    Well it’s now 2020 and I just blew thru and cleaned the check valve and bam, no more mega slow drip. Thanks!

    Carlos Carrillo -

    I have an old model Keurig. I've always used filtered water and did all my white vinegar cleaning. The problem that I have I'm fairly sure is a defective micro switch. I turn the machine on…it will fill with water and heat the water. The cup size selections both turn blue but will not flash to allow me to select anything. I'm assuming the micro switch (with #4) in your top view picture is the cause…however, I cannot locate a replacement part anywhere. So two questions…do you agree with my assessment and if so, do you know where to get the switch?

    Kara Eshelman -

    Oh man, this worked for me. Saved me from purchasing a new one.

    Virginia Leonard -

Conclusion

To reassemble your device, follow these instructions in reverse order.

oldturkey03

Member since: 29/09/10

778345 Reputation

90 comments

Perfect - been looking all over for a solution besides trashing the unit.

Thank you for the step by step instructions!

kellywihlm -

Awesome! didn't want to have to buy a new Keurig - worked like a charm!

cabate -

awesome thank you kindley
racinnut2001 -

Outstanding presentation. I've had my Keurig apart before. However, as I use well water and don't have the best filtration system, mine tends to clog frequently.

I will add however, that the case for, at least some Keurig coffee makers have clips holding the cover in place that can be rather difficult to release.

Bill Leach -

I should add, excellent photography!

Bill Leach -

It’s easy IF you use the MACRO function in the CAM (some don’t have it)

Jess Cast -

09/30/2016

This guide and the photos are excellent! Kudos!

However, after precisely following each step I did NOT find any debris, from the K-cup holder, thru the top puncture needle, through the working check valve. Since NO clogs there, the problem is elsewhere.

Bob McGhee -

I thought that, too, until I rinsed the cup holder under some hot water and smacked it upside down on the sink a few times. Two pretty large coffee grounds came out of somewhere when I did that. Now it works fine. Good luck!

Bucky -

Thank you for your diligence in providing this guide. My check valve was all gummed up....45 minutes later, it is making great coffee again!

paulcrustad -

Excellent...Works like a charm. My K-cup holder was the culprit.

pskepple -

I thought my old Keurig coffee maker was about to give up the ghost. It had slowed to just a trickle and wouldn't fill my cup anymore. This morning I took it apart and cleaned it, easily within 30 minutes from start to finish, using these simple step-by-step instructions with pictures. It's problem was clogged needles, top and bottom. Now it works like it's brand new again. These instructions saved me from replacing it this afternoon as I'd planned. The only expense I'm out was one paperclip and two plastic tie-ties. Not a bad deal if you ask me. Seriously, not a bad deal at all.

Bucky -

After a long hour I figured out how to fix it. I give old turkey 3 a 30 for his directions and patted my FEMALE self on the back for a job well done.

Phyllis M. Newton -

@pmnewt1 thank you Ma'am and I am glad it worked out for you.

oldturkey03 -

This is truly amazing helpful. I still can not figure out the cup trat but that's OK I guess lol at least it working better than before. Thank you so much

Sandra Decker -

My go to plan is trying to take things as part and hopefully find the issue and hopefully get it all back together.

This eliminated all the hoping and got me right through to the meat of the problem.

Thank you for this awesome guide.

Mailman -

We too were about ready to give up on our machine but gave one last internet search for a possible fix. This did the trick! Thanks so much oldturkey03...you da best!

anonymous 5519 -

Thank you very much! This worked perfectly!! :)

missjones3077 -

Thank you very much. From hot water getting pumped back to the water reservoir to clean noise free full cup of joe

William S Zelazny -

We fixed our Keurig thanks to you!

deannagotte -

Thank you so much! Worked like a charm. So glad you like to tinker oldturkey03!

thies -

I tried all steps and water started coming out, but it pauses as if it was still clogged. Won't give me a full glass.

Andre Simmons -

Omgawwwd!! My sister was going to toss her old one, or put it into her grauge sale. She gave it to me, I followed your direction to the T an I now have an awesome Keurig that preforms like new!! You are Awesome!!! Thank you, Thank you, Thank you!!

Barbara Stevens -

Had a heck of a time getting the top to come off: it did not lift up and pull forward easily. Other than that problem, the cleaning process went fine. Thk you so much for posting those instructions.. I was about ready to toss my Keurig and go back to my “Mr. Coffee” Brewer!

david milright -

Thanks for your great photos and very clear instructions. After doing all of your steps I ran an empty cycle and then the “descale” light came on. So, I ran half a gallon of vinegar through it and that worked like a champion…. for two days (total of three K-Cups) now it’s back to the same light trickle of water and the “descale” light is back on. I’ve already replaced the reservoir with a brand new on. Any idea? Could it be a bad check valve? Where can one find these parts?

Gary Bennett -

On used Keurigs from Goodwill, that would not pump anything. I have had to remove the water reservoir and use an air compressor with a blow nozzle and a rag wrapped around the nozzle and blow a shot of air through the inlet screen. Just blow a second or two. Do not blow very long or you will blow some hoses off inside. You will see a lot of milky white substance come out the nozzle.

Dan Taylor -

Worked great for me!— with the exception that I've had trouble getting the cover back on correctly. I'll try removing it and repositioning it again today. It is now working alright as far as brewing goes, but something is binding the cover when I open and shut it to put in a K-cup. It makes a loud snapping noise unless I press down on the back of the cover with my hand when opening or closing it. But thanks for this great “remedy “!

Preston Smith -

Did you end up getting your cover back on properly? I am having trouble with that too. Thanks!

Sarah Fraser -

If you remove the top cover. There are 2 black looking tabs inside the machine, that are across from each other. The top needs to line up with them or hook in. You can test it by closing the lid before you put the crews back in

Elaine Ketchum ell -

I'm having trouble putting my top cover too. Don't see the notches.

Maritza Del Real -

My check valve was stuck. Thank you for this tear down. With out it I couldn’t figure how to get the top off

Rich Sigle -

Before I torn the coffee maker apart I unscrewed the round filter at the bottom of the water tank and washed it out it was very slimy and had a ton of sediment. used vinegar on the unit just last month, now it is working just fine

Carol Thompson -

Perfect - been looking all over for a solution besides trashing the unit.

Thank you for the step by step instructions!

randy.pitcock -

Son. This was the exact fix. I tried it the first time and it didn’t work. Followed the steps again, and spent a bit more effort on step 5. That was precisely the issue. Thank you for taking the time to make this help. Took me ten minutes to take apart and reassemble.

Nathan Allen -

My machine was making a clicking sound like it was trying to flush water through but none was coming out. These directions worked perfectly for me. On the first try I didn’t spend enough time on step 5, and it didn’t work. But going through again and taking the time to flush the check valve did the trick.

Thank you!

Nathan Allen -

I cleared the check valve as instructed and I still have water coming out of the side instead of the top any thoughts

Kathy Blake -

As instructed I clean the check valve and the needles and the screen reassembled and I still have water coming out of the side valve any thoughts

Kathy Blake -

Thank you, Thank you and Thank you! I ran the gym clip up inside the needle and it worked perfectly, you just saves me $100! Thank you so much!!!

Kelly Johnson -

Thank you, Thank you and Thank You! I ran a bent gym clip up inside the needle and it worked perfectly. You just saved me $100. THANK YOU!!!

Kelly Johnson -

Thank you thank you!! Worked perfect!

suth_h -

How to get the Phillip screws out! They are stuck

SHIRLEY Ann parish -

@keurig123 stuck how and where?

oldturkey03 -

Thank you so much!!!! Life saver

Micdelos -

Where are the screws to remove the top cover?

pboser -

Step 4. Picture 2. Underneath the top cover

Elaine Ketchum ell -

Mine brews about 8 oz, very slowly. tried descaling , cleaning needles, lines, check valve , cup holder, screen filter and new filter.

Still only 8 oz. I’ll brew a cup tomorrow to see if it comes out faster. May just have to accept 8oz cups

Elaine Ketchum ell -

@elliek don’t forget the little filter inside the reservoir in step #4. You’ll be amazed by the things this little bugger can cause if it is clogged.

oldturkey03 -

I am having trouble getting the top to fit right. I’ve tightened the front screws but the back part of the top is preventing it from closing fully. Any thoughts?

Stormy Weather -

In this case, the upper check valve was the problem - it was sticking. One giveaway was that blowing into the overflow return to the reservoir with a soda straw, gave bubbles out the lower reservoir (check valve) connection and this temporarily cleared the sticking upper check valve. After a while, it would begin sticking again and the excess hot water was returned to the reservoir.

I found that a plastic soda straw was the right diameter to mate with the upper check valve, which in turn mates with off the shelf (home Depot) plastic tubing. That way, hot water could flow right through. and it took several minutes to clean out the residue inside. My version was the Kitchenaid that had the reservoir screen in the removable filter holder - no need to remove the check valve to get the screen. The Kitchenaid has a paper charcoal filter that has to be replaced periodically instead.

Chester Heath -

I would like to add one other thing that I found on one of my Keurig units. When you remove the water reservoir look into the hole under the reservoir where the water flows into the unit ( you may need a bright light ). You should see black plastic with checker pattern holes. My unit had build up which was narrowing the square holes off ( vinegar flush through unit had not removed this scale ) . I mechanically cleaned each little hole with a pointed toothpick and laid the unit on its side at the sink and flushed out the residue with the sink spray nozzle. This solved solved my problem of slow water draw down in the reservoir at the start of the brew cycle. It was taking twice as long to get water into the system before the brew cycle would start. This might stress the internal pump and cause premature failures . Guess that’s why they came out with the new 2.0 version which appears to use some type of plunger pump for the water which gives that clickety-click sound when brewing.

Robert Perkins -

Thank you! Keurig works! Very simple and clear instructions!!!

Deann Kirby -

Fantastic instructions and photos! Our check valve was stuck. Saved us from buying a new one. Thanks!!

S G Turner -

Thank you!

Suggestion, on step 2, you should show a picture of the disassembled cup holder. I was not aware it comes apart until I used a paperclip to clean the pin hole and observed that the paper clip went into the bottom of the holder. It makes it easier to clean if you pop off the bottom “cap” of the holder.

josephy -

I got quite the surprise this morning when I lifted out yesterday's Kcup and a bug crawled out and then crawled into the machine. I ran 2 tanks of vinegar through but paranoid there is a bug body in there. Do you think i'll be able to see enough of the inner workings by following your guide? I got takeout coffee this morning and bought a $9.00 5-cup coffeemaker as a backup. I love my Keurig and hope I can restore it!

Missy -

@mamapeep Whatever bug crawled out of the Keurig is most likely long gone. It just liked the leftover K-cup. Since you already cleaned the “plumbing” of the Keurig I am pretty sure it is not anywhere near your water supply.

oldturkey03 -

Have an old 2011 Platinum B70 that quit pumping the water. I put vinegar in the water holder and let it sit for 24 hrs and still would not work. So that is why I found this site. I was hoping the vinegar would loosen things up but still would not pump water. So I picked it up off the floor about 6 in. and gently let it drop down on the floor. I did this 3 times. Sure enough I must have jared something loose and it began to pump. Then I descaled it with 48 oz of white vinegar according to directions (let it sit 4 hrs when add water light comes on) after you run the vinegar through before you rinse with clear water. Works like brand new. Had one other problem in past that I can tell you about. The on/off switch would jam and was so tight I could not turn it on. Called Keurig and they said it could not be fixed and offered me a discount on new one. Well, I decided I would spray WD-40 on the switch. I laid the machine on its side so WD-40 could run inside. Yes, that worked.

Barbara Othon -

This worked perfect! I still can’t get the top to fit on right, but everything else works like new. The steps and the pictures were very clear and easy to understand. Thank you!

Kristie Layne -

I tried and I tried these steps to no avail. I spent FAR TOO MUCH time repeating Step 6. Before replacing the cover, I watched my machine try to brew. I think it’s toast. I’ve had my Keurig for 6.5 years. When it tries to brew it spurts out a little water & then no water even moves up the hoses out of the pump.

starfirelite79 -

Meanwhile, since I cleaned the water tank filter, it’s happily bubbling away. I need my morning cup of coffee. I have not had it yet today. I’m ready to throw my Keurig against a brick wall.

starfirelite79 -

Our keurig showing not ready and won’t turn off and no lights in the reservoir. Think the magnet does not contact

Norma -

Makes Mr. Coffee look better all the time!

gimmeadeal -

WOW! After all the searches glad I found this one! Had 2 clogged hoses at the needle area and the hopper area, eventhough I descaled it a cpl months ago, I had no idea you could even take it apart like this. It was easy took me 20 mins, cleared hoses, descaled again and the water is flowing like a river…..brand new again!!!!

Thanks

Bruce -

Great, easy to follow steps, and a wonderfully clean Keurig!!!

Thank

Mel Fischer -

Perfect! I descaled and big chunks of limescale got into the lines. If everyone tried to repair their appliances instead of ditching and buying new we wouldn’t be as disposable of a society!

Michele B -

Thank you! It all worked

audreyberner -

Perfect guide. Thanks so much. Was ready to throw it away, but now it works great again.

Stephen Post -

When I shoved the paperclip up the needles to see if they were plugged, which they weren’t I took the top off and noticed that there was little holes in the tubing.Must have been from shoving the paperclip up inside.Though many people said no harm can be done. Now how do I fix the little holes? Glue?

flyingcyberdog -

Have a B40 Kuerig coffee maker that was slowing done a lot while brewing and delivering half as much coffee it should. Only snag was having to buy a long shank phillips driver. (Depth of water tank is is 10 inches) Problem completely cured and works like new.

glenharts -

KEurig K200 disassemble and reassemble super easy

https://youtu.be/BuKrGVtH7PU

rosanne623 -

Do these instructions help with the 2.0 models? I’m not afraid to tear something apart, but I am a little worried about the electronics and the touch screen. My brewer is only about a year or two old, (I bought it used from a friend). I’ve cleaned it with vinegar, and the descaling solution that is $13 dollars a bottle. No luck, I’m considering trying CLR because I know I have extremely hard water and it builds up scale on everything. I started out using bottled water, but sometimes I have put my tap water in it. As soon as the hubs gets up and has his coffee, I’m going to try to clean the screen at the bottom of the tank, first. If that doesn’t work, then I’m going for the full tear down. I NEED my coffee. I’m pretty sure my water is the culprit, because it’s progressively gotten worse over the last couple months.

jenedm1978 -

I Had taken the basket apart to assemble the spring took a bit of maneuvering but finally went back together after the bottom needle broke then glued the needle back in still working like new for over a week now thank you for the demonstration

cjprkth -

I don’t have the dexterity to do this operation. What do I do

korj_deroche -

Wow!! So very thankful to you!! Great photos and explanation.

gtodd2002 -

Excellent fix… I did not know I could take the top off. I always have gone in through the bottom of my Keruig and clean the water tubes from there… I knew there should be a check valve, but could never find it. Know I'm able to keep it working. Thanks for the information and fix. I was ready to go and purchase a new coffee machine.. 4-11-2020

Jack Eisenstein -

This was so helpful! The pictures are great and the written instructions are simple and easy to follow. Worked like a charm!

Miranda Barnes -

My model mostly looks the same. Shortly after warranty expiration it stopped working. Found water supply lines to the pump just flopping around loose inside! A couple of properly tensioned wire ties and done. Been going strong for years since.

Out of 20+ years of gadget repairs (two-way radios, computers, etc), I gave to say this one was fairly easy. No one should feel skeptical about their skill set on this one. Take your time, follow the instructions and pictures, and maybe take some yourself to be sure how things go back!

Tim Oates -

My Keurig is giving out 12 oz. of hot water no matter which button is pushed. Just cleaned Keurig top water spout; removed water tank and cleaned it; removed Keurig cup holder inside; cleaned all spouts with sewing/craft pin. Still getting 12 oz. of water flowing through, when only 6 or 8 is button pushed. What do I need to do now?

Faye Heil -

CAN WATER BE LEFT IN THE COFFEMAKER TO STORE IT? PLEASE HELP FOR I DON’T WANT TO DAMAGE IT!!!!!!!!!! medicjr78@gmail.com THANKS

Sharon Zblewski -

When you open the Keurig to remove the pod holder,is there a way to disassemble the top that you lift up from the machine?? I really need to clean the inside of top/bottom to get all of the coffee residue from inside of the machine.

Richard Eich -

The screen in the water reservoir was the culprit in my case. As soon as I removed it and “brewed” without it, immediately correct and consistent water volumes were delivered for each “mug” size no matter how much water was in the reservoir. We could barely see through the screen and scrubbing with a brush was only partially effective. I ended up using my air compressor with a nozzle. It effectively blew out all the scum or whatever it was. I had not known about this screen before. For years the coffee maker would dispense less water (coffee) as the water level in the reservoir decreased but at least it was predictable. Recently the coffee maker started dispensing erratic amounts no matter what the reservoir water level was or which “mug” size button was pushed. Everybody talks about descaling, checking the check valve in the top, the needles, or the filter underneath but no one, including Keurig ever mentioned this screen in the reservoir.

gregl32 -

This worked for us! Took top apart and cleaned/blew out check valve. Works perfect again after a white vinegar soak. Thank you!

Phillip Reynolds -

My Keurig K40 was clean as a church inside and no blockages. mine after the power is on will be ready to brew and spits a little coffee in the cup and then the noise starts and the lights flash. add water and also the heater lite stay on. Keurig sent me a new water container but everything is the same. Any ideas ? My coffee maker looks like new so I hate to pitch it There isn’t any build up or scale on the unit as the public waterhere is very soft.

jim fischer -

Outstanding, thank you! Pictures were also a great help, Thank you!

Shanan Morris -

My Keurig K140 coffeemaker was dribbling coffee and refilling itself after only dispensing about one ounce or less of coffee. As I cleaned the coffeemaker, the water was coming out fine. As soon as I put a K-cup in it, it still dribbled coffee out of it. I found this page and read about cleaning the lower needle and the K-Cup insert. I had only washed and rinsed the plastic parts without focusing on the needle itself. When I took a flashlight and looked into the insert. I noticed that there was a small rubber sleeve that should have been over the needle but came off and was jammed between the needle and the inside wall of the insert. After tapping the insert on my kitchen counter, the sleeve fell out. I took a pair of needle nose pliers and put the rubber sleeve back on the needle and pushed it down firmly. After that, my Keurig ran perfectly. So that maybe something some of you with similar problems may want to check for. If the rubber sleeve is missing, you may need to buy a replacement K-cup insert.

Curtis -

This was a godsend! So easy to follow and so detailed. Thank you !

Judy -

I've descaled, cleaned pins but with a pod in I still only get water?

Danielle Fuscia@gmail.com -

If you only get water it is not going through the pods. Check the bottom of the pod and see if it is punctured. Clean around the needles and check the outlet. Make sure it is clear of any debris.

oldturkey03 -

I was going to buy a new machine !!! This worked like a charm and only took me at the most, 20 minutes. Make sure you keep the screws in a safe place and not near your machine, as you are moving around a lot, and may knock them out of the area. I was able to blow air into the tube, but had to press it in half in the chamber that holds the bubble filter in the head of the machine, and it release tons of water that was obviously caught up.

Thanks for the great photos and tips.

Chris B -

moi les lumière ne s.éteigne plus

malice111 -

Thank you for your great step by step directions and excellent photos with labels. The only issue I encountered was post re-assembly when I went to pull the handle down after inserting a kcup. It wouldn't come down without a fight and made such a scary sound when it did that I thought I broke it. But now it's working great and although it's much older it still makes better coffee than my K910.

Paula Pogorzelski -

Glad it helped you with your Keurig. Yes, I forgot to mention that the handle makes this terrible sound just before it seats itself!

oldturkey03 -