Introduction
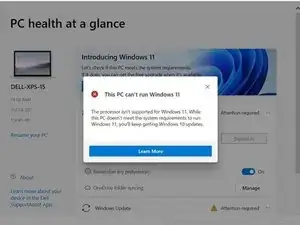
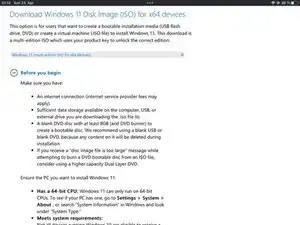
With the recent release of Windows 11, Microsoft has imposed certain requirements for hardware compatibility, including the need for TPM 2.0, specific CPU architectures, and a minimum amount of RAM. However, not all users may have hardware that meets these requirements, or they may simply want to bypass these checks for other reasons.
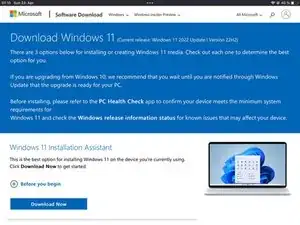
That's where Rufus comes in. Rufus is a popular tool that can create bootable USB flash drives from ISO images, and it also offers various customization options, including the ability to bypass certain installation checks for Windows 11. In this guide, we'll walk you through the steps of using Rufus to create a bootable USB flash drive that will allow you to install Windows 11 without the need for TPM, CPU, and RAM checks, as well as online signups.
Disclaimer
Before we proceed with the guide, it's important to note that while it is possible to bypass the hardware requirements for installing Windows 11 using Rufus, it does not guarantee optimal performance on underpowered hardware. Windows 11 is designed to take advantage of the latest hardware technologies, and running it on older or underpowered hardware may result in slower performance, crashes, or other issues.
Changes made
Below you can see the changes Rufus will make to the registry of the installation media.
Windows Registry Editor Version 5.00
[HKEY_LOCAL_MACHINE\SYSTEM\Setup\MoSetup]
"AllowUpgradesWithUnsupportedTPMOrCPU"=dword:00000001
[HKEY_LOCAL_MACHINE\SYSTEM\Setup\LabConfig]
"BypassTPMCheck"=dword:00000001
"BypassSecureBootCheck"=dword:00000001
"BypassRAMCheck"=dword:00000001
"BypassStorageCheck"=dword:00000001
"BypassCPUCheck"=dword:00000001
Parts
-
-
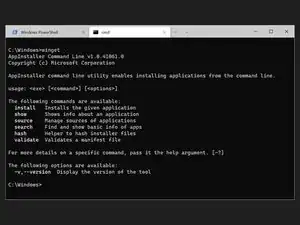
Launch the windows command line interface.
-
Enter
winget install Rufus.Rufusto install Rufus. -
Restart the terminal application and launch Rufus by typing
rufus.
-
-
-
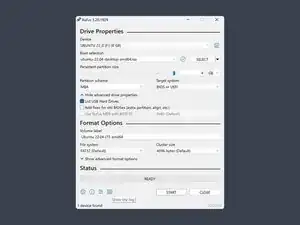
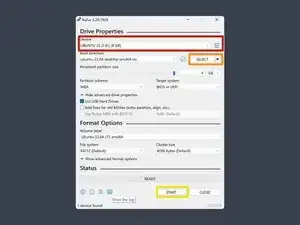
Select the flash drive you want to use.
-
Select the ISO image you downloaded.
-
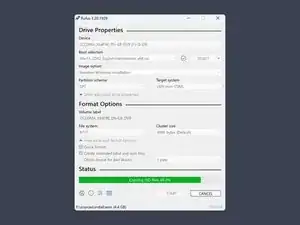
Press START.
-
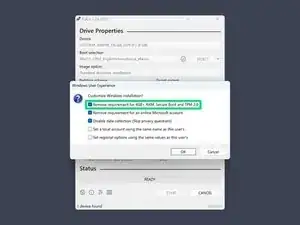
Select the option Remove requirement for 4gb+ RAM, Secure Boot, and TPM 2.0 and confirm with OK.
-
-
-
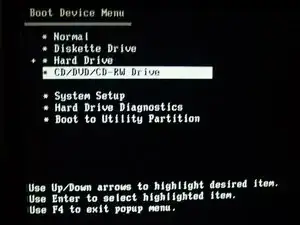
Boot from the USB flash drive by rebooting your PC while pressing the key that opens the boot-device selection menu.
-
Select the option that boots the PC from the USB flash drive.
-


Have fun!

2 comments
Merci pour ce tuto. Windows 11 installé à partir de l'ISO téléchargée chez Microsoft fonctionnera-t-il indéfiniment ? Ou faut-il ensuite acheter une clé de validation ? Merci.
Rob -
Les clés de validation de Windows sont liées à votre compte Microsoft ou à votre appareil. Si vous possédez déjà une clé Windows 10, elle devrait s'activer automatiquement. Si vous n'en avez pas et que vous êtes satisfait de ne pas personnaliser l'apparence de votre système, vous pouvez l'utiliser sans l'activer, car Microsoft est devenu moins strict en ce qui concerne l'obligation d'une clé. Cependant, un petit filigrane apparaîtra dans le coin de l'écran, vous demandant d'activer Windows à un moment donné.