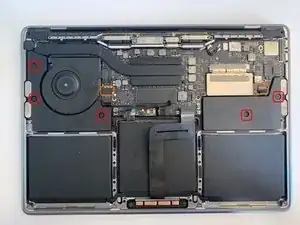
Introduction

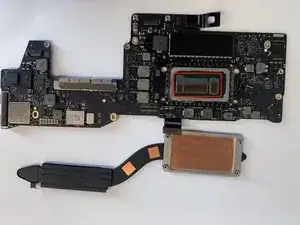
Shows how to disassemble the required parts to remove the motherboard then replace the thermal compound between the CPU and heatsink.

  1. iqmpESAKSlUguVbw
    iqmpESAKSlUguVbw
    drhecbsvLbiC5nsq
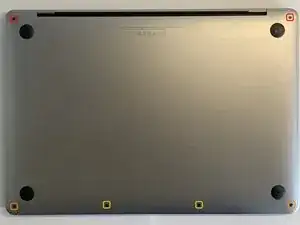
    • Use the T5 screwdriver or bit from an ifixit set to remove the 6 screws

    • Remove the following screws.

    • Two 6.2 mm screws

    • Two 5.3 mm screws

    • Two 3.4 mm screws

    • Place the screws in their own section on your screw tray.

  2. aVJ3fGJM5RKuAcrk
    aVJ3fGJM5RKuAcrk
    WskiXcx4Y6y6VOyK
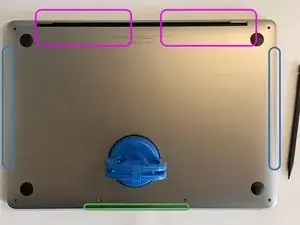
    • Place laptop with fan vent facing away from you.

    • Use the suction cup to gently lift up the backing on the bottom of the laptop. then use either a plastic spudger or guitar pick.

    • With a guitar pick or plastic spudger gently open and disengage the clips around the outside.

    • When the majority of the case is unclicked. Gently but firmly wriggle the panel out of the corners. Since the 13" MacBook pro late 2016 and up use a secure mounting mechanism.

    • Be careful to not bend the case. if its too hard to wiggle you may have missed a screw from the previous step

    • This is where the clips attach to the bottom cover.

    • Do not use Metal or conductive spudgers as it can short out the computer.

  3. yeETGnTbiCiBWaGH
    yeETGnTbiCiBWaGH
    4RxOorOQUSyrvlio
    • Before you proceed to disconnect the battery to reduce the risk of harm to the computer. Or yourself via electric shock.

    • Gently lift up the black cover. Then use your fingernail to flip up the small ZIF connector (Zero insertion force). then detach the cable from the port. The next photo shows what the connector looks like.

    • Remove the single T5 screw holding the battery connector to the laptop.

    • Fold up the connector. Then its disconnected.

    • Place this screw in a parts tray.

    • Replacing Battery. Continue with this guide. This also has a more detailed method of disassembly. An apple service provider repaired this laptop in the past so its missing some parts incase your laptop looks different. Battery replacement Guide

  4. 1OeULIHBuApdV1ZB
    1OeULIHBuApdV1ZB
    hHjPULqCridnV5lO
    5TNksww2IwMislvw
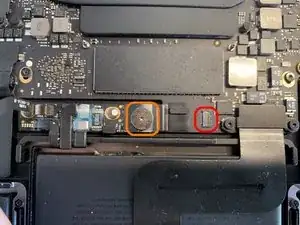
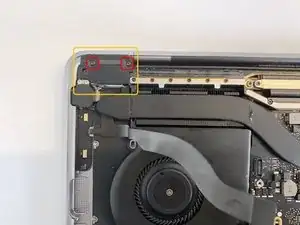
    • Use a T5 Torx screw to remove the 2 2.1mm screws

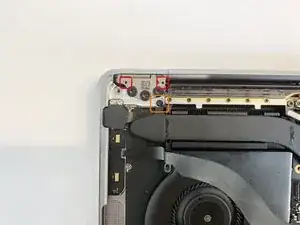
    • Use ESD safe Tweezers to remove the Metal cover.

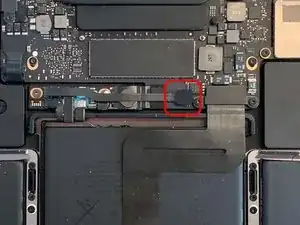
    • Use either your fingernail or a plastic spudger to lift the connector up.

    • Place Screws on parts mat. Then place cover on parts mat.

    • Replacing Trackpad? Follow this guide to complete the steps required. Trackpad Replacement.

  5. CIgKLKs2FroyLXvf
    • Use the T5 screwdriver/bit to remove the 5 T5 Torx screws.

    • unplug the 2 speaker ZIF connectors. Follow the steps from step 3 to look at the technique.

    • Lift the speaker from furthest point and pull it away from the case of the laptop.

    • Remember to put the 5 T5 screws in the magnetic parts tray.

    • If you need to replace the speaker you can stop here.

  6. rHHmYX3WHEI6tKdR
    • Use the T5 screwdriver/bit to remove the 2 T5 Screws.

    • Slide the SSD Down in this direction.

    • If you are replacing the SSD or doing data recovery you can stop here.

    • Place the Screws in a separate grid on the magnetic mat.

    • Do not place the SSD near the magnets since it can cause data loss.

  7. 3T3KA4UfNgc3S2IJ
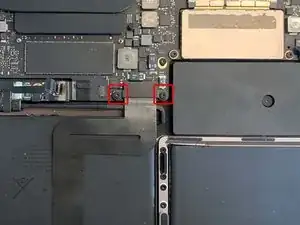
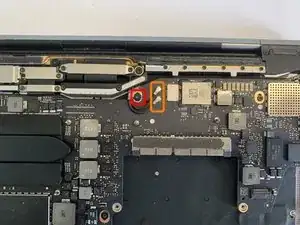
    • Use the T5 screwdriver/bit to remove the one T5 screw.

    • Use a plastic spudger to gently pry up the 2 silver cables.

    • Be careful to not damage the connection since this is a fragile connector.

    • Place the screw in a separate grid on the magnetic parts tray.

    • If you are replacing the antenna assembly follow this Guide. Antenna Cable Assembly Replacement

  8. pFRG6pTgpPv3KSoL
    • Use a T5 Torx screwdriver/bit to remove the 3 T5 screws.

    • Note: Items in this colour will have been removed at this step. just messed up taking a photo.

    • Remember to place the screws in a separate grid on the magnetic may. There is a single screw left.

  9. i5AFVYuD1ocg4DSq
    i5AFVYuD1ocg4DSq
    RCQKloLrkXAeHAsU
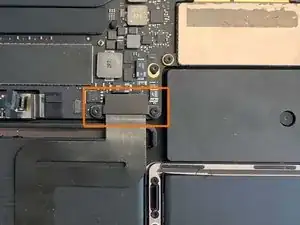
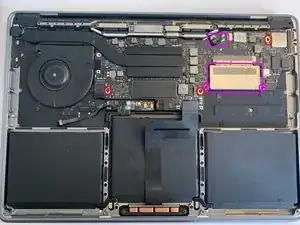
    • Use a T4 Screwdriver/Bit to remove the 2 screws.

    • Remove the plastic clip with a small part of ESD safe tweezers.

    • Use a T4 Screwdriver/Bit to remove the final screw of the motherboard.

    • Remember to place the screws and plastic piece in a separate grid on the magnetic parts tray,

  10. LcpKGVXCYuJIlltP
    LcpKGVXCYuJIlltP
    JmM4Ci1YrrwFlmZH
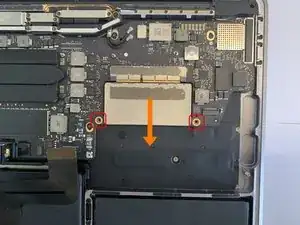
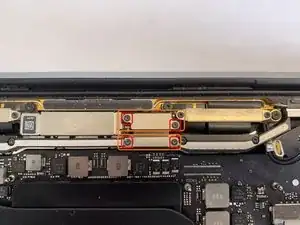
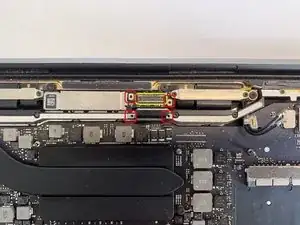
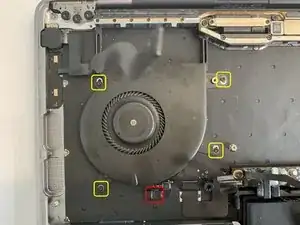
    • Use T5 Torx screwdriver/Bit to remove the 4 screws.

    • Using an ESD safe pair of tweezers remove the 2 metal brackets.

    • Using a plastic spudger gently pry up on the display connector.

    • Be careful with removing the connector because it is a fragile connector and is prone to damage.

    • Remember to place the screws and brackets in a separate grid on the magnetic mat.

  11. VPagavyqNJZ1SLg6
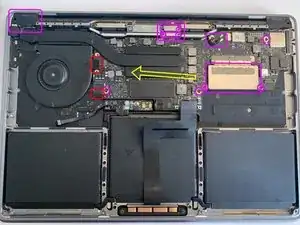
    • Remove the ZIF and lego connectors.

    • Lift up and in the direction of arrow.

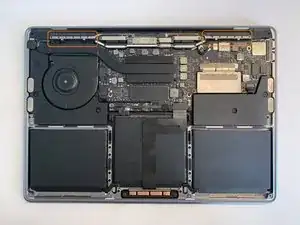
    • Note: Items in this colour have been removed in previous steps.

    • Be Careful of the thunderbolt 3 ports as they are very fragile.

  12. vNrhotE5J4uE1PlC
    • Disconnect ZIF connector.

    • Using a T4 Torx screwdriver/Bit remove all 4 of the screws.

    • If you are replacing the fan you can stop here. but can remove way earlier.

  13. GC2TZkgTvUVmu4VJ
    • Use a T4 Torx Screwdriver/bit to remove the 4 T4 screws.

    • Remove the silver retention clips.

    • Remember to place the screws and retention brackets in a separate section on the magnetic mat.

    • The pieces will separate now

  14. cjNnCTq4mpqoRAGk
    cjNnCTq4mpqoRAGk
    TlDRmeWEaUJQ6GYg
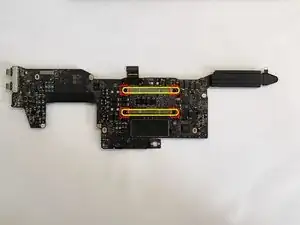
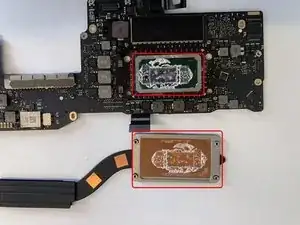
    • Use isopropyl alcohol to remove the excess thermal paste with a lint free cloth

    • Although isopropyl alcohol isn't conductive be careful with it since its extremely flammable.

    • Apply a small grain of rice of thermal paste onto the CPU die.

    • And you're done :)

    • The next image is how I organised the screws. each section is a different screw type and organised from left to right bottom up.

Conclusion

To reassemble your device, follow these instructions in reverse order.

Kalib Ellery

Member since: 17/10/16

477 Reputation

One comment

There is a mistake in Step 10.

It's not T5 Torx screwdriver, it's T3 Torx.

I have the same A1708, but it's MacBook Pro 13" Function Keys 2017.

MAJKL -