Introduction
Tools
-
-
Before disassembling the computer, follow these steps:
-
Shut down the computer
-
Disconnect all external devices connected to the computer
-
Disconnect the power from the computer by first unplugging the power cord from the AC outlet and then unplugging the AC adapter from the computer
-
-
-
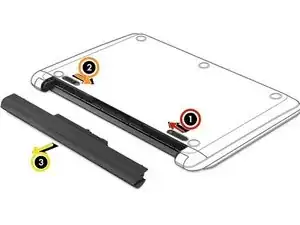
To remove the battery:
-
Position the computer upside down on a flat surface
-
Slide the battery lock latch (1)
-
Slide the battery release latch (2)
-
Remove the battery (3) from the computer
-
-
-
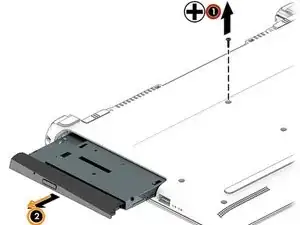
To remove the optical drive:
-
Remove the Philips PM2.5x6.0 screw (1)
-
Remove the optical drive (2) by sliding it out of the optical drive bay
-
-
-
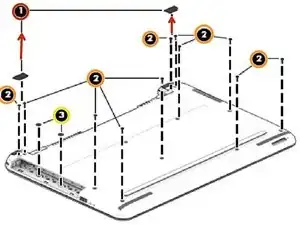
To remove the bottom cover:
-
Position the computer upside down the the front toward you
-
Remove the two rubber feet from the rear of the bottom of the computer (1)
-
Remove the 11 Philips PM2.5x6 screws (2) from the bottom of the computer
-
Remove the 2 Philips PM2x2 screws (3) from the optical drive bay
-
-
-
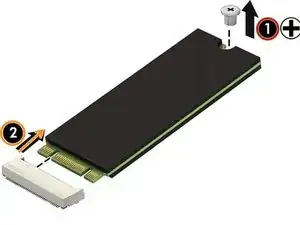
Remove the solid-state drive
-
Remove the Philips PM2x2 screw (1) that secures the drive to the system board
-
Remove the drive (2) by pulling it away from the connector
-
-
-
To remove the solid-state drive board:
-
Disconnect the cable from the system board (1)
-
Remove the two Philips PM2.0x3.0 screws (2) that secures the solid state drive board to the computer
-
Lift the board out of the computer (3)
-
To reassemble your device, follow these instructions in reverse order.


