Introduction

Use this guide to replace a damaged back case, or open the case to access other components of your camera.

We highly suggest you use a magnetic project mat or an organization tray. This camera has many different types of screws and keeping them organized is key to proper reassembly.

  1. HUuVPB5nGXimig4I
    HUuVPB5nGXimig4I
    NKi13DXVRHh2WYYk
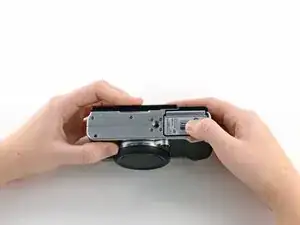
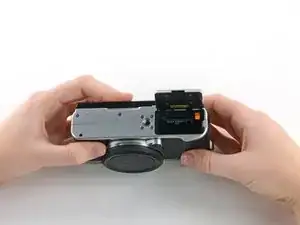
    • Turn the camera upside down to locate the battery compartment.

    • Slide the button up to open the compartment.

    • Slide the orange button up to release the battery.

    • The battery is not shown in these photos.

  2. WG2aER25jFbwnOQP
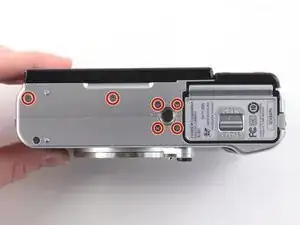
    • Remove the six 2.5 mm Phillips screws from the bottom of the camera.

  3. KQCSAfXhajBPMQft
    • Use tweezers or a finger nail to peel back the rubber cover on the left handgrip.

    • Remove the 3.4 mm Phillips screw.

    • Remove the 3.7 mm screw.

  4. GUORcUyOmsx2ibjW
    • Use tweezers or a fingernail to peel back the rubber cover on the right handgrip.

    • Remove the 3.2 mm Phillips screw.

    • Remove the 3.8 mm Phillips screw.

    • Remove the 2.8 mm Phillips screw.

  5. WPk3CgI1LtKaXVwK
    WPk3CgI1LtKaXVwK
    2PddbDegErKYWIOu
    • Use tweezers to slide the metal shield straight out of the external flash mount.

  6. rUTBAwgvwbJalsFa
    rUTBAwgvwbJalsFa
    ynSFTqfJcL1EiJsw
    Z1BFIoBQyJZ3bXM3
    • Remove the four 4.6 mm Phillips screws from the external flash mount.

    • Use tweezers or two fingers to remove the mount clip.

  7. bbYWWCXCtRmxp6Pr
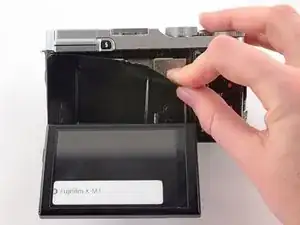
    • Extend the LCD.

    • Remove the two black 4.3 mm Phillips screws from the back case.

  8. QfZsDqRZ6xVGlbbM
    QfZsDqRZ6xVGlbbM
    YTrVTOe5XcXDEboo
    • Use two fingers to peel back and remove the black plastic cover from behind the LCD.

  9. xEUwtEijALdvnj11
    xEUwtEijALdvnj11
    fCnALSPbUOQxqnEC
    hjLCJokiKTGthKd3
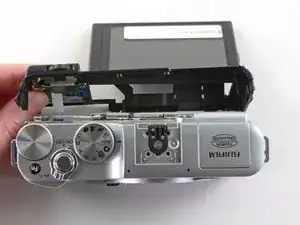
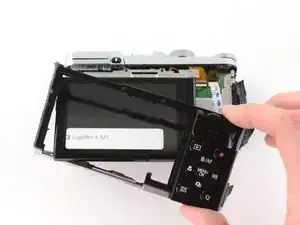
    • Slowly pull the back frame away from the camera.

    • Do not attempt to remove the frame, as it is attached to the camera by a ribbon cable.

    • Use tweezers to pull the white and blue ribbon cable out of the connector.

  10. TvghfGEyEnIJMTs6
    • Slide the frame around the LCD to remove it from the camera.

  11. dopMGLCOVFESAcoJ
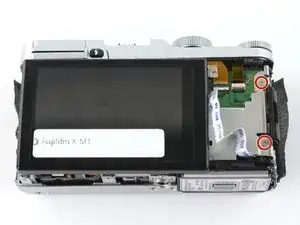
    • Remove the two 2.6 mm Phillips screws from the right side of the metal frame.

  12. lkZr2gfj1O6KaNbe
    lkZr2gfj1O6KaNbe
    t41oQDxA3p5REU2t
    • Use tweezers to unhook the speaker near the left handgrip.

  13. IWhnhTPLMXXvBFPc
    IWhnhTPLMXXvBFPc
    1CsQlmsXUC1OrDbY
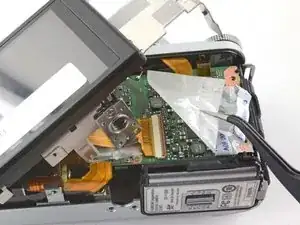
    • Slowly lift the metal frame away from the motherboard.

    • Do not attempt to remove the frame, as it is attached to the motherboard by a large ribbon cable.

    • Use tweezers to remove the plastic covering the motherboard.

  14. asXYllBOd2OAeQjO
    asXYllBOd2OAeQjO
    y43cv5vBQnbP6hn5
    FSnYcwaPbEfmFtBZ
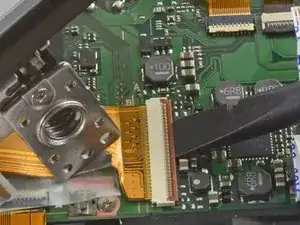
    • To remove the ribbon cable, flip back the orange lock on the large ZIF connector with the flat end of a spudger.

    • If the ribbon cable does not pop out on its own, use tweezers to pull it out of the connector.

    • Remove the back case.

Conclusion

To reassemble your device, follow these instructions in reverse order.
Kelsea Weber

Member since: 12/11/15

19745 Reputation

0 comments