Introduction

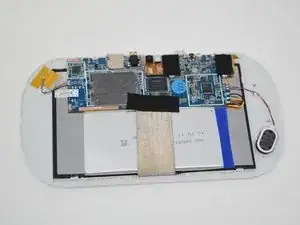
If your device is not charging, turning on, and the volume is not working, and you have recently repaired the screen, speaker, and battery, then your motherboard will need to be replaced. This guide will show you the steps to removing the motherboard from your device.

  1. GJvEeAorZ1ISJukB
    GJvEeAorZ1ISJukB
    bQACUuQbHd2qf2eC
    YoZSDk3Q1KJHbIU5
    • Turn off the device before starting

    • To prevent damage, open the device on the side without the buttons.

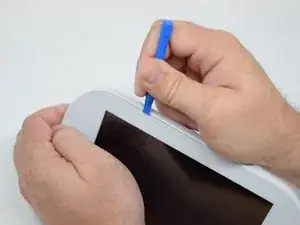
    • Insert the hooked end of the plastic opening tool in the gap between the screen and the back panel on the edge of the device.

    • Slide the plastic opening tool down the long side of the device.

    • Insert tool again and slide it down the long slide of the case a second time.

  2. fgWWDdAyUVhID14M
    • Pull the back panel away from the screen.

  3. uKGMaH4UpO1Tr4kJ
    • Remove the black tape to reveal the wire ribbon connector.

  4. ZcK5QwRSs45iB6OB
    ZcK5QwRSs45iB6OB
    NqeZCNPoqN1mGNRQ
    2wyv2de4YqaEjt4F
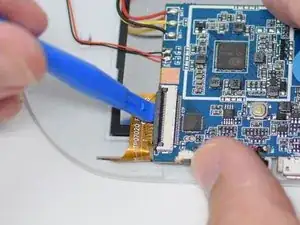
    • Flip up the black retaining tab using the plastic opening tool.

    • Pull out the large wire ribbon that crosses over the battery.

    • You may need tweezers to pull out the wire ribbon.

  5. HrFSsbAxNZheQChj
    HrFSsbAxNZheQChj
    XtGJEr61RZWQixMN
    DWYbVptQerZstldi
    • Insert the plastic opening tool under the battery.

    • Using the plastic opening tool, pry up the battery.

    • There is tape on the back of the battery. Some more force may be required to separate the battery from the back of the display.

  6. UUWNOBaouWKJbKBW
    UUWNOBaouWKJbKBW
    Ehci1lRhG5V3lSjC
    • Remove the wires from the motherboard using a soldering iron tool. Here is a link on How To Solder and Desolder Connections.

    • After the connections are desoldered, remove the battery.

    • Close the black ribbon retaining tabs once ribbons are inserted during reassembly.

  7. wFLQMOWrkh4sSgQh
    wFLQMOWrkh4sSgQh
    diyZNgGSThfuhSP6
  8. bWWI1MjJGZvjkpkO
    bWWI1MjJGZvjkpkO
    3QOyc2welUoDxbTQ
    GRmyPjbS1ZqgWMLr
    • After the connections are desoldered, remove the speaker by prying it up using a plastic opening tool.

    • There is glue on the back of the speaker. Some more force may be required.

  9. v1GL4ABmbYkFmwtR
    v1GL4ABmbYkFmwtR
    ZGu1V2oqujQNs6Ns
    • Remove the black tape to reveal the wire ribbon connector.

  10. vfmhREIr4BEdSPby
    • Use the plastic opening tool to flip up the black retaining tab.

  11. xdL1TaKHGpkw1ugV
    xdL1TaKHGpkw1ugV
    1fuWXMLN5pCqfOQf
    • Pull out the wire ribbon connected to the camera.

    • The camera is held in place by glue, so extra force may be required.

    • Remove the camera from the device.

    • Close the black ribbon retaining tabs once ribbons are inserted during reassembly.

  12. GB3rjkqpWtXBdV6O
    • Remove the black tape to reveal the screen connector.

  13. 3kKsKqBZlOYHW2jJ
    3kKsKqBZlOYHW2jJ
    ndMLOHutJoScbRiU
    • Flip up the retaining tab using the plastic opening tool.

    • Pull out the screen wire ribbon to disconnect the screen and motherboard.

  14. DgnZVbqHxOt5JQFM
    DgnZVbqHxOt5JQFM
    ACbdIsgAR2JdRedH
    • Using a PH 00 screwdriver, remove the four 4.5 mm screws that are holding the motherboard in place.

  15. eMBsYaOEcEVQnPLn
    • It is now safe to remove and replace the old motherboard with your new motherboard.

    • Close the black ribbon retaining tabs once ribbons are inserted during reassembly.

Conclusion

To reassemble your device, follow these instructions in reverse order.
Amanda Davis

Member since: 12/07/18

581 Reputation

0 comments