Introduction

Use this guide to replace the carburetor in your Echo Chain Saw CS-590 (2019).

Although it's not necessary to remove the guide bar, it's highly recommended you do so to minimize any damage to the chain and to yourself.

Note: Check that the serial number on your replacement part matches the one listed in the "Parts" section of this guide.

  1. EXqrpoIiVuTlWQpj
    EXqrpoIiVuTlWQpj
    HdgxWTa3PoaumQwV
    • Make sure you have the ignition switch turned off before starting your repair.

    • The chainsaw should be cool to the touch before continuing.

  2. VlDpTlKOKZAQGHeb
    VlDpTlKOKZAQGHeb
    lHMfIELUULyDD2XT
    • Use your fingers to loosen the air filter cover knob.

  3. hM5CJiHDnD4G2taS
    hM5CJiHDnD4G2taS
    pOHJ11GAZ5EvoCvZ
    YMmTvYbwPcaXOWxb
    • Remove the air filter cover.

  4. MjMcC4LWGGjshQhJ
    MjMcC4LWGGjshQhJ
    XcEo1FphwtCChEHW
    pqvhItih2LOKvZkk
    • Use your fingers to pull up and disconnect the spark plug boot.

  5. uIeULaEtZwacg5vq
    uIeULaEtZwacg5vq
    OnvVeeJSK6X1Ku5A
    HRTNwxHDJfPRhkwd
    • To minimize debris entering the intake, pull the choke shut before continuing.

    • Remove the air filter

    • During reassembly, clean the air filter with compressed air or with light brushing before reinstalling it.

  6. fprWV6JLP2CWaXvu
    fprWV6JLP2CWaXvu
    fnYwu2PlJm1UPPPU
    • Use a T25 Torx screwdriver to remove the five screws securing the front handle to the bottom and right side of the device:

    • Four 24 mm-long screws

    • One 25 mm-long screw

  7. GFJMPFFC6UrZtvFN
    GFJMPFFC6UrZtvFN
    STkUQDHYn5oWvtJd
    ksfCfYQdLRNxy3oB
    • Pull the handle toward the rear of the device to remove it.

  8. ZRPLAVeHjFMaSONl
    ZRPLAVeHjFMaSONl
    qlhmPLC2WBLXOhXk
    • Use a 13 mm wrench to remove the two nuts securing the sprocket guard.

  9. SlcKdx1dtwlotJtM
    SlcKdx1dtwlotJtM
    rivpeHXNpLLJYHpF
    temJNuTUTyqpyGlG
    • Remove the sprocket guard.

  10. C4EWcYOQwvLJitjw
    C4EWcYOQwvLJitjw
    MNXVHVVXHUounYit
    LUZrk2qmpW1FHLGE
    • Push the guide bar towards the back of the device to create slack in the saw chain.

    • Pull the guide bar away from the device to separate the saw chain from the clutch drum.

    • Remove the guide bar.

  11. JFMCcfuYLvUA624B
    JFMCcfuYLvUA624B
    sCEQTtNqlMHSDivY
    • Make sure the front hand guard is in the unlocked position before continuing.

    • Use a T25 Torx screwdriver to remove the two 20 mm screws securing the front hand guard.

  12. yqeipxYZgcrRlLKe
    yqeipxYZgcrRlLKe
    p63V56LxB4weIiRI
    • Pull the front hand guard toward the rear of the device to remove it.

  13. DFDFCMt1OkZEdDNY
    DFDFCMt1OkZEdDNY
    R3Yc2YE6uJaIqbcU
    • Use a T25 Torx screwdriver to remove the three 20 mm screws securing the engine cover.

  14. PYgGilYQLMfCFISQ
    PYgGilYQLMfCFISQ
    R4Xs1bBLegDCheHg
    xmmTYRdGTLX2NlWB
    • Pull the engine cover straight off the device to remove it.

  15. 4C2NDZx1QIpM3QYY
    4C2NDZx1QIpM3QYY
    UcRRVpB2vIfdHlWo
    • Use a T25 Torx screwdriver to remove the two 54 mm screws securing the carburetor cover.

  16. DcOmGPVSVTPZieqo
    DcOmGPVSVTPZieqo
    GlTUGo1IkOXDYPUd
    Y4jevE1QaggLlEHu
    • Pull the carburetor cover straight off its housing to remove it.

  17. 4jSSGbUBNBmYA3hW
    4jSSGbUBNBmYA3hW
    AMFIHGkFIqPB2PGa
    1sp1jFDmUGBvZl5r
    • Before performing this step, put on safety glasses to avoid any fuel spraying in your eyes.

    • Use your fingers to pull the right fuel pipe out of the carburetor.

    • Repeat the same procedure for the left fuel pipe.

  18. U2bAo6BDeAhCTrNP
    U2bAo6BDeAhCTrNP
    CDYLEa3PGCHUpeki
    APZRUmA6I5vdmDda
    • Pull the choke lever through its bracket to separate it from the frame.

    • Twist the lever counter-clockwise to disconnect its clip on the carburetor.

    • Remove the choke lever.

  19. IeHwBhDIaARnASJE
    IeHwBhDIaARnASJE
    Xiw4dj5riEC4wJkf
    21BxyRjrLVQxYnNk
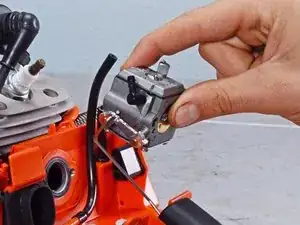
    • Lift the carburetor out of its housing.

    • Twist the carburetor counter-clockwise to disconnect the throttle rod's metal clip.

    • Remove the carburetor.

Conclusion

To reassemble your device, follow these instructions in reverse order.
Alex Diaz-Kokaisl

Member since: 16/01/22

117875 Reputation

2 comments

And what about using a new carburetor gasket? Got a part # to go with it?

TED -

steps 6 to 14 are unnecessary they have nothing to to with the removal or install

HECTOR -