Introduction

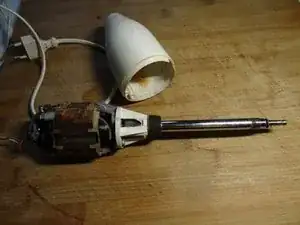
If the mixer no longer turns, the shaft can be blocked, but also the motor, e.g. due to rust or moisture. The motor can be disassembled and repaired quite easily, this is shown here.

  1. cNmcWxjEySZ2gRpD
    cNmcWxjEySZ2gRpD
    QCjZGctNTeDUvtMq
    IYdEGBQvpsZDRIlU
    • Unplug the power cord and remove the cutter blade.

    • The top cover is fastened with two Torx TR10 security screws. These screws are different from normal Torx screws: they are equipped with a center pin. Use the right bit or screwdriver with center hole.

    • Remove two Torx TR10 screws.

    • Carefully lift off the cover. It is latched at the front.

  2. oaNH1XUgEkDNNIGo
    oaNH1XUgEkDNNIGo
    djaAvCDgTjVLdHgq
    QHhPDVVH6BZuBec6
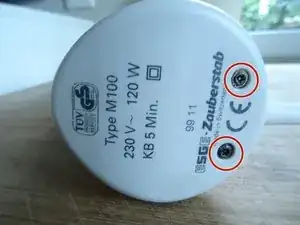
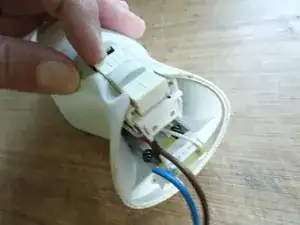
    • This is what it looks like under the cover.

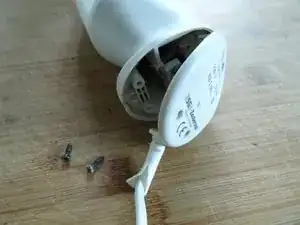
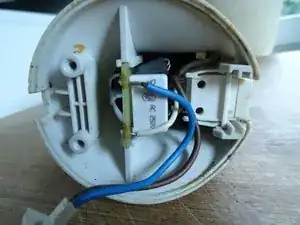
    • Slide out the two buttons and the small circuit board. The buttons are only snapped in.

  3. R11MNWpSPA2GLXvA
    R11MNWpSPA2GLXvA
    uYVGA3XqDURhfCrk
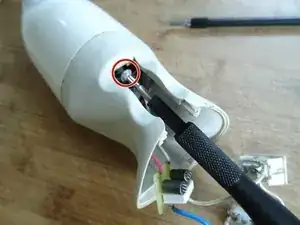
    • The handle is fastened with a Torx T8 machine screw and a Torx T8 plastic screw. You will need a long screwdriver.

    • Remove two Torx T8 screws.

  4. jhN2ipY3Y5rP2rnG
    jhN2ipY3Y5rP2rnG
    ZjusUkdm2YyFJsEM
    • Unclip the handle from one side.

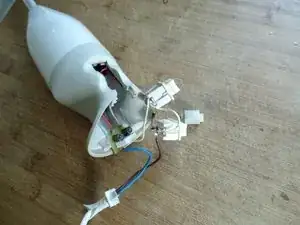
    • Unthread the cable, the buttons and the board.

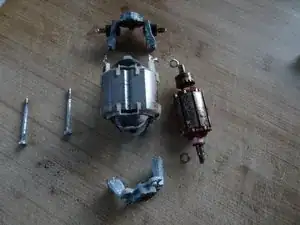
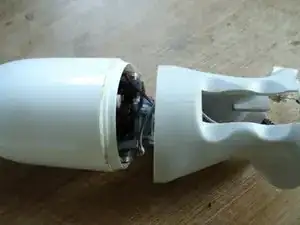
    • The motor ist exposed. However, it is not yet completely accessible, since the lower plastic housing part cannot yet be slid over the bell. The bell must first be removed.

  5. SI1g5qkuEAwH3RSE
    SI1g5qkuEAwH3RSE
    eIrWGQEVNVlyOTVa
    vknmRo1JXRbRqjZP
    • First try If the bell can be unscrewed. It is fastened with a left-hand thread, so turn it in the "wrong direction", clockwise, to loosen it.

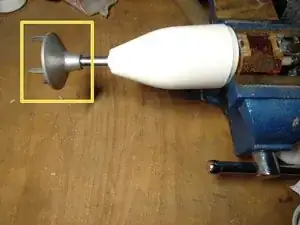
    • Pull on the knife to remove it

    • The bell sits probably quite tight, as it should not come loose during normal operation. When reassembling, glue it in place with a few drops of fluid threadlocker, if needed.

    • If it does not come off easily, then slide the lower plastic part towards the bell and clamp the motor in a vice. Do not tighten the vice very much, the motor is sensitive.

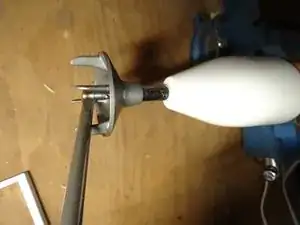
    • Use a long screwdriver as a lever between the bell and the shaft. Then carefully unscrew the bell. Reminder: the wrong way round, i.e. clockwise.

    • Pay attention to the washer between the shaft and the bell, do not lose it.

    Es fehlt leider wie man das Messer entfernt bevor man die Glocke entfernen kann, wäre super wenn man den Schritt noch hinzufügt.

    kapott -

    Aber das ist doch das "normale" Wechseln der Einsätze (gibt ja verschiedene), so wie in der Gebrauchsanleitung beschrieben. Es kann halt nur sein, dass er nicht oft abgenommen wurde (sollte man tun, um ihn sauber zu halten) und deswegen festklebt. Dann in heißem Wasser erwärmen und vorsichtig mit einer Zange abziehen oder einem starken Schraubendreher abhebeln. Wenn dann der Messereinsatz zu leicht geht, kann man die Metallraste vorsichtig mit der Zange zusammen drücken.

    VauWeh -

  6. tKIUcCrSMlduMu1N
    • Pull off the lower case over the shaft.

    Leider endetz die Erklärung zu früh. Beimeinem Gerät dreht sich die Welle nicht bei eingeschaltetem Motor.Der Motorläuft alleine perfekt-Offensichtlich ist mit der Kupplung zwischen Motor und Welle etwas nicht in Ordnung. Wie kann man dioes eaustauschen bzw. prüfen-?

    Saronni -

    Da durfte die Gummikupplung am oberen Ende der Welle gerissen sein In dieser Anleitung, Schritt 8, drittes Bild ist das Teil gut zu sehen. Eine Schraube ist eingegossen, die muss herausgedreht werden, dann kann das Ersatzteil eingedreht werden, leider relativ teuer, google nach Gummikupplung ESGE.

    VauWeh -

  7. cjFhARlUcFXfUXqd
    cjFhARlUcFXfUXqd
    DaNFWrmmfUVIIFFl
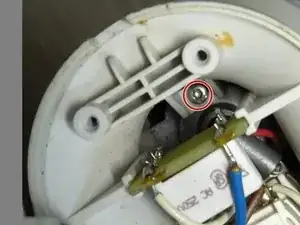
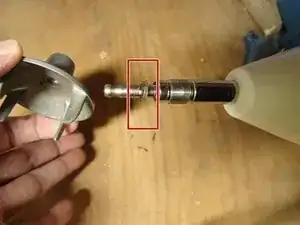
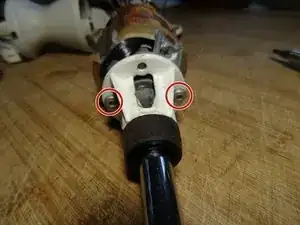
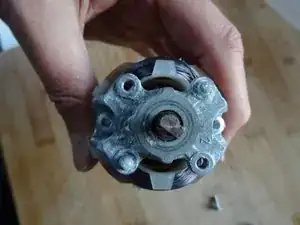
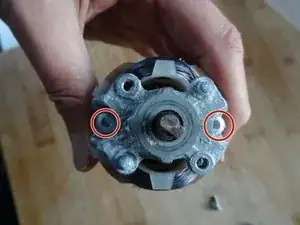
    • Using a Torx T15 screwdriver unscrew the two screws securing the flange of the shaft to the motor.

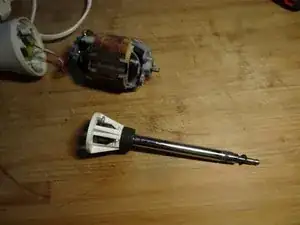
    • Seperate the flange including the shaft from the motor.

  8. jKq6Rb6joSlKHMaZ
    jKq6Rb6joSlKHMaZ
    PKcVBcdiNTEUVDsf
    DmcgsjUEpuIbiHny
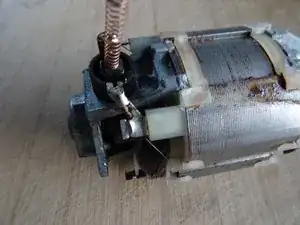
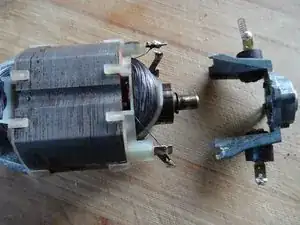
    • Desolder the red and the white wire. These wires are thin and delicate, don't break them.
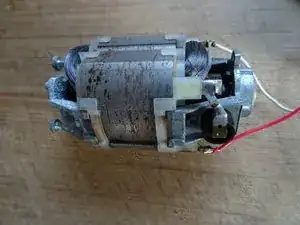
    • The motor remains.

  9. XgdoWIbjAUEPlAmX
    XgdoWIbjAUEPlAmX
    GHlYfyHWjLEfHhYZ
    • The rotor is easier to remove and reinstall later when the carbons are pushed back.

    • Desolder the connections to both carbons.

    • The contact strips are delicate and cannot be bent open and closed often, work very gently.

    • Very carefully bend both contact strips open so that the coil springs are free and the carbons can be pushed back.

  10. fQM5N32eKC1Z4aGI
    fQM5N32eKC1Z4aGI
    ByNlWSkIVTQSUIO5
    • Using a Torx T15 screwdriver remove the two long screws keeping the motor together.

  11. VQPLsBaQoZB1yALj
    • Carefully pull out the upper motor shield including the carbons.

  12. kSIkoELr1qhb3JZk
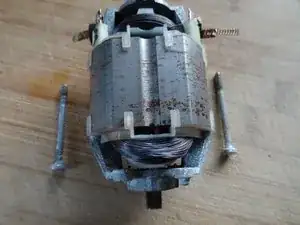
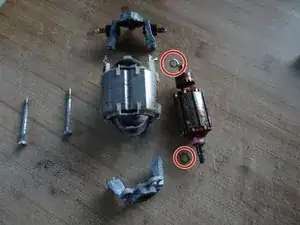
    • Carefully pull out the bottom motor shield.

    • Remove the rotor. If it is stuck tap it carefully out using a hammer.

    • Take care of the two washers located on the top and the bottom of the motor shaft.

    • This motor was heavily rusted and dirty inside. All sliding surfaces, the contact surfaces on the commutator (where the carbons rest), the rotor and the armatur insides were cleaned with fine sandpaper. The bearings were lubricated with silicone oil. After reassembly, the motor ran as it did on the first day.

    Für die Lager besser Feinöl (aka Nähmaschinenöl) benutzen. Die Welle dreht sich sehr schnell und dafür ist Silikonöl nicht die Beste Wahl. Aber: top Anleitung. Danke für die Mühe zur Erstellung 👍

    Hai bike -

Conclusion

To reassemble your device, follow these instructions in reverse order.

VauWeh

Member since: 19/10/15

199864 Reputation

0 comments