Introduction
This guide will demonstrate the steps that need to be taken to remove the fans located in the Dell XPS 15 9570.
The fan is a piece of hardware that is responsible for cooling the computer's processor by redirecting the hot air out of the laptop. A failing fan could be recognized due to the fan running at a higher temperature than it has been previously, or the fan making more noise than was occuring when the device was new. These symptoms can result in continuous crashing due to overheating or the laptop not booting up due to permenant damage.
Before using this guide make sure the vents located on the back plate and front hinge of the device are clear of dust and debris to cancel out the possibility that the device needed better airflow.
Before beginning this repair, power off your device and unplug it from the charger. Also check that the motherboard located below the fan is kept clear of extra debris.
-
-
Flip open the system badge and with a Phillips #00 screwdriver, remove the two 8.5 mm screws.
-
-
-
Using the Phillips #00 screwdriver, remove the four 4 mm screws holding the battery in place.
-
-
-
Use the Phillips #00 screwdriver to remove the two 4 mm screws securing the grey display cable bracket.
-
-
-
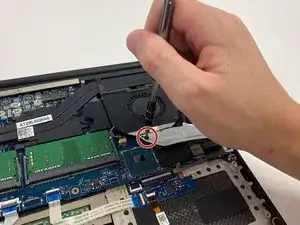
Using the Phillips #00 screwdriver, remove the 4 mm screw at the back right corner of the fan.
-
-
-
Disconnect the fan cable on the left of the fan and on the right side from the RAM, using the opening tool.
-


To reassemble your device, follow these instructions in reverse order.