Introduction

Use this guide to remove and replace the Solid State Drive (SSD) in your Dell XPS 15 9520.

Before you perform this repair, back up your existing SSD if possible. If you’re replacing the SSD where your operating system is installed, familiarize yourself with a disk cloning utility so you’ll be ready to migrate your data to the new SSD.

  1. ISvdFZQIAMFXTwOW
    ISvdFZQIAMFXTwOW
    AMMa6PdHTnd46OxV
    • For your safety, discharge the battery below 25% and power down your device before disassembly.

    • Use a Torx T5 screwdriver to remove the eight 3.3 mm-long screws securing the back cover.

  2. CUDAEEIcYHlWpo1R
    CUDAEEIcYHlWpo1R
    mrHZhsWKWg2yjrAi
    • Insert an opening pick between the bottom-left corner of the aluminum back cover and the chassis.

    • Leave the pick inserted before continuing to the next step.

  3. VBsF61aIcWpYEo4y
    VBsF61aIcWpYEo4y
    efxqpGT6HHiQ6jA3
    • Insert the flat end of the spudger into the gap you just created.

    • Pry up to release the corner clips.

    • Repeat this process for the opposite corner of the back cover.

  4. rBY4eBo6PKMHb2jI
    rBY4eBo6PKMHb2jI
    gURGNbU3akbPbtGx
    IGwdpDcSn6fGljfu
    • Reinsert your opening pick under the aluminum cover at the front edge of the laptop.

    • Pry to loosen the cover.

    • Pry at multiple locations along the front edge to release all of the retaining clips.

    • Do not use a sliding motion along the front edge. This may damage cables near the trackpad.

  5. CXSn5yWMDCrIIww3
    CXSn5yWMDCrIIww3
    QEBIcLtZfVMZOXjq
    ZHxQNkBmMoAomeM5
    • The edges of the back cover are very sharp. Use caution when handling it.

    • Lift the back cover off the chassis and remove it.

    • If the back cover feels stuck to the chassis, use an opening pick to release any remaining clips around the back cover's perimeter.

  6. GfxBuCOQDfUre11j
    GfxBuCOQDfUre11j
    KpRmnD2rcu5qOweh
    PGyhxYvGTrt1feyW
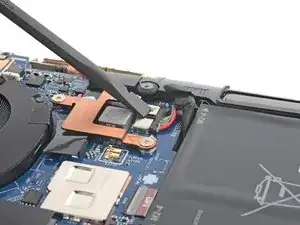
    • Use the flat end of a spudger to push the battery connector's square tab away from the socket and disconnect it.

  7. NTbfSnZBdKvJO2BU
    NTbfSnZBdKvJO2BU
    ZkwqV2rAptVETpym
    • Use your Phillips screwdriver to remove the 2.6 mm-long screw securing the SSD cover.

  8. aSrvDpBqNWQVOCFo
    aSrvDpBqNWQVOCFo
    nUbD6LYJb6AVVSRP
    5HWgToOPlriyoYXX
    • Grip edges of the SSD cover near the screw indent.

    • Pull the cover from the chassis to free it from the silver retaining peg.

    • Remove the SSD cover.

  9. hHlgpjermCq3aGEc
    hHlgpjermCq3aGEc
    2oWUbIlE3PCPdD5a
    AccVwMlldMxRZrFT
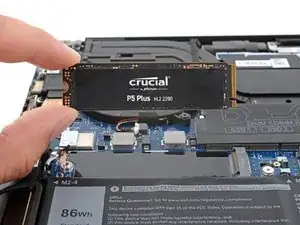
    • Grip the edges of the SSD near the screw indent.

    • Pull the SSD straight out of its socket and remove it.

    • If it feels stuck, wiggle it side to side as you pull.

Conclusion

To reassemble your device, follow these instructions in reverse order.

Take your e-waste to an R2 or e-Stewards certified recycler.

Repair didn’t go as planned? Try some basic troubleshooting, or ask our Dell XPS answers community for help.
Clay Eickemeyer

Member since: 19/09/22

65190 Reputation

0 comments