Introduction
If your Dell XPS 13 7390 has lost its ability to hold a charge, you probably have a dead battery that needs to be replaced.
A working Dell XPS 13 7390 battery provides power to your computer. Laptop batteries discharge more quickly after a large number of charge cycles. If you notice that your battery is discharging faster than usual, perform a battery calibration to accurately determine its charge capacity. If you continue to notice large drops in charge percentage, you should replace your battery.
A punctured Dell XPS 13 7390 battery can start a fire. If your battery is swollen, take appropriate precautions.
Be sure to turn off your device before you begin.
Tools
Parts
-
-
Remove the eight screws (M2x3, Torx) that secure the base cover to the palm-rest assembly
-
With the computer face-down, open the computer at an angle.
-
Using a plastic scribe, pry the base cover from the palm-rest assembly, starting at the front left and right corners.
-
Moving the base cover from left to right, release the clips securing the base cover to the palm-rest assembly.
-
Lift the base cover from the palm-rest assembly.
-
-
-
Ensure that the battery cable is disconnected from the system board.
-
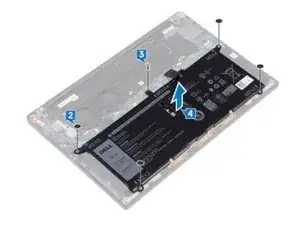
Remove the four screws (M2x2) that secure the battery to the palm-rest assembly
-
Remove the screw (M1.6x4) that secures the battery to the palm-rest assembly.
-
Lift the battery off the palm-rest assembly.
-
Turn the computer over, open the display, and press the power button for about 5 seconds to ground the computer.
-
-
-
Align the screw holes on the battery with the screw holes on the palm-rest assembly.
-
Replace the four screws (M2x2) that secure the battery to the palm-rest assembly.
-
Replace the screw (M1.6x4) that secures the battery to the palm-rest assembly
-
-
-
Align the screw holes on the base cover with the screw holes on the palm-rest assembly and slide in the base cover into place.
-
Replace the eight screws (M2x3, Torx) that secure the base cover to the palm-rest assembly
-
Congratulations, you’re all done!
3 comments
I have an xps 13 7390 and when I perform step 1 - prying open the base cover - the computer turns on. I searched the internet for how to configure my PC to not automatically power on when the lid opens (even when it's only opened 1/4 of the way it tries to turn on) and my BIOS does not seem to have a Power On - Lid Open on/off option. Any suggestions? Thanks.
Uncle -
UPDATE - My XPS 7390 does, in fact, have a LID Power on/off option through the F2 Function. This gets you into BIOS and it was all the way at the bottom of the Power Management option. Apologies.
Uncle -
This guide is better and more accurate than Dell’s website. Just replaced the battery DHGH8 (4-cell 52 Wh, 7.6 V) in my XPS 7390 with no problems.


My xps 7390 attempts to power on after removing the screws, and partially opening the lid at an angle to pry it open. I stopped following the instructions at this point for fear of a problem. I sought some advice from the web and learned that some XPS 7390's have a power on option when the lid is open, which you simply turn off. Mine does not appear to have that option.
Uncle -