Introduction

  1. jPWISaqwmdQeCAAl
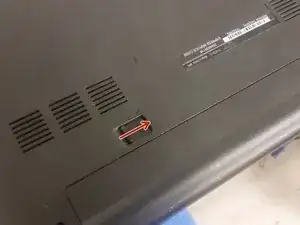
    • Flip the laptop over. With the battery side facing you, push the latch to the right.

    • Lift the battery. You're done!

  2. 5Y6Z4AWMslbL2nAX
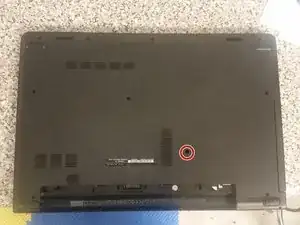
    • Remove the single tiny Philips screw securing the disc drive.

    • Slide the disc drive out.

    It is missing a step in regards to removing the Optical Drive so that the middle screw can be removed for the next step.

    luis gutierrez -

  3. aBtlwoCncrSKjjqZ
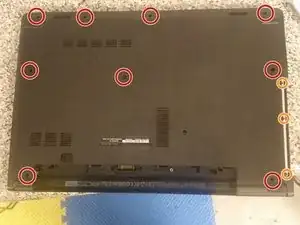
    • Remove the nine long Philips screws securing the bottom cover.

    • Remove the three small Philips screws securing the bottom cover.

  4. AGZffirjksmZJdar
    AGZffirjksmZJdar
    PtyosXfgVFcePO2G
    hhDh4AUmnwXB6TK4
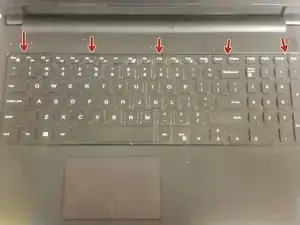
    • Flip the laptop right-side-up and open it.

    • Use a spudger on each of the five keyboard clips.

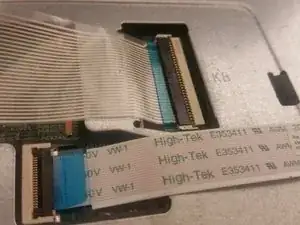
    • Lift the keyboard slowly, and then remove the cable from the connector.

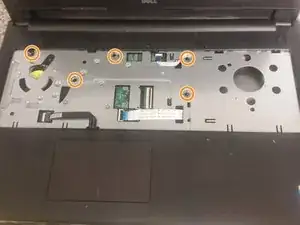
    • Remove the five medium-length Philips screws.

    Is there a step missing between this step and the next? How did we get inside the case?

    David Maag -

    4.5a Unplug (UP!) and remote ODD cable connector

    4.5b Use a spudger to remove back (downside) plastic cover

    Gluek -

    There is a metal plate attached to the bottom piece near the security lock. And it interacts with another piece on the hinge, so it has to be sort of taken away with a sideways motion, or you risk bending the hinge.

    Thomas Estes -

    As Gluek says, remove the two lower connectors. Do NOT remove the upper one as it is painful to get back in.

    1. Flip the laptop back over so the bottom is facing you. There is a phillips head screw in the battery compartment. It has a extra wide head (about the diameter of a green pea), and is shiny metal. Unscrew that.

    2. At this point, you can pry apart the bottom plastic case from the top of the case. This will feel a bit scary, but just start pulling on the bottom shell (near the DVD drive slot it is easier). You will probably feel like you are breaking it, but it should start to give. You should be able to completely remove the back panel now.

    I admit that I started watching the other site’s video by the Parts People at this point. I found getting it back together a bit tricky. You have to thread that ODD ribbon through the right hole before assembling the back case.

    Peter Laird -

    Better instruction than “remove cable from connector” would have been real helpful … like how to release the clip. Pretty sure I just ruined my laptop, the black part of clip broke off and now it won’t lock down.

    dave -

  5. qFxjJWyNlNH4ouND
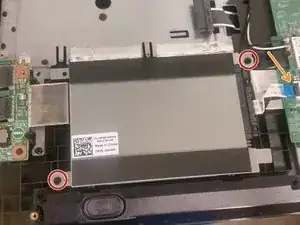
    • Remove the two screws securing the HDD caddy to the palmrest.

    • Remove the ZIF cable from the connector.

    • Lift the caddy.

  6. O5DDoeuXsrZjlvRB
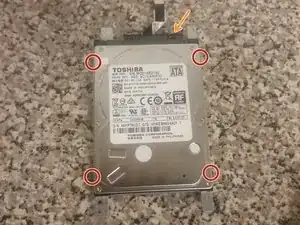
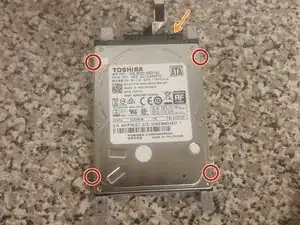
    • Remove the four screws securing the HDD to the caddy.

    • Remove the SATA-to-ZIF connector from the hard drive.

    • You're done!

Conclusion

To reassemble your device, follow these instructions in reverse order.

Joseph Sctbunio

Member since: 24/09/17

7332 Reputation

3 comments

Good guide except step 2 would be better if it said “remove optical drive” or “remove CD/DVD drive”.

mt_braun -

I was getting suspicious wether or not my laptop wardrobe replacement caused keyboard function loses (first F3, Caps lock, Left shift, Tab, second comes X key and now W key). Nearly all the keys other than the W key is rarely used and the method of hard drive removal shown in this web seems to support that idea too

Sirius K -

BIG omission after step 4. this guide fails to tell you how to remove the entire back of the laptop. That is doable, if you read the comments for step 4. but pictures would have been very helpful. However, there were two screws in the battery holding compartment which I had to remove, not one.

tom -