Introduction

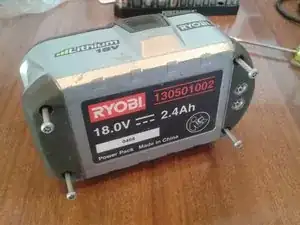
This guide applies to Ryobi One+18V Li-ion Battery (130501002), but should also have more general application. This guide will show you how to disassemble the battery pack and check the cell balance and rebalance the cells if necessary.

The battery should normally measure about 18V across the terminals (21V max). If it reads about 12V, then it is likely the battery protection circuit has activated because of cell imbalance. (Those were my symptoms.)

Cell re-balance could also help if the battery isn't taking a full charge (not showing green on the fuel guage button).

The time estimate for this guide is for disassembly and cell balance measurement. Cell rebalance charge time is extra.

CAUTION: Battery disassembly exposes high current circuits. Be careful!

This battery is of 2P5S configuration (sets of 2 parallel cells, 5 sets in a series string). It uses Sanyo 18650 Li-ion cells.

  1. YjAQPUX1CQxdvcqK
    YjAQPUX1CQxdvcqK
    YIVgO3mSUV36i4SY
    • CAUTION: Battery disassembly exposes high current circuits. Be careful!

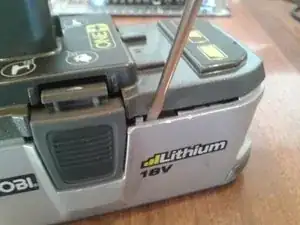
    • Remove the four T15 security screws from the bottom.

    • Remove the one T10 screw on the top.

  2. JShw3b2ZysCLySZV
    JShw3b2ZysCLySZV
    LioxaMabd5VmcpCp
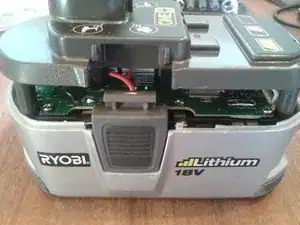
    • Lever the cover clips to remove the top cover. Leaver up so the base pops out.

    • Using an insulated instrument, lever the battery terminal assembly down inside the top cover.

    • CAUTION: use of a metal instrument for the above step risks shorting the battery contacts.

  3. uyb1sKpfa1ItrifJ
    uyb1sKpfa1ItrifJ
    4ZCTSAiTlLXU4bnm
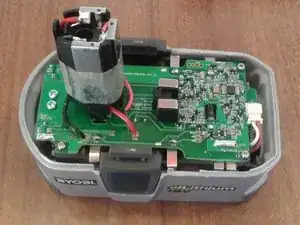
    • Once there is enough gap, reach in and hold the battery terminal assembly, while sliding off the top cover.

    • The battery catch clips on the sides can be removed if you want.

    Cells seem to be balanced, but 18 v seen between the terminals is NOT seen at the “ front “ terminal. Is there a circuit diagram somewhere that can help me understand this ?

    also, my battery blinks red, the clicks to blink green about 10 times then goes back to red blinking…not sure what that is telling me.

    Ron Bruno -

  4. BeZjOy6KQQLYq3h4
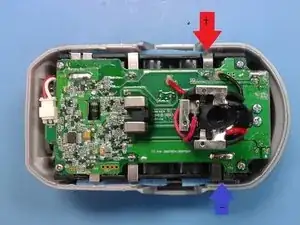
    • With a Digital Multimeter (Volt Meter) set to DC Volts, measure the cell balance. The nickle straps are good test points. Note the cell voltages.

    • Cell 1: TP6 to CL1

    • Cell 2: CL1 to CL2

    • Cell 3: CL2 to CL3

    • Cell 4: CL3 to CL4

    • Cell 5: CL4 to CL5 (Battery Pos)

    • The cell voltages should be in the range 3.0V to 4.2V. The cells should all read about the same, say 3.9V. If the cells are more than 0.1V different, then cell imbalance could be a problem for your battery pack.

    If I have 2 cells at 0 and won’t take a charge all others 3.45 changing them to good ones should fix it you think

    Curtis -

  5. abBwXkaHBZyWWbVC
    • Use a Benchtop Power supply with adjustable voltage and adjustable current limit. Voltage and current meters are necessary too. Example, the Topward 3000 series. Set the voltage to the higher cell voltage you measured, but no more than 4.2V. Set the current limit to 0.5A.

    • Connect the power supply to the cell to be charged up (rebalanced), positive to positive, negative to negative. Crocodile clips are useful for this.

    • As the cell charges up the voltage will rise and stop at the set voltage, then the current will start to decrease toward zero. When the current drops to near zero the cell is charged.

    • Remove the power supply and repeat the cell voltage measurements.

    • Repeat charging on other cells until all cells are within about 0.1V.

    Mercie beaucoup batterie reequilibre

    romain -

    I'm assuming that these types of batteries all have some kind of a programed chip that can be triped? ?

    tom watkins -

    Das wird nicht helfen. Genau das sollte die eingebaute Elektronik doch regeln!?

    qqqqqqqqqq4321 -

    Bonjour,

    J’ai vérifié, toutes mes cellules sont à 3,92 ou 3,93. Mais ma batterie ne marche pas.

    J’ai une puissance de sortie à 15,02 au borne. (Bat- et bat+)

    Une tension de 19,66 en sortie de cellules (bat+cl5 et gnd)

    Pas de lumière aux led de niveau.

    Avez-vous une solution ?

    Pat Rick -

    Used a phone charger and multimeter and manually balanced the cells, and it worked perfectly, just clipping the aligator clips to the end of the cells (making sure to confirm I was getting the right polarity). Thanks for the info.

    stib -

    I'm not sure I see the point in this. Yes, you have possibly fixed the battery for one more use, but no, you haven't sorted out the original problem of why the cells are not being fully charged

    Peter Harris -

Conclusion

To reassemble your device, follow these instructions in reverse order from step 3.

edwardb

Member since: 24/08/11

2342 Reputation

56 comments

Using this guide, I successfully dismantled my 18V Ryobi Li-Ion battery with no problem. THANKS edwardb! In my case, I do have cell voltage imbalance exceeding 0.1V (3.48 to 3.36V). I would like to get your feedback on an alternate STEP 5 since I don't have a variable power supply yet. It seems that we recharging the individual pairs of SANYO cells to the same voltage so that the protection circuit will function properly again and allow the reassembled Ryobi battery to be recharged again using the standard Ryobi chargers. If this is this correct, then there might be 2 other options for reducing the cell imbalance to less than 0.1V as mentioned in STEP 5.

OPTION 1: Carefully deplete the cells having the higher voltage to reduce the voltage imbalance to less than 0.1V, or

OPTION 2: Carefully charge the lower voltage cells using a solar panel that has a power rating of less than 4.2Vx0.5amps =2 watts.

Would either OPTION 1 or 2 work?

Al Manzer -

Hi Al, Glad the guide is useful.

Yes your option 1 or option 2 would both work.

For option 1, use a power resistor with sufficient rating (say 10 ohm, 2W). Careful monitoring would be needed. Be sure to stay above 3.0V.

Option 2 should work fine too, might take a while depending on how many cells you can charge while the sun is out (and giving you good power in the solar panel).

Good luck

Ed

edwardb -

Ed, thanks for your quick response. This is how I re-balanced my cells. I charged the 4 lowest voltage cell pairs, one at a time, to the same level as the highest voltage cell (3.48V) using a spare 18V Ryobi battery. I connected one cell tab to one terminal of the spare Ryobi using thin bell wire (it's like speaker wire). The polarity is critical (negative-to-negative, or positive-to-positive). I then attached one end of another bell wire to the other terminal of the spare Ryobi. With the free end, I made frequent intermittent contact with the other cell tab. This means touching the wire to the cell tab long enough to see sparks and repeat the contact every 5-10 seconds, depending on how fast the wire heats up. If the wire is hot, then increase the interval between sparking. During this procedure, it is important to monitor the voltage across the cell. In less than a half hour, all cells were charged. After reassembly, I was able to charge the battery up to about 19.8V, a bit less than usual (20.5V). Amazing!

Al Manzer -

How about another alternative: why not use one of the higher voltage cells to charge one of the lower voltage cells? Put two of the cells together with a resistor or series of resistors in between them.

If my EE skills are in tact, you could put a chain of 470 milliOhm 1/4W resistors in series - one for every .1V difference. As the voltage difference drops, remove a resistor from the chain until there is only 1 resistor between the two cells that differ by .1V.

So for example, if one cell was 4.2 V and another was 3.6 V, put 6 of the resistors in series. When they go to 4.2 and 3.7 remove a resistor, when they go to 4.1 and 3.7 remove a resistor until one is 3.9 and the other is 3.8.

Mouser sells these resistors for less than 20 cents here: http://www.mouser.com/ProductDetail/Yage...

Your thoughts?

Kenton -

Kenton, you need to consider your application from the energy perspective. Cells in a Ryobi battery are normally cycled from 3.5 to 4.1V, resulting in 4.8 Wh output/cell. In your example, the 4.1V cell would lose about 1Wh of energy while discharging to 3.9V, based on what I’ve read on the internet. That energy would be distributed to a) the charging of the weaker cell, b) the heat load of your resistors, and c) the charging inefficiencies. For item a), the weaker cell would need about 2Wh charging from 3.6 to 3.8V. For item b), the resistors would dissipate <0.1Wh in one hour at say 0.3 amps. For item c), I would not be surprised if it takes an extra Wh to charge an cell by 2Wh. At the end of the day, you would likely have 2 depleted cells.

Ed’s original intent was to rebalance the cells without removing them from the Ryobi battery. For your approach, you would need to remove the cells if both the stronger and weaker cells come from the same battery pack. Hope this helps. What do you think Ed?
Al Manzer -

Just wanted to say thank you for this tutorial. I don't have a benchtop power supply, but an old cell-phone charger transformer worked perfectly for me. The one I had was 4.8V, 0.9A and I just cut the end off and wrapped each lead around each probe of my multimeter. The multimeter read 4.8V and then I'd touch the probes to the contacts of the low battery cell and the multimeter would drop down to 2.9V (in my case) and slowly trickle up to 3.48V (which was the same as the other cells). It worked perfectly and I didn't even have to have a fancy power supply. Now I've gotta get back to trimming the yard. Thanks again for the ideas!

Damian -

HobbyKing ECO6 50W 5A Balancer/Charger w/ accessories 18.99$ is super for Li Ion and Pb, LiPo, NiCd, NimH, LiFe

and

Lets you control current (amps) voltage time of charge and much much more.

Now

I use

Turnigy Accucel-6 50W 6A Balancer/Charger w/ Accessories $22.99

Which is almost identical

With ether you can not go wrong.

Ed Hughes -

So how would you connect the balancer? I am extremely interested in this technique. Do you have to do one cell at a time or can you connect without even taking the battery apart? Please explain.

Richard Regalado Jr -

Thanks for the writeup, very useful information.

I have a P104 18V battery and opened it to test the cells.

All cells are reasonably close. One is 4.1, one 4.07 and the rest 4.06.

So they appear to be reasonably well balanced but I still have issues.

The battery seems to charge fully and shows full bars on the indicator but the battery will only work for a short time and then start dying under load.

When I try to test the voltage across the outside terminals I only get a quick flash reading then it drops to 0. The reading is variable but usually flashes around 19v. Any ideas on what the issue might be? Bad temp sensor in the pack maybe? Any way to test?

Nite Owl -

Nite owl. Did you ever find a solution to your Ryobi battery problem? I have one doing the same 20 volts for a quick burst then nothing. In a tool this will repeat over and over pull the trigger and it runs for half a second then dies

Scott Reagan -

Well Nice Owl, your circuit board could be faulty. Try charging the battery while it is disassembled. If the voltage is 0 at the terminals and full charge at the connections across the cells then it might be the circuit board. Next, to check the temperature sensor, bypass the temp sensor with a jumper wire to see if the battery starts charging normally. If it does then the sensor is faulty. Hope that helps.

Al Manzer -

So where are Cell 1: TP6 to CL1

Cell 2: CL1 to CL2

Cell 3: CL2 to CL3

Cell 4: CL3 to CL4

Cell 5: CL4 to CL5 (Battery Pos) ?

I'm new to this but I have two dead although new maybe two charges,and one never worked. And how do you charge each cell? I don't have a Benchtop Power supply with adjustable voltage and adjustable current limit.

daddywoofdawg -

WORKED PERFECTLY with cell phone charger THANK YOU ,THANK YOU ,THANK YOU!!!!!!!!

Frank O -

I was also able to rebalance my battery using this guide and a cell phone charger. I do have one P107 (battery with fuel gauge) that is completely gone. I was considering buying a P102 and using the cells in the p107 so I can keep the fuel gauge. The p102 is about half the cost of a new p107. Has anyone done this or think it is possible?

John -

It's very possible, the difference being 102 has 11865 cells and 107 has 21865 cells, so basically what you will have is a 102 with a fuel gauge.

Dmac3009 -

I have a question. I have a p108 that is fully charged each cell at 4.2v and all cells together measure 21v but at the upper terminals i only get 16v. Now obviously its a problem somewhere on the board but does anyone have a clue which component could be reducing the voltage?

john -

Also useful if you leave your battery uncharged for a long period of time, a year or more, the defective light will come on not allowing the battery to charge. If this happens the battery has been totally discharged to the point where the charger can not determine if the battery is inserted. Try putting a 12 volt battery charger to the Positive and negative points on the battery for a minute. It will charge the battery enough so that the charger will recognize the battery is installed. Essentially re-polarizing the battery. Just did it to my father's kit with 2 batteries. My Dad passed away nearly 2 years ago and I was cleaning out his garage and found the 4 piece kit. The Batteries had not been charged in at least 2 year. Deader than a door nail. Re-polarized the 2 batteries and "Walla" they took a charge. The tools are working great.

jerryschutz -

Dude, sweet! I thought I was going to have to throw out a three-year-old battery, but this little tip saved me. Sad that Ryobi didn't implement automatic battery balancing, but hey, you gotta do what you gotta do!

Erik Ness -

My question is how do you open the battery pack that seems to have a security cover over one of the five screws? I have a Ryobi P102 battery pack

Stan -

Yes, you have to dig out the plug that covers one of the screws. It’s there to discourage DIY’ers. :)

Michael Cyr -

Hi Edward or anyone else. Both my batteries never charge or go green. Just the red slow pulse when I plug them in charger. If I let them sit in charger for a while they get up to 16.32v. Not much higher and work to turn the drill for 5 sec then it dies. So I tried this guide and measured the volts across all the points specified above but they don't look to be more then .1 v variance.

Tp6-cl1 =3.25

Cl1-cl2= 3.22

Cl2-cl3=3.26

Cl3--cl4=3.23

Cl4-cl5=fluctuates between 3.29-3.30

Is that still the case or do I have something else going on. Maybe bring them all up to 3.30 and see if that's the issue?

Michael Spivack -

Hi Michael. It seems that you may have 2 issues. There is likely a problem with your charger. I have 4 old (different model) Ryobi chargers and 16 old batteries. I find that not all chargers will charge all my batteries, ie, some batteries will only charge on one or two chargers. I also have some batteries that appear fully charged (green light) and will only work for a few minutes before being depleted (red light), I've set these batteries aside and will swap out the 18650 cells on a cold snowy day next winter when I have more time. Meanwhile, you could try charging all 5 cells individually to about 4.00+/-0.05 V, then reassemble and try your drill. If your drill only works for a few minutes, then the problem lies with the cells and you can try swapping them out with newer cells. If the charged battery works fine, then you probably have a faulty charger. Good luck.

Al Manzer -

This actually works. I also used an old phone charger plugged into a AC wall socket and wrapped the wires around a multimeter test probe to recharge each cell. I charged each cell back above 3.3 volts. The Ryobi charger took it from there. I did alot of research before doing this. The chip board in the battery must not allow the charger to charge "excessively depleted" cells in a pack to protect against fires. I use R/C cars with lithium batteries. Supposedly any voltage drawn below 3 volts per cell damages a lithium cell. Make sure you have the correct polarity when touching the cells or POOF!

Cael Sprute -

Hi, One of my two P104 Ryobi batteries has a malfunction. I took the pack apart and found that the last two cells (Battery Plus edge) had a reading of -0.7Volts. I replace the two cell group with purchased cells and still the battery will not charge. The central terminal (of the battery pack) reads about 8 Volts while the two positive and the + to - tabs also reads about the same 8 volts. The battery plus to battery minus solder taps on the PC board reads about 16 volts. The FET Q8 may be a problem. The approximately 8 volts is present on the Gate pin and the Drain pin. I am in the process of trying to trace the track on the PCB and find out why the anomalies are there, however I am finding it very difficult without a schematic. Do you by any chance can direct me to a site or some one who may have a schematic of Ryobi PCB P/N280079004/280079009.

Chris Mallios-August 12

Christos Mallios -

I just used this guide this morning to save Two P107 batteries. Both were fully charged and functional and both didnt work the next week. I was pretty upset as the kit is just under 3 years old but I've never charged either battery more than 15 times... Used a fine flat blade to pry out the security tab, 5 screws all security T15 for me. Checked battery voltage across all 5 cells. On both my P107’s cell 3 was at 0.9 volts. Smells kind of fishy Ryobi as both batteries were purchased together. Used an auto battery charger set at the 6 volt 2 amp setting with alligator clips and volt meter in line. Had to disconnect the charger a couple times to double check the resting voltage on cell 3. Final charge at 3.55 volts. Topped up cell 5 on both batteries from 3.4 to 3.55 as well. All other cells were between 3.58 and 4.1. Both batteries are now fully charged at 18.33 volts and run the drill… no telling if or when the problem will re occur, but nice to have the drill running again. Will keep on charger from now on.

JordonK -

It is such rubbish about 20 volt tools have higher power than 18 volt tools. They are the same voltage when fully charged up. It's just marketing hype, unless you own true 24 volt & up battery tools.

When cell balancing You should not use a higher charge voltage than 12 volts. Preferably use a strong 6 volt battery or a plug in a/c to d/c transformer, match polarity always with d/c current & it should bring the individual cell up to the nominal voltage, the voltage of the highest charged cell in your pack.

You can manually touch the terminals with the 6 volt wires on the lower voltage cell and check it with a voltage meter, then stop charging the individual cell when it comes up to matches the other cell's voltage.

When all battery cells are the same voltage, never go higher than 4.2v, then you can charge your Ryobi pack back on your Ryobi charger. It should start charging fine if it isn't below the depleted battery voltage of any lower than 17v for the whole pack combined cell voltage.

Aaron -

I have been watching the feedback roll in over the last few years and am pleased that Ed’s procedure has helped so many people. The batteries that I have rebalanced years ago are still working. Good job Ed!! Thanks

Al Manzer -

Am I doing something wrong in my measurements? Or is my voltmeter defective? or is it within normal parameters?

Ezio Cusi -

Am I doing something wrong? I have very high measaurements for the five cells: ten, thirteen,twentyone, twenty-one, thirty. and even higher in another battery.

Ezio Cusi -

Ezio, i think your voltmeter is either wonky or you are not taking the correct measurements. You need to measure the voltage croess indiviual cells which should be around 3.1 to 4.2 volts.

Al Manzer -

My issue : the battery runs the drill but not enuf power for the saw. Always charges in maintainence modè. Im confused ! ?!

jeff Blair -

I have 4 x 36v Ryobi batteries. On a full charge, the measured voltage is around 20v. Upon inspection o f one of the battery, I can only see cl1 + & - , cl6 +&-. There are other terminations, but they are all positives with no corresponding negatives. The other terminators go up to c10. I can assume that I have faulty cells, but unsure how to proceed to recharge each individual pack. The voltages measured at c1 & c4 are 4.08v.

Any help would be appreciated.

Philipwinfield -

Perhaps you should gently take the circuit board and battery pack out of the case to check the voltage for each 18650 cell. It is a snug fit, but they do come out.

Al Manzer -

I have a P107 Lithium 18V battery. 4 of the cells read 3.83v and one reads 3.71v The battery runs the drill ok, but I tried to charge it in the Ryobi charger and it just blinks red and never turns green.  Charger bad, cell imbalance?

Ron Woods -

Looks taking the battery apart and checking it with the volt meter, then putting it back in the charger has started it recharging again. The green light on the charger is blinking and this morning the green light was steady and charged at 20.20v on the other P102 battery.

Ron Woods -

I successfully re-balanced using the mobile phone method described in this blog. My battery was an old one with the screw on the base BPL-1815(130429000. Having raised all the individual batteries to 3.15 volts it successfully charged on the charger until I had a steady green light. When I attached it to the drill it didn’t work. I checked the voltage across the pillar terminals and it read 15.8 v. I stripped it back down again and measured each battery voltage - all 5 read 4.12v. Any idea what may be causing this loss at the pillar terminals. Incidentally, i measured the same 15.8 at the base of the terminal.

jim.dewberry -

Have two P107 batteries that refused to charge.  Both indicators on the batteries showed one or two bars of power.  Opened both up and the cells were out of balance.  Some as low as 3.2 volts; highest in both pack (The bottom battery) happened to be 4.2 volts.  Odd.  Used a USB charger to bring all cells within .1 volt of 4.2 volts.  Meter shows 20.6v across the entire pack, and the built-in indicator shows full power bars.  Drill seems to run fine.

However. . .  Output when I test across the battery terminals that actually plug in to the drill show 8v.  So I ran the pack all the way down in a drill, charged it back up.  Charged back up to full power on the built-in meter, and voltmeter shows all cells around 4.1v again.  But pack terminals still only show 8v.  Quite odd.  Or normal?  Never tested the voltage on a new pack, and not sure if this is some kind of safety that the circuitry only opens full power once connected to a tool?  Can someone test a good pack’s terminals for me please?  Thanks!

Pat -

No one ever answered the folks asking how to find the test spots as I'm wondering too. I see the ends of each 5 sets of AA shaped batteries and I see wires leading to metal near them labeled cl1 cl2 cl3 and cl4 on circuit board but see no cl5 or the tp6 one. So you cant just check each of the 5 battery ends?

KBWood -

Edit: Ok once both covers fully apart, you can see how they run together on ends of batteries in a series and realize multimeter probes will touch 2 at a time because of straps except start and finish(opposite far corner). My battery is a P105 as a note however.

KBWood -

To those confused as to the locations of CL1, TP6 etc….this may help. Look closely at the picture of Ed’s battery circuit board shown in the picture of step 4. The big blue arrow points to TP6 and if you look closely you can see it printed on his circuit board (although my board was not marked).

The big red arrow in the picture points to CL1. Look on the board and you will find CL2,3 and 4. Just measure from TP6 to CL1 with your negative probe on TP6 and your positive probe on CL1. Then move your negative probe to CL1 and your positive to CL2 and continue in this manner. For the last step you measure from CL4 to the positive (red wire) side of the contact on top of the pillar (tower) that goes into the tool or battery charger.

Hope this helps!

ucdavisrentals -

My “perfectly fine until today” P104 battery suddenly flashed defective in the charger, after taking it apart and measuring above points all read exactly 3.65V except the last pair CL4 to CL5 which read -0.39V. How could that have happened and can I return the pair to the proper polarity and bring them back up to the correct voltage?

The battery is in use fairly often meaning I don’t leave it sitting around to self-discharge more than a week or 2, I don’t leave in the tools when not in use nor do I leave it in the charger after it’s done charging.

Thanx in advance for any help/suggestions

Eastwood -

I've got 4 -p107 batteries all with the same issue, after charging only 2 bars light up on the indicator & at the terminals that interface with the tools I only get 7.8 - 8v.

However, when I pull the case apart & test the cells I get 4.0 - 4.2.. there good, & at the positive & negative on the board it's 20+v.. I'm thinking the temp sensor is the issue.. has anyone else have this issue? It does get excessively hot in las vegas in the summer.

jasonwmorse -

I have an 18v Ryobi pack that showed one light on the battery level indicator and wouldn’t run the tool or take a change. I took the pack appart and found all of the batteries were good except for one; 4 batteries reading 3.8v to 4 volts. One battery was at 00.03 volts; I tried charging that battery but it wouldn’t take a charge. I replaced the bad battery with an identical 18560 cell holding a 4.2 volt charge. Three of the 4 indicator lights lit up after doing that. I ran the drill for about 10 minutes and then plugged the pack into the charger and it took a charge. One bad battery will kill your pack. I don’t have a spot welder so I just soldered the battery in place. Hope this helps!

tony c -

Hi,all cells are at 4.0 and across the BMS borad it reads fully charged at 19.99, but at the +/_ point on stem it read 8.9 and has a short life powering tools ,is this a BMS prblem and can it be fixed

Bill How -

I have a battery that I charged manually with an outboard power supply… .

the issue for me is the two MOSFETS hanging off the Heat Sink… marked Q 1 - Q2 . the battery pack minus goes to the Source of Q1, out the drain to the Drain of Q2 and out the Source to the exterior minus connection.

They are IRFB7437 40 volt 195 Amp units… I can ground the Gate of Q2 with a 1/4 watt 470 ohm, and the minus connection is ok…

So, in theory can just bypass the internal PCB and just manually charge this one by hand, and energize the gates on the fets.

darn PCB’s… but you cant fool everyone..

lmlisak -

I was going to try this but before I did I borrowed a friends Ryobi charger, a P117. It charged my battery that my P113 said was bad. I then bought a P117 and was able to successfully charge another battery pack my old charger said was bad. For the price a new charger I no longer was to buy two new batteries.

I don’t know if the new charger will work in all cases but we tried it because I was complaining about batteries failing and my friend said he has never had a problem.

Jeff -

Can’t see very well and not very smart is there a repair shop some where I can send and have repaired has to be better than 70 for new one I have 6 batteries and only used a few times and won’t charge can you help ty

Stevecarr -

Cell phone charge cord works to top off cells at home.

Batteries plus will rebuild your pack for you with new 18650 cells if you cant do it yourself.

Has anyone tried to stack packs for higher ah output?

Tom Taylor -

If I read from the positive end to the negative end of the battery string I read 19.? Volts but from the battery external contacts I read 8.? Volts.

JeRay Bellon -

For those who are noting that there is 8 volts on the battery (stem) contacts, this is normal. You are not seeing the full voltage until the battery is loaded. Connect a couple of small 12v car bulbs in series (one wire of each bulb holder joined to the other, then the spare wire of each bulb holder on to the battery. The bulbs should light and the internal circuit of the battery will give full output

jimandpamelamorrison -

I have the BCL14181H charger and the ONE+ 1.5Ah battery. The charger is flashing red led only. The manual said battery too hot or cold, or battery needs ‘pre-charge’. I dismantled and checked the cells and there is a slight imbalance of 0.3 volts. I waited a few hours but red led still flashing. No big change in cell voltage. I was going to just cycle and charge them myself (I’m a tech so have all necessary gear) but I decided to leave charger on overnight to see what this ‘pre-charge’ actually does. Next morning, still flashing red but cells all a little lower in voltage and imbalance a little less. My cells were fairly well charged to start with (3.9v on most) so it looks to be very slowly discharging and balancing them with the BMS circuit. It has now been 36 hours and still dropping (now around 3.5v on most cells). I’m going to leave it and see if it can cycle them down to full discharge and recharge on its own. I’ll try to remember to report back.

jimandpamelamorrison -

Also, the battery meter LEDs on the back of the battery are slowly going out each day that it’s on charge with red charger LED flashing so you can see that the battery pack is going through a discharge.

jimandpamelamorrison -

Ok. It started to discharge one of the cells to 2.9v so I stopped there. The balance went out again. I think the BMS just isn’t able to handle the discharge/ recharge rejuvination cycle in this case so I’m cycling each cell on my analyser. Fingers crossed

jimandpamelamorrison -

Ok. 2 cells were failing under load. All cells had a high impedance (150 milliohms vs around 25 milliohms for a good one) All had dropped to around 900mAhr capacity. I have used this battery pack around 20 times in 2.5 years since I bought it. I’ve always stored it at around 70 to 90 percent. Very poor results from LG cells. Unrecoverable

jimandpamelamorrison -

I took my ryobi p107 that always says full charge on the charger.. But the charge check button only shows two bar and not 4… But the contacts on a multimeter shows only 6v.. Open it up.. 3 cells at 4.10V and 2 at 3.6.. Charges those cells back up to 4.10.. Put everything together… ThThe charge check button is at 4 now.. And still 6V on the main terminals.. But still works with drill… Any ideas?

Tien Tran -

Hello Ed, I have a Ryobi plus 1 battery pack that won't charge. I've pulled it apart. The pack has 5 sets of 2 parallel cells. Voltage of each of the 5x two parallel cells is 3.7V, i.e. they are balanced, and the voltage of the pack is close to 18.5V. However, at the spring loaded contacts on the centre post, which connect with with the charger or a tool, the voltage is only 14.1V. Can you please suggest a fix? Bob Jensen

Bob Jensen -