Introduction

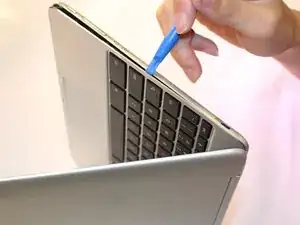
These steps will help you in the replacement of the battery for an Asus Chromebook Flip C100P. Either the battery has lost its ability to hold a charge, which in turn means you most likely have a dead battery that needs to be replaced. Before beginning, make sure to power off your device completely and disconnect the device from any external power source. '''A punctured battery can cause a dangerous fire. If your battery is swollen, take the appropriate precautions in this link: ++What to do with a swollen battery '''


  1. EoTBLqXMBbhBX1XE
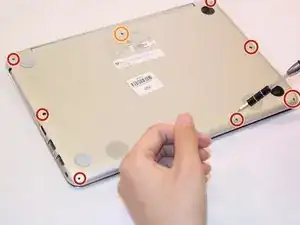
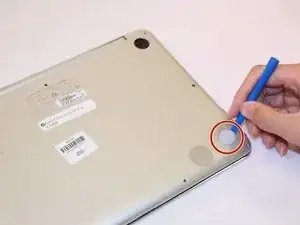
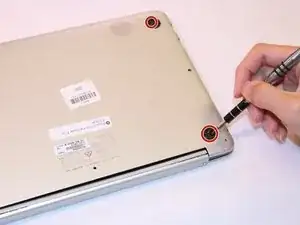
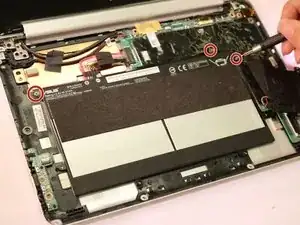
    • Unscrew the eight bottom cover screws (one of them is under the hand) using a screwdriver with a J1000 tip.

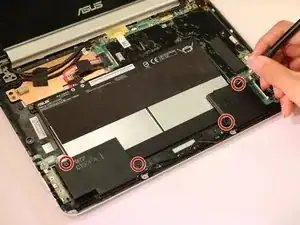
    • Unscrew the middle screw towards the top of the device using a screwdriver with a T5 tip.

    For me, in this step, all the screws were T5.

    Jorge Gomes -

    Same for me!

    David Lipson -

    same for me. there are no J1000 screws in this device involved in this repair.

    Fabian Aldo Santiago -

    also, despite the size discrepency of this instruction’s step, the top middle screw is still a different size so keep track of them.

    Fabian Aldo Santiago -

  2. Avc3ctTVGScRTgDV
    • Use the plastic opening tool to remove the four bottom rubber feet.

  3. 31ShfoAs2QTV2vJa
    • Unscrew the four screws under the feet using a screwdriver with a J100 tip.

    there are 5 screws under 3 of the foot pads (two of them have 2 screws each and one has none). the screws also vary in size so keep track of them.

    Fabian Aldo Santiago -

  4. Vbj2gOBWaAYZqqBd
    • Use the plastic opening tool to pry up the palm rest assembly.

  5. gXvdfv5ZnqUmTDOn
    • Disconnect the two cables from the motherboard with tweezers

    very hard to put the cables back in. Be careful.

    Felipe Lyon -

    How do you get them back in please?

    Steve Drake -

    I agree. This part is tricky. (On my c100p) the connector for the smaller cable rotates on one side to unlock/lock. The larger cable has a slide to help get the cable situated. Be sure to check ALL the keys prior to putting the keyboard back on. I didn’t and the 2,w,s,and x keys didn’t work causing me to have to redo the work.

    Bryan Krusniak -

    Some creative placement helps: lay keyboard flat (ribbons up), fold chromebook hinge to 90 and lay on its side slightly overlapping the keyboard: this should gives the ribbons enough slack while giving us visibility and room for hands. Don’t forget to close the little “locks” on each side of the wide ribbon.

    Jorge Gomes -

    Tweezers are a must, also don’t grab the cable like the picture shows, use the blue tag part of the cable just below to insert and remove from the connector.

    Gregg Tilles -

    on my unit the large ribbon had some adhesive sticking it down to the top of the speaker box and its conector had the same aforementioned slide mechanism to release it. the small ribbon on mine doesn’t appear to have any type of release mechanism that moves. the small blue tab is stiff plastic you use tweezers to pull / push with and the cable is friction fit into the socket.

    Fabian Aldo Santiago -

  6. PPiIEH4oXFCyJwr5
    • Unscrew the four J1 Screws of the Audio Cards

  7. moxDHsuylIWvA4RU
    • Unscrew the three Battery Screws by using a screwdriver with a J00 tip.

    What is a J00 tip? Small phillips/strait tip? Allen wrench? Specific Asus tool?

    chasmark -

    J00 or JIS #00 is a screwdriver bit type. In this case, a Phillips #00 (PH00) should do the trick!

    Austin Blakely -

    the upper left screw by the asus logo is smaller/shorter than the other 2. keep track of them.

    Fabian Aldo Santiago -

  8. fl4SMUUePHUhoXcO
    • Lift the battery cable out of Mother Board

    In what direction do you unplug the cable?

    gideon morrow -

Conclusion

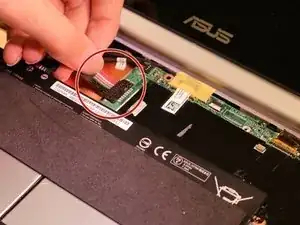
To reassemble your device and complete the battery replacement, please follow these instructions in reverse order.

Ruofan Wang

Member since: 27/06/16

191 Reputation

One comment

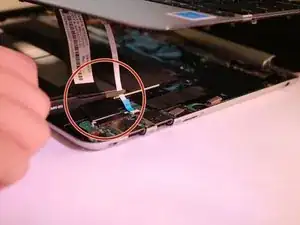
The difficulty rating should be higher. The sound card does not need to be removed, but this is not mentioned. I only noticed it from the next picture. Reattaching the keyboard cable is very difficult; a hint with tips would help.

Chas Hofmeister -